
How to Change a Diaper: Step-by-Step Guide for New Parents
This post contains affiliate links. As an Amazon Associate, we learn from qualifying purchases
To change a diaper, you follow a sanitized sequence: wash hands, gather supplies, place the child on a secure surface, clean front to back with individual wipes, dry thoroughly, apply a new diaper, dispose of waste, and wash hands again. The core safety rule is to keep one hand on the child at all times. Texas state law mandates individual cloths or disposable towels for drying, and the federal ASTM F2388-21 standard governs the safety of the changing product itself.
That “secure surface” clause is where the real argument starts. One major manufacturer’s manual insists you “always use a restraint system.” The national childcare hygiene guide published by the government says the opposite: “Do not use a safety strap or harness.” They can’t both be right for the same child in the same moment.
What follows is the full procedure, pulled directly from the source documents that daycares and inspectors use. We’ll walk through the eight non-negotiable steps, decode the safety standard that became law in 2022, and settle the strap debate with the data that explains why the contradiction exists.
Key Takeaways
- The ASTM F2388-21 standard is the mandatory federal safety rule for all baby changing products manufactured after July 31, 2022.
- Never leave a child alone on a changing surface. The universal rule across all sources is to keep one hand on the child.
- Clean front to back with individual wipes or cloths to prevent urinary tract infections, and ensure the child is completely dry before the new diaper goes on.
- Disinfect the changing surface after every soiled diaper change, following the cleaner’s required contact time for it to be effective.
- There is a direct contradiction on restraint straps: manufacturer instructions often mandate them, while official childcare protocols explicitly prohibit them.
The 8-Step Diaper Change Sequence (And Why Order Matters)
This isn’t just about cleanliness. It’s about containment. A systematic order keeps the mess off the child, off you, and off everything else in the room. Break the sequence, and you’re chasing a wiggling baby with one hand while holding a dirty diaper with the other.
The official CFOC diaper changing procedure from the Child Care Technical Assistance Network mandates this flow. Each step gates the next.
- Wash Your Hands. Do this before you touch any supplies. You’re moving from the general environment to a sterile field.
- Gather All Supplies. You need the new diaper, wipes, a bag for soiled clothes, and diaper cream (if used). Place them within arm’s reach, but out of the child’s reach. This is a specific requirement under Texas diaper changing regulations.
- Place the Child on the Changing Surface. Keep one hand on them always. If using a disposable liner, put it down now.
- Remove the Dirty Diaper. Unfasten it, but don’t pull it out from under the child yet.
- Clean the Child. Lift the child’s ankles gently. Use wipes or a damp cloth to clean from the front to the back. For a poopy diaper, use multiple wipes until the skin is completely clean. Fold the dirty diaper over to contain most of the mess.
- Dry the Skin Thoroughly. This step is law in Texas: “Ensure that a child is dry before placing a new diaper.” Use a clean, individual cloth or disposable towel. Moisture left against the skin is the fast track to diaper rash.
- Slide the Clean Diaper Underneath. Remove the dirty diaper and immediately position the clean one. Fasten it snugly, but check the proper diaper fit, you should be able to fit two fingers between the diaper and the baby’s waist.
- Wash Your Hands Again. This time, you’re washing away the pathogens from the change itself. It’s the final seal on the procedure.
Common mistake: Dressing the child before disposing of the waste. The soiled diaper and used wipes are still right there. Secure the child in a safe place first, then deal with the trash and wash up.
The timing between steps five and seven is critical. Have you ever finished wiping, reached for the cream, and the child suddenly pees? That’s why the “slide-under” technique exists. Placing the fresh diaper underneath before you remove the dirty one creates a backup catchment layer.
The Safety Standard That Became Law: ASTM F2388-21
Your changing table, pad, or station isn’t just furniture. Since July 31, 2022, it’s a consumer product governed by a mandatory federal safety rule. The CPSC changing product safety standard, which incorporates ASTM F2388-21, sets the benchmarks every new product must hit.
This standard exists because the data demanded it. Between 2005 and 2017, the Consumer Product Safety Commission received 188 incident reports involving baby changers. Those included 7 fatalities.
| Standard Component | What It Covers | Why It Matters |
|---|---|---|
| Structural Integrity | Tests for weight load and durability. | Prevents collapse under a squirming child. |
| Stability | Ensures the unit won’t tip over. | Mitigates risk if a child pushes against it. |
| Barrier Height | Mandates minimum sides on contoured pads and add-on units. | Stops a roll-off during the few seconds you reach for a wipe. |
| Restraint System Strength | Tests the buckle and strap if included. | If a strap is provided, it must not break under stress. |
| Warning Labels | Requires permanent, specific safety warnings. | Informs you of the weight limit and fall hazard. |
The standard defines key terms you’ll see on product labels. A changing table is a freestanding structure for a child up to 30 lbs. An add-on changing unit is a rigid product attached to another piece of furniture, like a dresser top. A contoured changing pad is the removable foam pad with raised edges.
The takeaway is to look for a label stating compliance with ASTM F2388-21. It’s not a marketing badge. It’s verification that the product survived a battery of simulated-use tests.
The Restraint Strap Contradiction: Manufacturer vs. Protocol
Here is the clearest example of a rule that depends entirely on who is writing it. Open the user guide for a common commercial changing station, like the Alpine Industries ALP411-E, and page nine is unambiguous: “Always use a restraint system to avoid serious injury from fall or sliding out.”
Now, open the national official childcare hygiene standards. Its directive is equally clear: “Do not use a safety strap or harness on the diaper changing surface.”
Where this goes sideways: Relying on a strap as a substitute for supervision. The CPSC incident data includes a fatality from strap entanglement. A strap can create a false sense of security, leading a caregiver to step away “for just a second.”
Why the conflict? The manufacturer’s instruction is a product liability statement. It assumes the strap is an integral safety component that was tested as part of the unit’s certification. The childcare protocol is a risk-mitigation rule written for a dynamic, high-traffic environment where straps can snag, be mis-fastened, or tempt a caregiver to turn away.
The resolution: Your hand is the primary restraint. Whether you use the strap as a secondary measure is a judgment call, but it never replaces the rule of keeping one hand on the child. If you use it, treat it like a car seat harness, snug, with the buckle secured and out of the child’s reach. Never, ever leave the child strapped in and unattended.
Setting Up Your Changing Area: Rules from the Manual
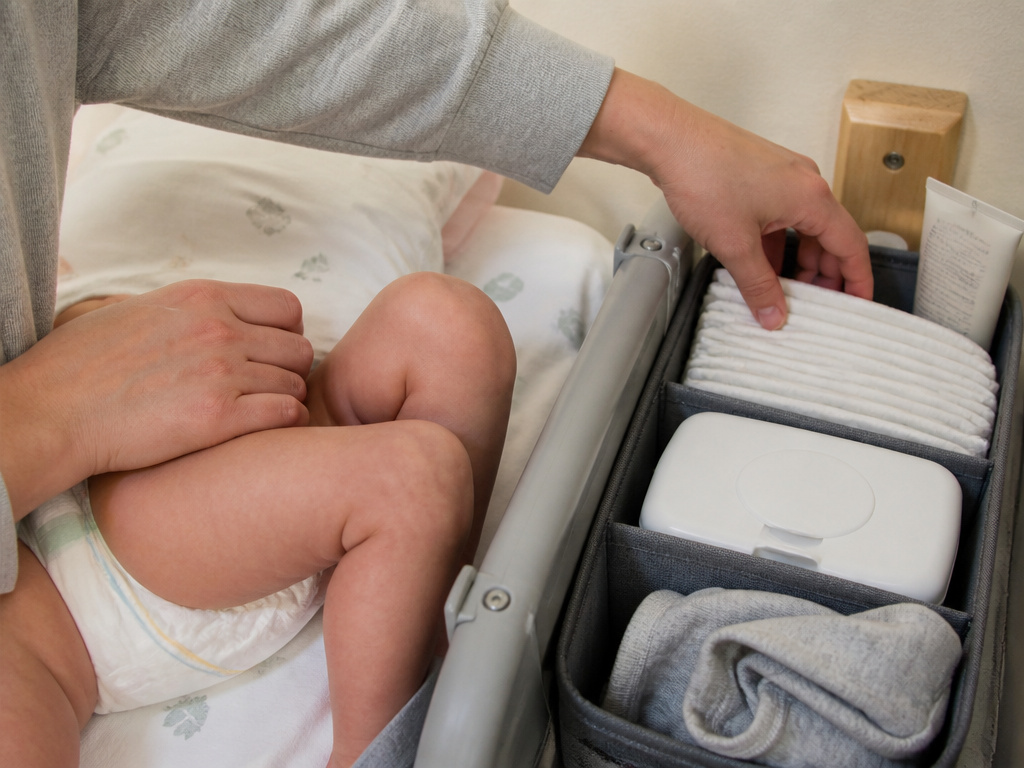
The physical space matters as much as the technique. A disorganized area forces you to turn away. A poorly installed station is a tipping hazard.
First, follow the installer’s manual. For a wall-mounted unit like the Alpine ALP411-E, the mandate is specific: “One wall stud MUST be located and USED.” Hanging it on drywall alone with hollow-wall anchors is a violation of the instructions and a direct safety failure. The weight limit for that model is 50 pounds (22.7 kg). That includes the child plus any items you place on the station.
Your supply kit should live in a dedicated caddy or shelf adjacent to the changing surface. It must contain: * Clean diapers * A sealed container of wipes * Diaper cream (with written parental permission if in a childcare setting) * A change of clothes * A plastic bag for soiled clothing * A roll of disposable changing surface liners (optional but recommended)
The diaper change frequency for a newborn can be 10-12 times a day. You will reach into this kit constantly. If you have to hunt for a wipe, you’ve broken the “hand on child” rule.
Cleaning and Disinfection: The “After” Procedure
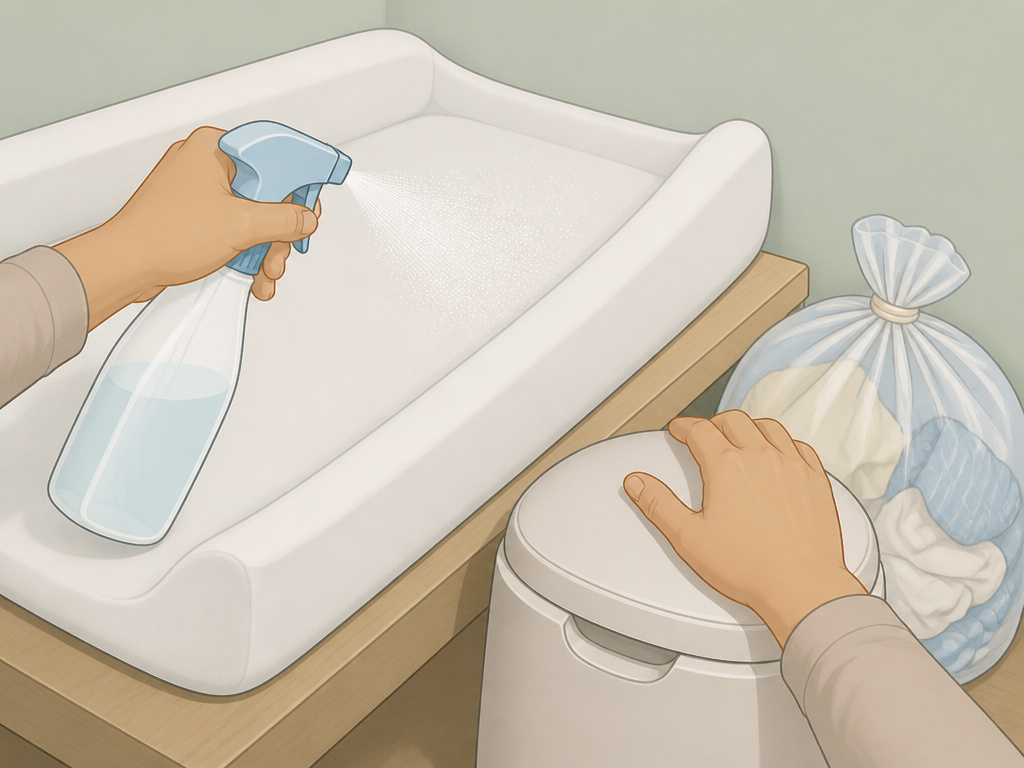
The change isn’t over when the new diaper is on. The surface is now contaminated. The procedure from the CFOC basics is precise.
If you used a disposable paper liner, discard it immediately into a hands-free, lidded trash can. If any visible soil got on the changing pad itself, you have a two-step process: 1. Clean: Wipe the soil away with a damp paper towel or a baby wipe. 2. Disinfect: Spray the surface with a disinfectant approved for children’s areas. This is the critical part, you must let it sit for the full contact time listed on the product label. If it says “leave wet for 2 minutes,” you wait 2 minutes. After the time is up, you can either let it air dry or wipe it dry with a fresh paper towel.
Soiled clothing goes into the plastic bag, which is then sealed and sent home. Never place dirty clothes on a shelf, a crib, or any other surface that can’t be wiped down. This prevents cross-contamination.
Your final act is that second handwash. Use soap and warm water, scrubbing for at least 20 seconds. It’s the bookend to the entire sanitary protocol.
Special Situations: Newborns, Blowouts, and Hygiene
The core steps are universal, but certain scenarios require a tweak in technique or emphasis.
For a newborn diaper change, the umbilical cord stump is the priority. Fold the front of the diaper down so it rests below the stump. This keeps the area dry and exposed to air, promoting healing. Be extra gentle with the wiping, as newborn skin is exceptionally thin.
A diaper blowout is a containment drill. Before you even lay the child down, have multiple wipes ready and a large disposable liner or towel laid out. Clean from the least-soiled area toward the epicenter. You may need to fully remove the child’s onesie or pants. Strategies for preventing blowouts often involve sizing up or trying a different brand, but when one happens, it’s all about managing the spill zone.
Gender-specific wiping is a common point of confusion. For girls, always wipe front to back to avoid dragging bacteria toward the urethra. For boys, clean the penis and scrotum, but also check the folds of the thighs. Our guides on wiping a baby girl and wiping a baby boy go into finer detail.
Should you wipe after just pee? The debate on wiping after pee is ongoing. For urine-only diapers, many pediatricians say a pat-dry with a clean cloth is sufficient to maintain skin pH, while others recommend a quick wipe. For any soiled diaper, wiping is non-negotiable.
Frequently Asked Questions
How do I keep my baby from rolling during a diaper change?
Keep one hand firmly on their abdomen or upper thigh at all times. If you need both hands to fasten a diaper, place your forearm across their torso. For an older, stronger baby, consider changing them on a soft mat on the floor, they can’t fall from there.
What’s the best way to handle diaper rash during a change?
Be extra gentle. Pat the skin clean instead of rubbing. Let the area air-dry completely for a minute or two before applying a thick layer of zinc oxide-based cream. The cream acts as a barrier, not a moisturizer.
Is it safe to change a diaper on a bed or couch?
It’s not recommended. Soft surfaces increase the risk of a fall, and they are difficult to properly disinfect if soiled. A firm, dedicated changing surface at a comfortable height is safest for your back and for the child.
Why is the front-to-back wiping rule so important?
It’s the single most effective way to prevent bacteria from the rectal area (like E. Coli) from entering the urethra and causing a urinary tract infection (UTI). This is especially critical for baby girls due to their anatomy.
My baby screams during every change. What can I do?
This is common. Keep a special “diaper change only” toy within reach to distract them. Talk or sing to them in a calm voice. Ensure your hands and the wipes are warm, not cold. Speed and confidence come with practice, your calm demeanor helps theirs.
Before You Go
Changing a diaper is a hygiene protocol, not just a messy task. The sequence, wash, gather, clean, dry, replace, disinfect, wash, exists to protect the child’s health first and your sanity second. The safety standards for the furniture itself are now federal law, designed to prevent the falls and entrapments documented in hundreds of incident reports.
Remember the strap dilemma. The manufacturer’s mandate and the childcare ban represent two different risk models. Your hand is the ultimate safety device. Use a strap only if it doesn’t compromise your attention, and never let it justify a turned back.
Keep supplies stocked and within reach. Follow the disinfectant’s contact time. And master the sliding a clean diaper technique. It turns a potential disaster into a manageable routine.
