
How to Prevent Diaper Blowouts | The 3-Step Leakproof Fit
This post contains affiliate links. As an Amazon Associate, we learn from qualifying purchases
To prevent diaper blowouts, you need three things working together: a diaper with a dedicated blowout barrier, a fit so snug you can’t fit more than one finger at the waist, and a change right before any car trip. A 2023 P&G survey found 13 million blowouts happen weekly in the U.S.; the right size and tech can cut that to zero.
The “right size” part is where most guides stop. They don’t explain that a diaper’s fit changes the moment your baby sits in a car seat, the incline redirects pressure and liquid stool finds the weakest seam. That’s why a barrier and a pre-trip change aren’t just tips; they’re non-negotiable for a car ride longer than 15 minutes.
What follows is the mechanics behind each step: how a blowout barrier actually works (it’s a pocket, not a gasket), the exact finger-test method pediatricians use, and the two times of day your change schedule matters most.
Key Takeaways
- The Pampers Swaddlers Blowout Barrier and Huggies Blowout Blocker create a physical pocket at the waist to contain runny stool, this is the single biggest tech upgrade since 2018.
- Use the one-finger test: if you can slide more than one finger between the diaper and your baby’s waist, it’s too loose and will leak.
- Always change a diaper right before a car trip. The inclined position in a car seat is the number-one scenario for a diaper blowout, according to pediatrician Dr. Florencia Segura.
- For newborns, a diaper with an umbilical cord notch (sizes P-2) prevents gaps and irritation that lead to early blowouts.
- Pair your diaper with pH-buffering wipes. Skin at a neutral pH is more susceptible to irritation from enzyme-rich stool, which can cause the squirming that breaks a diaper’s seal.
Why Blowouts Happen (It’s Not Just the Diaper)
Newborns are blowout machines by design. They pass stool up to 12 times a day, and it’s a liquid consistency. No absorbent core can lock that away instantly. The real failure point is almost always the waistband or leg cuff.
A diaper that’s too big leaves gaps. A diaper that’s too small can’t contain the volume. But even the proper diaper fit can fail under two specific conditions: when a baby is in a semi-reclined car seat, and when the diaper has been on just a little too long for a “loading event.” The stool follows gravity and hydrostatic pressure, not the diaper’s design intentions.
A 2023 P&G survey quantified the scale: 13 million diaper blowouts happen to parents every week in the U.S. Six in ten parents fear them, and more than a third live in constant fear of one happening at any time.
That fear is why brands have moved beyond just absorbency. The latest best diapers for blowouts invest in containment engineering at the exits.
The Snug-Fit Finger Test (And Why It Works)
Weight ranges on diaper boxes are a starting point, not a guarantee. Two babies at the same weight can have completely different torso shapes and thigh thickness. The definitive check happens after the diaper is on.
The one-finger test is the standard. Fasten the diaper snugly. Now, try to slide a finger between the diaper’s waistband and your baby’s skin. You should be able to fit one finger comfortably, but not two. If two fingers slide in, the diaper is too loose. You should also run a finger around the inside of each leg cuff to pull the ruffles out, these are built-in gaskets, and leaving them tucked in is an invitation for leaks.
| Fit Problem | Visual Sign | Blowout Consequence |
|---|---|---|
| Too Big | Gaps at waist or legs, waistband sits low on hips | Liquid stool escapes through gaps, often up the back. |
| Too Small | Red marks on waist or thighs, waistband is stretched taut | Capacity is overwhelmed; blowouts happen at the waistband or leg seams. |
| Just Right | Snug with one-finger space, ruffles flared out | Containment features can work as designed. |
A diaper that’s too big is just as problematic as one that’s too small. The gap issue is why a tailored fit matters more than moving up a size “for comfort.”
The Blowout Barrier Breakdown: Pampers vs. Huggies
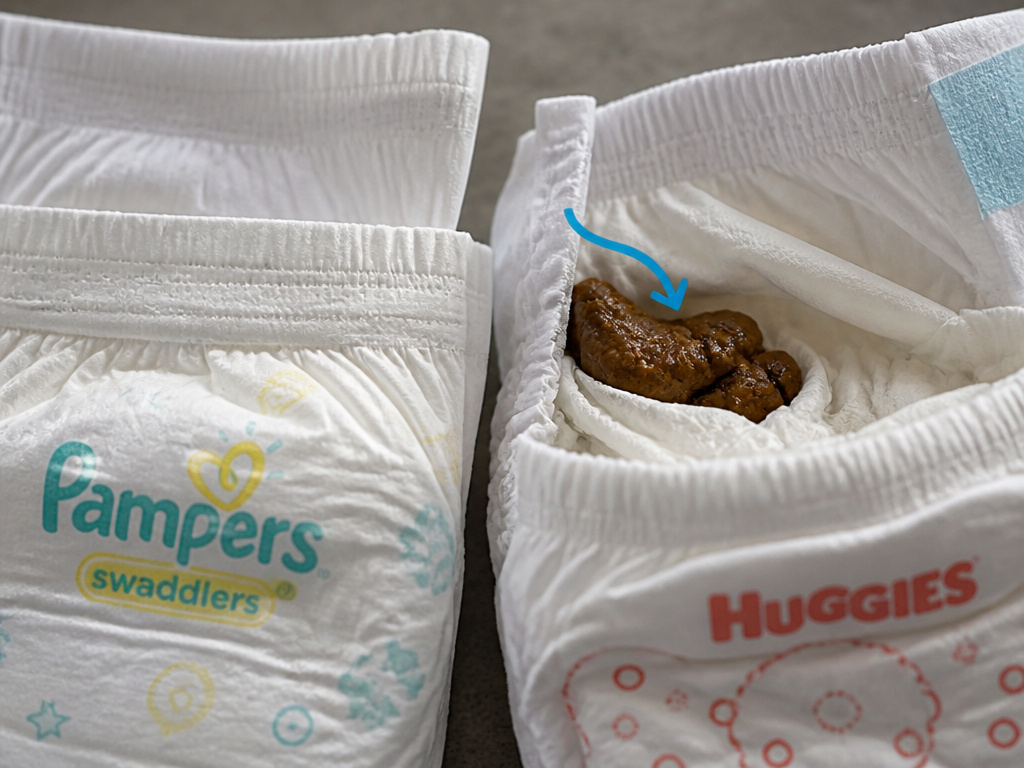
This is the non-commodity core. Generic “leak protection” isn’t the same as a blowout-specific design. In the last few years, both major brands have released engineered solutions, and they work differently.
Pampers Swaddlers Blowout Barrier: Introduced in 2023 as Pampers’ biggest innovation since 2018. It’s a redesigned waistband and backsheet that, according to their pediatric research guide, helps prevent up to 100% of leaks, even blowouts, for sizes 2-7. The key is how it manages the stool’s path.
Huggies Blowout Blocker: Featured in all Huggies diapers (excluding preemie sizes 3-6). The central part of the waistband isn’t glued to the inner liner, creating a pocket designed to catch and contain poop before it escapes over the top.
Where this goes sideways: Assuming all high-absorbency diapers are equal for blowouts. A highly absorbent leak-proof diaper might hold more urine, but only a dedicated waistband barrier tackles the specific physics of runny stool moving up and out.
Both systems aim to do what a standard waistband cannot: act as a catchment basin. For parents in the thick of it, choosing a diaper with one of these features is the first tangible step toward prevent blowouts altogether.
The Critical Pre-Trip Change (And The 2 Other Key Times)
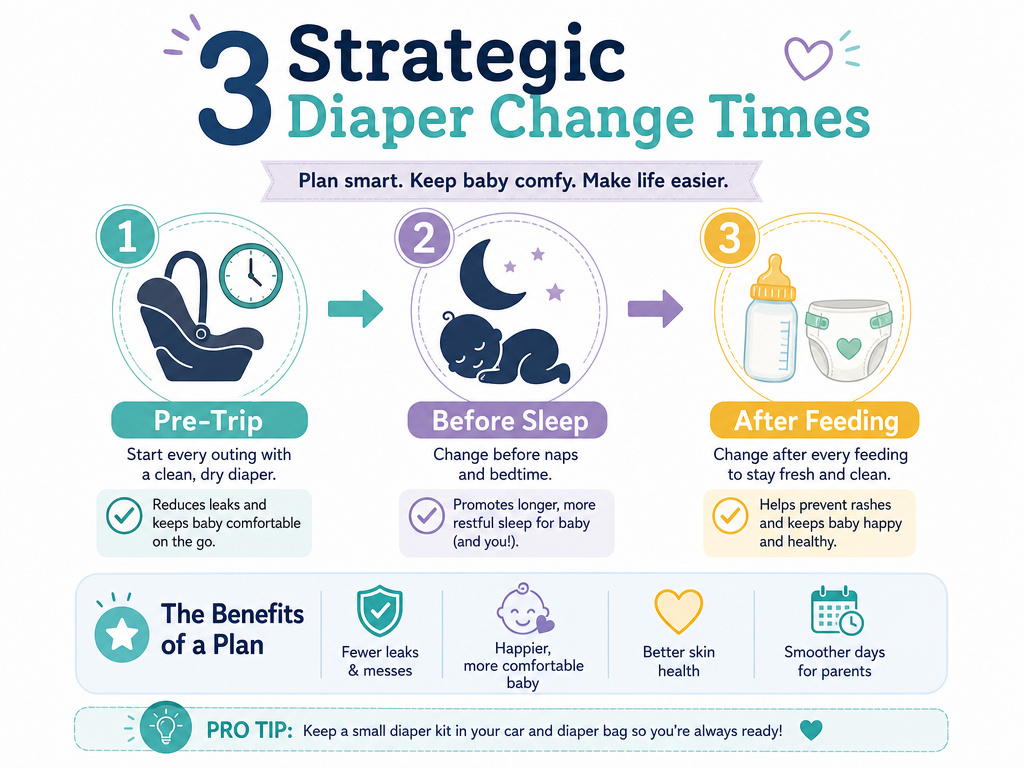
You can have the perfect diaper and the perfect fit, and still get a blowout in the car. Pediatrician Dr. Florencia Segura identifies car trips as prime time because of the baby’s inclined position. Gravity works against the diaper’s backsheet.
Change the diaper right before you buckle them in. Every single time. Even if it was changed 30 minutes ago. This isn’t overkill; it’s resetting the containment system for a new physical orientation. Always pack a full change of clothes, too.
The other non-negotiable change times are: 1. Right before a long nap or bedtime. A sleeping baby is a still baby, and waste pools. Using a dedicated overnight diaper here is wise, they have extra absorbency where it counts. 2. Immediately after a feeding. For newborns, the gastro-colic reflex often triggers a bowel movement shortly after eating. Getting a fresh diaper on before that reflex kicks in gives you a clean slate.
This schedule isn’t about frequency for its own sake. It’s about strategic timing that aligns with your baby’s biology and activity.
Step-by-Step: The Blowout-Proof Diaper Change
This is the procedure that puts the specs and timing together. Skip a step, and you’re relying on luck.
- Gather a “blowout kit.” Have your barrier diaper, pH-buffering wipes, a change of clothes, and a plastic bag for soiled items all within arm’s reach before you start.
- Clean thoroughly front-to-back. Use enough wipes to get skin completely clean. Residual stool contains enzymes that raise skin pH and cause rash, leading to squirming that breaks seals.
- Let the skin air-dry for 15 seconds. Patting is okay, but a moment of air-drying ensures the waistband adhesive will stick properly. Damp skin weakens the stick.
- Position the new diaper. For newborns, use the umbilical cord notch. Ensure the back of the diaper is positioned high enough, it should sit just below the small of the back.
- Fasten snugly and perform the one-finger test. Secure the tabs symmetrically. Check the waist. Then, mandatorily, run your index finger around both leg cuffs to pull the ruffles out.
- Dress in loose-fitting clothes. Tight onesies or pants can press on the diaper and compromise the fit you just engineered.
If you’re using a cloth diapering at night system, the principles are identical, fit, containment flaps, and pre-sleep changes matter even more due to the lack of chemical absorbents.
Troubleshooting: If Blowouts Keep Happening
You’ve got the tech, you’re nailing the fit, and you’re changing on schedule. But the leaks continue. Here’s where to look next.
- Check the diaper line-up. Is the back of the diaper tucked into the crease of the buttocks? If it’s riding low, stool will go over the top.
- Assess the diaper’s capacity for your baby. Some babies are “super-soakers.” If you’re getting diapers for leaks of urine as well, you might need to size up for capacity while using a hack to maintain fit: fasten the waist snugly as usual, but then fold down the top front of the diaper inward before snapping the onesie. This adds a double layer at a common overflow point.
- Consider a dietary trigger. For older infants on solids, certain foods (like prunes or pears) can drastically loosen stools. It’s a temporary phase; weather it with extra vigilance and maybe a backup diaper cover.
Common mistake: Sizing up in panic after one blowout. This usually creates gaps and causes more leaks. First, exhaust the fit and technique checks. Move up only when your baby is consistently at the top of the current size’s weight range and the leg cuffs are leaving deep marks.
Frequently Asked Questions
Are some babies just more prone to blowouts?
Yes. Newborns, due to frequent liquid stools, are the most prone. Babies with very round torsos or slender thighs can also be tricky to fit perfectly, making them more susceptible. The solution is meticulous fit and targeted diaper technology.
How often should I change a diaper to prevent blowouts?
There’s no universal timer. Change before sleep, after feedings, and before car trips as mandatory. Otherwise, check every 2-3 hours, and use the diaper’s wetness indicator, a line that turns blue/green, as a reliable guide. A fully saturated diaper is more likely to fail.
Do diaper brands really make that much difference?
For blowouts, absolutely. A standard diaper and a diaper with a blowout barrier are engineered differently. The barrier is a specific response to the problem of stool escaping the waistband. It’s the difference between a moat and a raised levy.
Can a diaper be too tight?
Yes. If it leaves deep, angry red marks that don’t fade within a few minutes of removing the diaper, or if it seems to be cutting into the skin, it’s too tight. You want snug, not constrictive. The one-finger test prevents this.
What should I do if a blowout happens?
Stay calm. Contain the mess: wipe baby from front to back, getting all the creases. Roll up the soiled clothes inside the diaper for disposal. Wash baby’s skin with a gentle cleanser or pH-buffering wipe to restore skin pH, air-dry, and start the blowout-proof change process over.
Before You Go
Preventing diaper blowouts isn’t about magic, it’s about mechanics. You need the right tool (a diaper with a waistband barrier), installed correctly (the one-finger snug fit with ruffles out), and maintained on the right schedule (especially before car trips). The 13-million-blowouts-a-week statistic shows how common the problem is, but the new barrier technology shows it’s also now solvable. Start with a box of Pampers Swaddlers or Huggies Little Snugglers, master the fit check, and never, ever skip the pre-car-seat change. That’s the trio that keeps the mess in the diaper and off your clothes.
