
Step-by-Step Guide on How to Change a Diaper Newborn Safely
This post contains affiliate links. As an Amazon Associate, we learn from qualifying purchases
To change a newborn’s diaper, wash your hands, lay the baby on a safe surface, and clean the entire area with water or fragrance-free wipes, moving front to back for girls. Dry the skin completely, apply a protective barrier if needed, and secure a clean diaper that fits snugly at the waist and legs. The American Academy of Pediatrics recommends 8 to 12 changes a day, or about every 2 to 3 hours, to prevent skin irritation.
That 2-3 hour window isn’t a suggestion. It’s the gap between a clean bottom and the start of a rash. Newborn skin lacks the fully developed outer layer that protects older kids, so moisture and ammonia from urine break it down fast.
What follows: the exact six-step sequence used in hospitals, the two creams that actually work (and why they’re different), the common mistake that ruins diaper tabs, and the specific regulations that govern this task in licensed childcare facilities.
Key Takeaways
- Change diapers at least every 2–3 hours, or 8–12 times daily, to stay ahead of moisture and prevent rash.
- Clean girls front-to-back only; this single direction prevents urinary tract infections by keeping bacteria away from the urethra.
- Dry the skin completely before closing a new diaper, trapped wetness is the primary cause of dermatitis.
- For disposables, avoid getting cream or water on the adhesive tabs, or they will not stick.
- In a childcare setting, regulations like Texas Administrative Code § 746.3501 mandate individual cloths for drying and locked storage for all supplies.
Why Frequency Beats Everything Else
The most important part of changing a diaper isn’t the technique. It’s the clock.
Newborn skin is permeable. The stratum corneum, the outer protective layer, is about 30 percent thinner than an adult’s and doesn’t fully mature for weeks. Urine raises the skin’s pH, which activates enzymes in stool that then break down the skin’s surface. The result is a chemical irritation that shows up as red, angry patches, diaper dermatitis.
Common mistake: Waiting for the diaper to feel heavy or the wetness indicator line to turn full blue. By then, the skin’s been wet for over an hour.
The American Academy of Pediatrics (AAP) quantifies it: a newborn needs its diaper changed 8 to 12 times a day. That’s every 2 to 3 hours, around the clock. This diaper change frequency isn’t just for poop; it’s for urine. A checking diapers schedule tied to feedings catches most wetness before it causes damage.
For preemies and ill infants, the stakes are higher. The European newborn care standards note that routine care like diaper changes can cause physiological stress, including blood pressure and oxygen saturation drops. Their protocol emphasizes developmental sensitivity, slower movements, contained handling, to minimize instability. The principle is the same for healthy term babies: speed matters less than consistency.
What to Use (and What to Skip)
Your supplies determine how clean and safe the process is. This isn’t about brand loyalty; it’s about ingredient lists and physics.
For cleaning: Warm water and soft cotton balls are the gold standard for newborns in their first few weeks. After that, move to a fragrance-free and alcohol-free wipe. The StatPearls newborn care guide is explicit: “Skin cleansing should be with soft nonwoven wipes, water, and emollient cleansers; these wipes should be free of alcohol and fragrance.” Alcohol strips natural oils and fragrance is a common allergen. A product like WaterWipes Sensitive Baby Wipes meets this clinical standard.
For protection: You need two agents, not one. * Petroleum jelly (Vaseline): This is a moisture barrier. It’s inert, seals wetness out, and is your first-line defense for slightly pink skin. Apply a thick layer. * Zinc oxide paste (Desitin Maximum Strength): This is a medicated barrier. The zinc oxide soothes inflammation and creates a thicker, paste-like shield. Use it when redness is present. Don’t wipe it all off at the next change, just clean the soiled area and reapply.
The gear: A dedicated, wipeable changing pad is non-negotiable for safety. Have everything within your reach but out of the baby’s future reach. The Texas childcare regulations make this a legal requirement for facilities: “Keep all diaper-changing supplies out of the reach of children.”
| Supply | Best Choice for Newborns | What Happens If You Use the Wrong One |
|---|---|---|
| Wipes | Fragrance-free, alcohol-free (WaterWipes) | Alcohol dries and cracks skin; fragrance can trigger contact dermatitis within days. |
| Barrier Cream | Petroleum jelly for prevention, Zinc oxide (40%) for treatment | Using nothing leads to rash; using a light lotion washes off and provides no lasting barrier. |
| Diaper | Correct newborn diaper size with wetness indicator | A too-large diaper leaks at the legs; a too-small diaper leaves red crease marks and restricts movement. |
Where this goes sideways: Using fabric softener on cloth nappies. The NHS explicitly warns against it, the coating makes the fabric less absorbent, which means moisture stays against the skin and rash risk soars.
The 6-Step Diaper Change Sequence
This is the core standard diaper change procedure. It works for wet and soiled diaper scenarios.
1. Prepare the Station.
Wash your hands. Unfold a clean diaper and place it underneath the baby, under the dirty diaper. This gives you a clean landing pad. Open the wipe pack.
2. Unfasten and Contain.
Unlock the dirty diaper’s tabs. If it’s a poopy diaper, use the front clean inner part of the dirty diaper to wipe away the bulk of the mess. Gently fold the dirty diaper under the baby, soiled side down.
3. Clean Thoroughly.
Lift the baby’s ankles with one hand. With the other, clean from top to bottom. * For girls: Wipe front to back, always. Use a new wipe surface for each pass. This is non-negotiable, it prevents fecal bacteria from entering the urethra. * For boys: Clean around the scrotum and penis. Do not retract the foreskin. Get into all the skin folds. For a major blowout, this is when you might move to a warm water rinse at the sink.
4. Dry Completely.
This step is in the official caregiver procedure mandate for a reason. Pat the area dry with a clean cloth or let it air-dry for 30 seconds if the room is warm. Trapped dampness is the enemy.
5. Apply Barrier & Redress.
If using cream, apply it now. Then, slide the dirty diaper away. Lower the baby onto the clean diaper, centered so the back waistband sits at the lower back. Bring the front up between the legs.
6. Secure and Check Fit.
Fasten the tabs symmetrically. You should be able to fit two fingers between the diaper and the baby’s belly. Check the leg cuffs are tucked out, not in. A proper diaper fit prevents 90% of diaper blowouts.
Navigating the Two Big Diaper Types
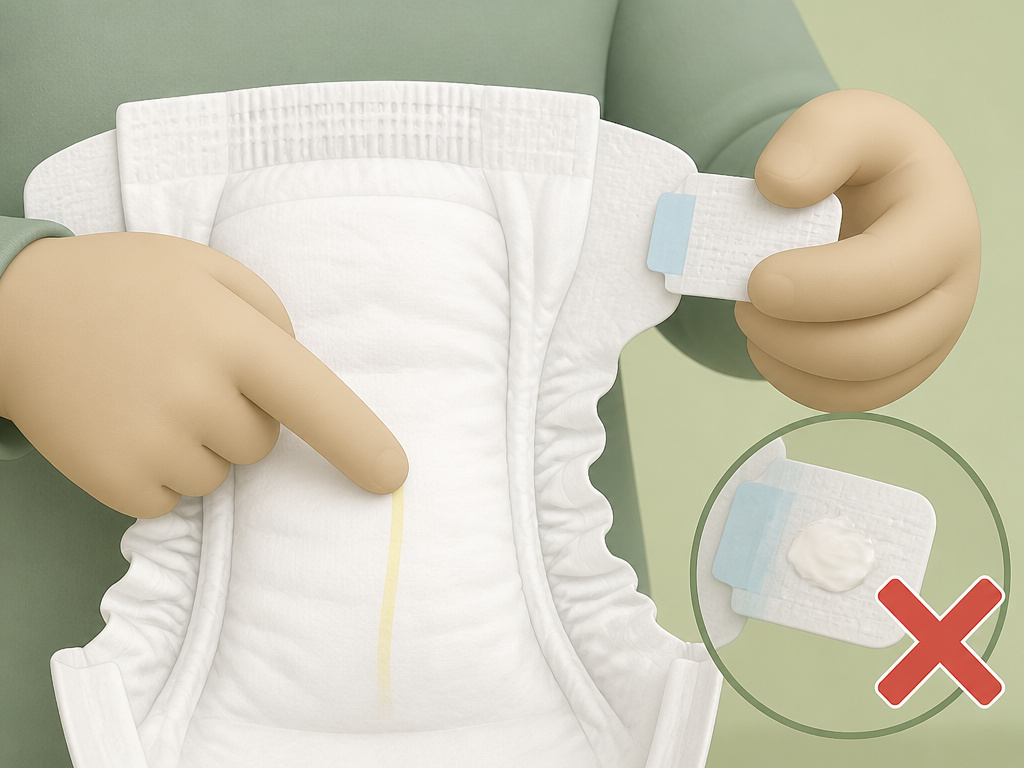
The six steps are universal, but disposable and cloth nappies have specific failure modes you must engineer around.
Disposable Diapers
- The Wetness Indicator: Most have a line that turns blue when wet. Trust it, but don’t wait for a full-color change. Check often.
- The Tab Failure: If baby wipes moisture or diaper cream gets on the adhesive tabs, they will not stick. Keep your fingers dry when applying cream, then handle the tabs.
- The Air-Pee Reflex: Especially in boys, cold air can trigger a pee the moment the diaper comes off. Keep a spare wipe or cloth draped over the area until you’re ready for the clean diaper.
Cloth Nappies
- The Absorbency Rule: Never use fabric softener. It coats fibers and ruins absorbency. Wash in hot water with a mild detergent.
- The Liner: Use a flushable or reusable liner to catch solid waste. It makes cleaning the nappy itself drastically easier.
- The Cover: A waterproof cover is essential. Ensure it’s snapped or velcroed snugly around the legs, but not tight.
The choice between them doesn’t change the cleaning or drying steps. It changes your supply chain and your leak-prevention tactics.
Solving the Common Newborn Diaper Problems
You’ll face these. Here’s what’s actually happening and how to fix it.
Redness/Rash (Diaper Dermatitis)
- Cause: Prolonged moisture contact, friction, or yeast overgrowth (Candida).
- Fix: Increase diaper change frequency. At every change, do a warm water rinse (no wipes), pat dry, and apply a thick layer of 40% zinc oxide paste. Let the baby have 10 minutes of diaper-free time daily. If it’s speckled with red dots beyond the main rash or doesn’t improve in 3 days, see a pediatrician, it may be yeast.
Constant Leaking
- Cause: Incorrect diaper sizing or improper fit.
- Fix: Size up. Ensure the leg elastics are pulled out from the body, not tucked in. For boys, point the penis down when you diaper. A leak prevention fit is snug at the legs and loose enough at the waist to slide two fingers in.
The Diaper Won’t Stick
- Cause: Adhesive tabs contaminated with cream, powder, or moisture.
- Fix: Wipe the tab area on the diaper front with a dry cloth. If it’s still greasy, you may need a new diaper. This is pure prevention, keep creams on your finger, not your palm.
Baby Cries During Changes
- Cause: Cold surface, sudden movements, or feeling unstable.
- Fix: Place a soft cloth on the changing pad. Talk or sing to the baby throughout. Keep one hand firmly on their abdomen for security. For very distressed infants, the ESCNH nappy change protocol recommends “contained handling”, gently holding the limbs in a flexed, fetal position during the wipe.
Frequently Asked Questions
How do I know if the diaper is on correctly?
You should be able to fit two fingers between the diaper and your baby’s stomach. The leg cuffs should be flared out, not tucked in. There should be no gaps at the legs. If the diaper sags low in the back, it’s on too loose.
Is it really necessary to change a diaper right after they pee?
Yes. For newborns, urine quickly raises the skin’s pH and begins breaking down the skin barrier. Waiting for a fully saturated diaper guarantees prolonged wetness, which is the direct path to a rash. Change at least every 2-3 hours, regardless of how heavy it feels.
Can I use baby powder?
Most pediatricians and guidelines now recommend against talc or cornstarch-based powders. They can be inhaled, causing respiratory irritation. The modern approach is to ensure the skin is completely dry and use a moisture-blocking ointment like petroleum jelly instead.
What if my newborn poops after every feeding?
This is normal, especially for breastfed newborns. It’s called the gastro-colic reflex. It means you’ll be doing a lot of changing a dirty diaper guide work. Just follow the front-to-back cleaning and thorough drying steps each time.
How tight should the diaper be?
Snug, but not constricting. The waist should be secure enough that the diaper doesn’t sag or slide down, but loose enough that you don’t see deep red marks on the skin after you take it off. A proper correct diaper fit prevents leaks without causing discomfort.
Before You Go
Changing a newborn’s diaper is a simple mechanical task made critical by fragile skin. Master the six-step sequence, prepare, unfasten, clean front-to-back, dry completely, protect, and secure. Your two guiding metrics are time (every 2-3 hours) and dryness (pat, then cream). Keep wipes fragrance-free, avoid powders, and never let supplies sit within the baby’s reach. When in doubt, a thick layer of zinc oxide and some air time fixes most problems. This routine, done consistently, keeps skin intact and prevents the pain of dermatitis before it starts.
