
How to Roll Diapers for Diaper Cake | Fast & Easy Techniques
This post contains affiliate links. As an Amazon Associate, we learn from qualifying purchases
To roll diapers for a diaper cake, you have two proven paths: the traditional roll-and-band method or a faster no-roll technique that uses a pan as a mold. The traditional method creates a tight, cylindrical cake but takes time. The no-roll method builds a stable, flat-sided cake in under twenty minutes and doesn’t require the recipient to unroll each diaper before use.
That choice between rolled and flat isn’t just about aesthetics. It decides how long you spend assembling the gift and how convenient it is for the new parent. A rolled cake looks classic, but the process is repetitive. A flat cake built in a pan looks just as polished and skips the most tedious step.
What follows: the exact step count for both methods, the specific diaper math from a real three-tier build, and the one decoration rule that keeps the diapers usable. You’ll also see why the manufacturing process for diapers themselves explains which assembly method holds up best.
Key Takeaways
- The no-roll method uses a cake pan as a mold, building each tier in minutes instead of rolling dozens of diapers individually.
- A standard three-tier cake uses about 96 size 1 diapers: 15 for the top, 36 for the middle, and 45 for the bottom layer.
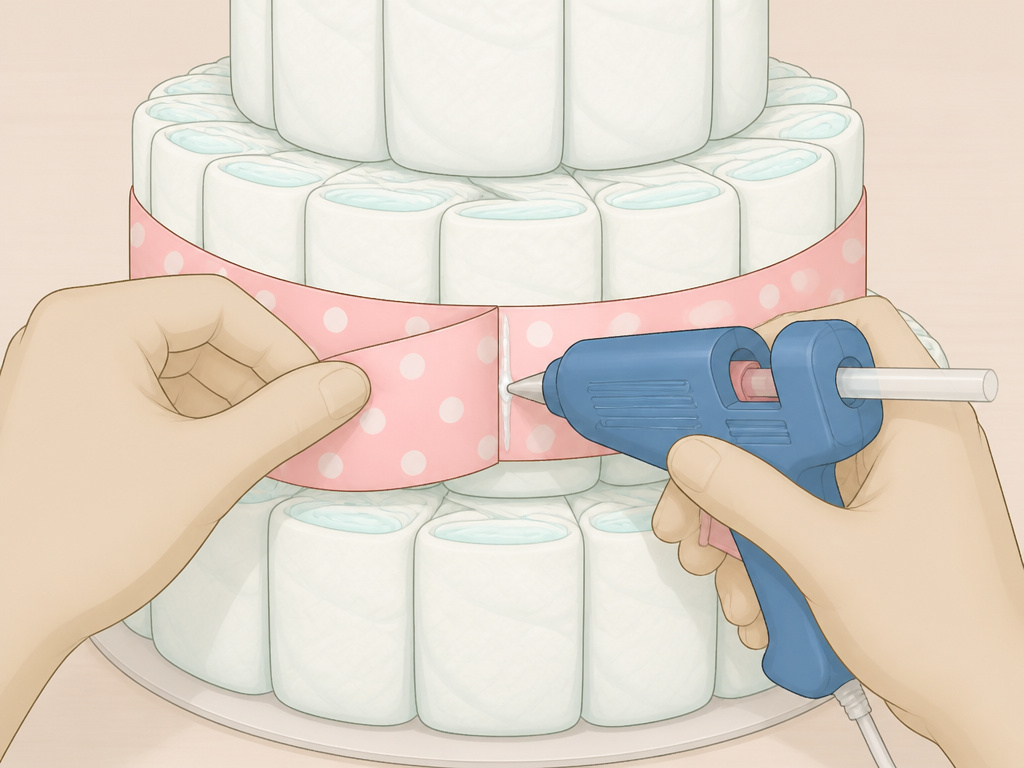
- Never get hot glue on the diapers if you want them to remain usable; glue the ribbon seam to itself, not to the diaper.
- Rubber bands are essential for the rolled method but must be completely hidden by ribbon for a finished look.
- The direction you roll matters: start from the bottom, folded end of the diaper for a tighter, cleaner cylinder.
The Traditional Rolling Method: Step-by-Step
This is the classic technique you see in most tutorials. It produces a round, layered cake that looks like it’s made of scrolls. The process is simple but becomes mechanical after the first two dozen diapers.
You need diapers, a large bag of small rubber bands, and a roll of ribbon. A hot glue gun is the best tool for securing ribbon.
Common mistake: Rolling from the top waistband. Starting at the top makes a loose, uneven roll that won’t stand neatly in the cake’s structure. Always begin at the folded bottom edge.
Step 1: Roll Each Diaper Individually
Take a diaper and lay it flat. Start rolling from the bottom, folded end, moving toward the top waistband. Keep the roll as tight as you can. Secure it with a small rubber band around the middle. Roll all your diapers first, it’s a mindless task perfect for doing in front of the TV. For a three-tier cake using size 1 diapers, you’ll need about 96 rolls.
Step 2: Build the Bottom Tier
Take three rolled diapers and stand them up in a triangle. Wrap a rubber band around all three to form a stable core. This trio should stand on its own. Now, add diapers around this core. Take a new roll and place it next to one of the three core diapers. Wrap a rubber band around just those two to connect them. Continue adding rolls in a circle, banding each new roll to its neighbor. This creates a bottom tier with one diaper in the center and six around it. Keep expanding the circle until the tier reaches your desired diameter, about 45 diapers for a large base.
Step 3: Construct the Middle & Top Tiers
Repeat the exact process from Step 2, but use fewer diapers. The middle tier often uses 36 rolls, and the top tier uses 15. As you build, periodically place the smaller tier on top of the larger one to check for proportion. You want each tier to be visibly smaller than the one below it.
Step 4: Secure and Stack the Tiers
Once all three tiers are built, stack them. You can use a dab of hot glue between the center diapers of each tier to hold them together, or insert a wooden dowel through the center for solid structural support. If you use a dowel, push it through slowly to avoid tearing the diaper material.
| Tier | Approx. Diaper Count (Size 1) | Key Build Tip |
|---|---|---|
| Bottom | 45 rolls | Build around a core of 3 diapers; expand the circle outward. |
| Middle | 36 rolls | Check proportion by placing it on the finished bottom tier. |
| Top | 15 rolls | This forms the peak; keep the roll very tight. |
The finished structure is dense and heavy. The rubber bands provide all the tension holding it together. Your next job is to hide them completely.
The Faster, Flatter Alternative: The No-Roll Method
If the thought of rolling and banding 96 diapers makes you sigh, this method is your escape hatch. It abandons rolling entirely. Instead, you use a cake pan as a mold, creating tiers with flat sides that stack into a clean, geometric cake.
I don’t have the patience for the traditional rolled diaper cakes. It’s a little too tedious rolling diaper… After diaper… After diaper. Not to mention the mother-to-be has to unroll each and every one.
The logic is straightforward. Diapers are rectangular prisms. Packing them tightly into a circular mold creates a stable layer without a single rubber band on each diaper. The community blog that pioneered this no-roll method reports assembly times under twenty minutes for a three-tier cake.
How the No-Roll Method Works:
- Grab Your Pans. You need three different-sized round cake pans (like 6-inch, 8-inch, and 10-inch). Springform pans are ideal because you can release the buckle and lift the side off without disturbing the diapers.
- Pack the Largest Pan. Take your diapers and stand them on end, packing them tightly into the largest pan with the folded edge facing out. This hides the colorful waistband in the center, giving the tier a uniform, clean look. Fill the pan completely.
- Temporarily Secure. Use a long piece of string or a large rubber band to wrap around the entire bundle of diapers inside the pan. Tie it snugly. This holds the shape.
- Remove the Tier. Carefully lift the entire bundle out of the pan. The string is now holding the tier together. Leave it in place.
- Repeat for Smaller Tiers. Use the smaller pans to create the middle and top tiers using the same pack-and-tie process.
- Stack and Support. Stack your three flat-sided tiers. For stability, many builders insert a wooden dowel down through the center. The tight pack and dowel make this cake surprisingly sturdy.
Rolled vs. No-Roll: Which Should You Choose?
This isn’t a minor style difference. It’s a trade-off between time investment and classic appearance.
| Aspect | Traditional Rolled Method | No-Roll Pan Method |
|---|---|---|
| Time | 60-90 minutes for a 3-tier cake | 15-25 minutes |
| Diaper Usability | Recipient must unroll each diaper | Diapers are ready to use instantly |
| Visual Style | Classic “scroll” look, cylindrical | Modern, geometric with flat sides |
| Stability | Very stable, but relies on many rubber bands | Very stable, relies on tight packing and often a center dowel |
| Best For | Gift-givers who prioritize traditional craft aesthetics | Gift-givers who want a beautiful, practical gift made quickly |
The no-roll method wins on practicality every time. It’s the technique I recommend for most people. The recipient will appreciate not having to dismantle a complex craft project just to change a diaper.
The Right Diapers and Tools for the Job
Your cake is only as good as its ingredients. Not all diapers are created equal for crafting, and the wrong adhesive can ruin the gift’s utility.
Choosing the Best Diapers
You want diapers that are uniform in size and have a relatively smooth, non-bulky design when rolled. Size 1 is the standard for diaper cakes, they’re small enough to create detail but large enough to be useful. Most cakes consume 80-100 diapers.
- Pampers Swaddlers: Their soft, flexible material rolls neatly and their consistent shape makes for uniform tiers.
- Huggies Little Snugglers: Another excellent choice, known for their symmetrical design which packs well in the no-roll method.
Stay away from diapers with excessive ruffling or bulky, irregular-shaped waistbands. They create lumpy, uneven rolls that are hard to assemble into a smooth circle. The goal is a uniform building block.
Essential Tools & Adhesive Warning
Your toolkit is simple: * Rubber Bands (for rolled method): Small, durable bands. You’ll need dozens. * Ribbon: This is your finishing material. Widths between 1.5 and 2.5 inches work best to cover rubber bands. Burlap, satin, or grosgrain are popular. * Hot Glue Gun: This is for securing ribbon only.
Where this goes sideways: Getting hot glue on the diapers. If glue seeps through the ribbon onto a diaper, that diaper is compromised. The parent cannot use it on their baby’s skin. Always glue the ribbon end to the ribbon body, not to the diaper surface.
This adhesive principle is borrowed from manufacturing. Diaper factories maintain strict temperature and humidity control (around 22°C ±3 and 55% RH ±15) for consistent adhesive curing. Your hot glue sets in seconds, but it creates a permanent, skin-irritating bond on the diaper surface. Be precise.
Decorating Your Masterpiece
 The decoration phase transforms a bundle of diapers into a celebratory gift. This is where you hide the mechanics and add personal flair.
Covering the Mechanics
Take your ribbon and wrap it around the entire circumference of each tier, covering all visible rubber bands or string. Overlap the ribbon ends and use a dot of hot glue to secure the seam to itself. Pull the ribbon tight for a clean finish. For a richer look, add a second, thinner ribbon on top.
Adding Toppers and Accents
The top of the cake is prime real estate for a cute stuffed animal, an elephant, bear, or bunny that matches the nursery theme. You can also use a large bow, a pair of baby shoes, or a “Baby” letterboard.
Weave smaller baby items into the tiers. Pacifiers, small baby bottles, socks, or teethers can be tucked into the ribbon or attached with a small, safe pin. For a full guide on creative shapes, see our tutorial for a pumpkin diaper cake or a sophisticated pram diaper cake.
Final Presentation
Place your finished cake on a cake stand or a sturdy, decorative plate. This elevates it literally and figuratively, making it the centerpiece of the gift table. For more foundational ideas, our article on what a diaper cake is breaks down its role as both gift and decoration.
Why the Rolling Method Works: A Nod to Manufacturing
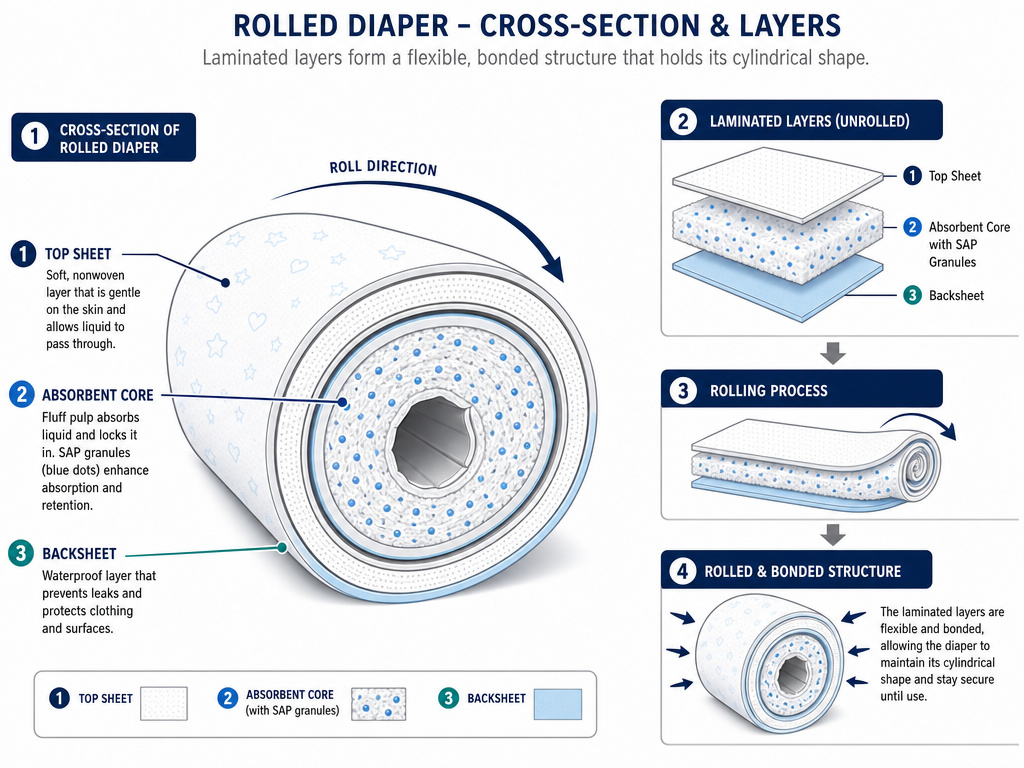 The way a diaper is constructed explains why it can be rolled or packed so effectively. In a factory, diapers are assembled on high-speed lines where layers are precisely bonded.
A modern diaper production line is an integrated system typically 40–60 meters in length, combining multiple processing stations into one continuous operation at speeds of 300–800 pieces per minute.
The absorbent core, a mix of fluff pulp and superabsorbent polymer (SAP), is formed on a drum and then wrapped in tissue. This wrapped core is then sandwiched between the top sheet and backsheet with hot-melt adhesive. The result is a flexible, layered rectangle that holds its structure. When you roll a diaper, you’re bending this laminated structure along its long axis. The materials are designed to flex without delaminating, which is why a tightly rolled diaper stays rolled.
The flat, no-roll method leverages the diaper’s inherent rectangular shape and stability, treating it like a brick in a wall. Both methods, in their own way, respect the engineered design of the diaper itself. For those considering other diaper-related services, understanding the benefits of a diaper service can also inform your gifting choices.
Frequently Asked Questions
Do you have to roll diapers for a diaper cake?
No, you do not have to roll them. The no-roll method is a legitimate and often faster alternative. You pack diapers standing on end into a cake pan, tie them, and then remove the pan. This creates a flat-sided tier without rolling a single diaper. It’s the basis for many alternative shapes, like the pram-shaped gift.
What is the best size diaper for a diaper cake?
Size 1 is the most popular and practical choice. They are small enough to create detailed tiers but large enough that the recipient will use them immediately. A typical three-tier cake uses about 96 size 1 diapers. Our guide on choosing diapers for a cake dives deeper into brand comparisons.
How many diapers do I need for a 3-tier cake?
Standard large three-tier cake uses approximately 96 size 1 diapers. The breakdown is usually 15 for the top tier, 36 for the middle, and 45 for the bottom. For complete instructions for a 3-tier diaper cake, including decoration, we have a dedicated walkthrough.
How do you keep a diaper cake from falling apart?
For rolled cakes, the rubber bands provide the primary tension, and a central wooden dowel run through all three tiers adds critical structural support. For no-roll cakes, the tight packing in the pan and the outer string or ribbon hold the tier, and a dowel is also recommended for stacking. Proper technique is covered in any good diaper cake tutorial.
Can you use hot glue on a diaper cake?
You can use hot glue only on the ribbon, never on the diapers themselves. Glue the ribbon seam to itself. If hot glue gets on the diaper, it renders that diaper unsafe and unusable for the baby. The goal is a beautiful diaper cake gift that doesn’t waste a single diaper.
Before You Go
Your diaper cake should be two things: a stunning centerpiece and a practical gift of essentials. The no-roll method with cake pans is the fastest route to that goal, cutting assembly time drastically. Remember the cardinal rule: keep hot glue off the diapers. Whether you choose the scroll-like look of rolled diapers or the sleek geometry of the flat-pack method, you’re giving a gift that truly helps. Now, gather your diapers, Pampers Swaddlers or Huggies Little Snugglers are perfect, pick your method, and build something wonderful.
