
Learn How to Make a Diaper Cake Without Rolling the Diapers
This post contains affiliate links. As an Amazon Associate, we learn from qualifying purchases
To make a diaper cake without rolling the diapers, you need three round pans, about 40 size 1 diapers, string, and a dowel. Arrange the diapers folded-edge-out in the pans, tie each layer with string, stack them on a dowel for support, and decorate with ribbon. This method cuts assembly time in half compared to rolling and keeps every diaper usable.
The folded-edge-out arrangement is the whole trick. It creates the cake’s visual swirl while hiding the diaper’s colored waistband inside the core. You aren’t just skipping a tedious step; you’re building a structure that holds its shape without damaging a single diaper.
What follows is the exact pan sizes and diaper counts that work, the one mistake that ruins diapers for good, and how to decorate so it looks professional. You’ll have a finished, gift-ready centerpiece in under thirty minutes.
Key Takeaways
- Use 10-inch, 8-inch, and 6-inch round pans as molds, requiring roughly 20, 13, and 7 size 1 diapers respectively for a standard three-tier cake.
- Never use glue or tape directly on the diapers. It renders them unusable. Secure layers with string or rubber bands hidden under decorative ribbon.
- For gifting, choose size 2 or 3 diapers instead of newborn sizes. Babies grow out of the smallest sizes within weeks, making larger sizes a more practical gift.
- Insert a central dowel rod after stacking tiers to prevent shifting during transport. Push it through carefully to avoid tearing the diaper material.
- The no-roll method is at least twice as fast as the traditional rolled technique, turning a multi-hour project into a 30-minute craft.
Why Skip the Roll? The Practical Advantage
Every traditional diaper cake tutorial starts with rolling dozens of diapers and securing each with a rubber band. It’s monotonous. The recipient then has to unroll and remove every single band before use. The no-roll technique eliminates that two-way hassle.
You build the cake in formed layers, not individual units. The diapers stay flat, folded, and completely free of adhesive or tight bands that can leave creases. This matters because a diaper cake is a functional gift first and a decoration second. If the mom-to-be has to scrub glue off a diaper or fight a permanent rubber band indent, you’ve defeated the purpose.
The no-roll method averages 20-30 minutes of assembly time. A comparable three-tier diaper cake using the rolled method can take over an hour just for the rolling and banding stage.
Speed isn’t the only benefit. The structure is often more stable. A rolled cake depends on the tension of hundreds of rubber bands. A no-roll cake is a single, tied cylinder per tier, locked together with a central dowel. It’s less likely to sag or lean in the car on the way to the shower.
Gather Your Supplies (You Probably Have Most)
You don’t need specialty craft store items. The core supplies are household basics. The only specific purchases are the diapers and a dowel from a hardware store.
The Non-Negotiables:
- Diapers: One large box of size 1 or 2 diapers. For the standard pan sizes, you’ll use about 40. A 96-count box leaves plenty for a big cake or mistakes. For help selecting, see our guide on the best diapers for this purpose.
- Round Pans/Containers: Three round, shallow pans or containers in descending sizes. The classic trio is a 10-inch, an 8-inch, and a 6-inch pan. Cake pans, pie tins, or even sturdy plastic containers work. The key is that the container’s depth is no more than half the height of a folded diaper.
- String or Thin Rubber Bands: For securing each layer. Baker’s twine, embroidery floss, or clear elastic bands are ideal. They must be strong enough to hold the diapers snugly.
- Wooden Dowel Rod: One 12-18 inch long, ¼-inch diameter dowel. This is your structural spine.
- Scissors & Ruler
The Decorations (Choose Your Theme):
- Ribbon: 2-4 rolls of ribbon, each at least 1 inch wide. Measure and cut a length for each tier that’s 1 inch longer than the circumference of that tier.
- Hot Glue Gun & Glue Sticks: For securing ribbon ends and attaching decorations. This is the most dangerous tool for your diapers.
- Cake Board or Tray: For a stable base. A large plate, cutting board, or a round cardboard cake board wrapped in foil works.
- Embellishments: Small baby items like pacifiers, rattles, socks, or a small stuffed animal for the topper.
The Core No-Roll Method: Step-by-Step
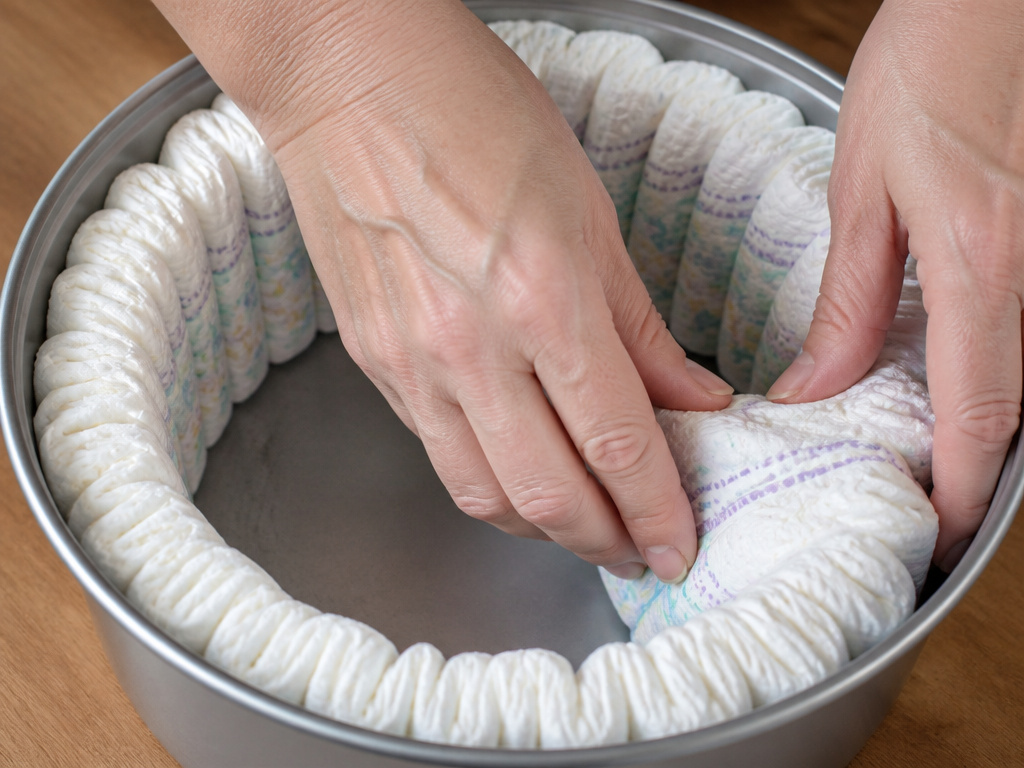
This is where the pans become your mold. You’re not building freehand; you’re using a form to create perfect, consistent layers quickly.
Step 1: Form the Bottom Tier
Take your largest pan (the 10-inch). Open your box of diapers. Take a stack of about 5-7 diapers and place them sideways into the pan, with the folded edge facing outward toward the pan’s wall. The colored waistband should face the center of the pan. This hides the branding and creates a clean, uniform exterior.
Continue adding diapers in small stacks, working your way around the pan to form a solid, tight circle. Pack them snugly against each other. For a 10-inch pan, this will use approximately 20 size 1 diapers. The exact number can vary by diaper brand and how tightly you pack them.
Once the pan is full and the diapers are packed tightly, wrap your string or a rubber band around the entire circumference of the diaper circle, right at the midpoint of the diaper height. Tie it firmly. The diapers should now hold their circular shape on their own. Gently lift the entire tied layer out of the pan and set it aside.
Step 2: Form the Middle & Top Tiers
Repeat the exact process with your 8-inch pan (using about 13 diapers) and your 6-inch pan (using about 7 diapers). You now have three freestanding diaper circles.
| Tier | Pan Size | Approx. Diaper Count (Size 1) | Key Action |
|---|---|---|---|
| Bottom | 10 inches | 20 diapers | Pack tightly, tie firmly. |
| Middle | 8 inches | 13 diapers | Ensure circle is even. |
| Top | 6 inches | 7 diapers | Check it’s centered before tying. |
Step 3: Stack and Secure with the Dowel
Place your largest tier on the cake board. Center the middle tier on top of it. Center the smallest tier on top of that.
Take your dowel rod. Carefully push it straight down through the center of all three tiers. Your goal is to find the natural hole in the middle of each diaper circle. If you meet resistance, wiggle the dowel gently or slightly adjust the diapers above—don’t force it and risk tearing.
Where this goes sideways: Forcing the dowel through a diaper. If you puncture the absorbent core or the waterproof outer layer, that diaper is compromised. Go slow and let the dowel find the gaps.
The dowel should go all the way through to the cake board but not protrude obtrusively from the top. If it’s too long, you can cut it. The dowel transforms three separate layers into a single, stable unit that won’t slide apart in transit.
Decorating Your Masterpiece
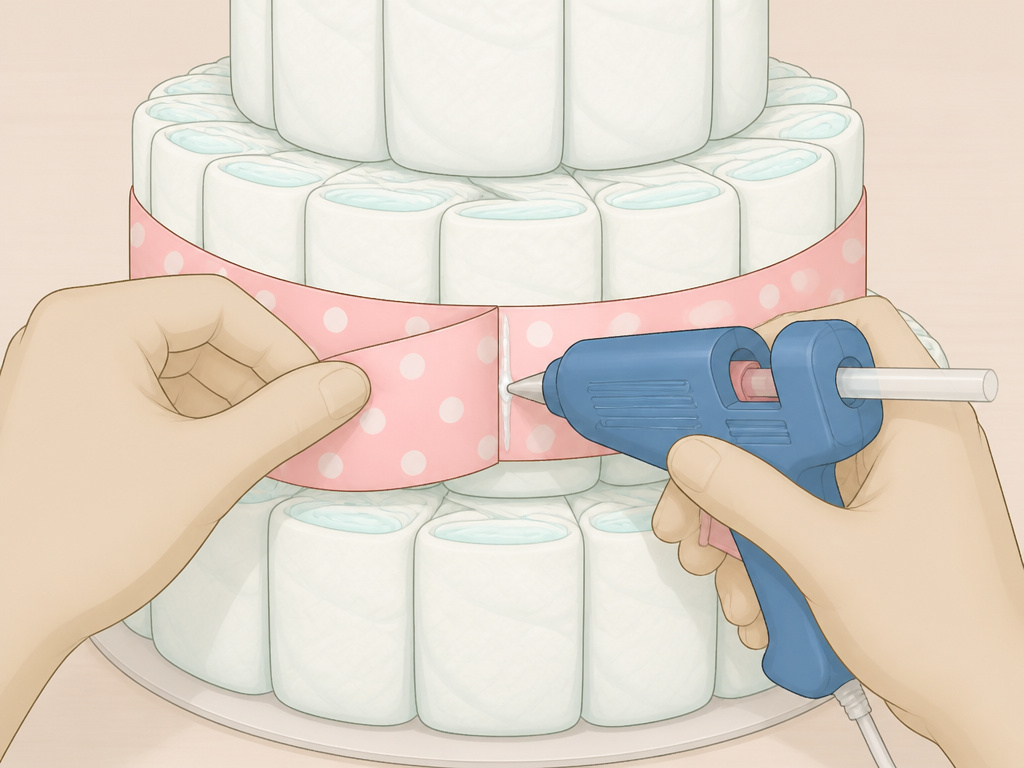
The decoration phase hides the mechanics and turns the diaper structure into a celebratory gift. This is where your theme comes to life.
1. Apply the Ribbon:
This is the most critical decorative step. For each tier, take your pre-cut ribbon length. Wrap it around the tier, covering the string or rubber band. Overlap the ends by about ½ inch at the back of the cake.
Common mistake: Getting hot glue on the diapers. A single drop of glue soaks into the diaper material and renders it unusable. The glue is only for the ribbon-to-ribbon seam.
Use a tiny dot of hot glue only on the ribbon ends to secure the overlap. Hold it in place for a few seconds to set. The ribbon now conceals the functional tie and gives the cake a polished, finished look.
2. Add Embellishments and a Topper:
Tuck small baby items into the ribbon or between diaper folds: a pack of pacifiers, a rattle, or a pair of baby socks. For the topper, a small stuffed animal, a teether, or a large “It’s a Boy/Girl” pin works perfectly. You can use a pin to attach a lightweight topper to the top tier’s ribbon—just ensure the pin does not go through a diaper.
3. Create a Base (Optional but Recommended):
Dress up your cake board. Cover it with wrapping paper, fabric, or a cute baby blanket that matches your ribbon. It completes the presentation and makes the gift look even more substantial.
No-Roll vs. Traditional Rolled: Which Should You Choose?
Your choice depends on your priorities: speed and usability versus a very specific, dense look.
The rolled diaper method involves rolling each diaper tightly from the bottom up and securing it with a rubber band. These rolls are then bundled together to form tiers. It creates a very compact, dense cake where the individual diapers are less visible.
| Aspect | No-Roll Method | Traditional Rolled Method |
|---|---|---|
| Assembly Time | 20-30 minutes | 60-90+ minutes |
| Diaper Usability | Perfect; no glue, no tight bands on diapers | Good; must remove each rubber band before use |
| Structural Stability | Very stable with dowel support | Stable, but relies on many tension points |
| Visual Style | Shows diaper folds, “softer” look | Tight, uniform, “rolled” appearance |
| Best For | Quick gifts, first-time makers, ensuring usability | Dense, traditional aesthetic, experienced crafters |
The rolled cake can use more diapers—a large three-tier cake can consume 96 diapers. The no-roll method is more economical with the diaper box, often using half that number for a similarly sized cake.
Pro Tips & Problem Solving
Diaper Size is a Gift Strategy.
Newborn and size 1 diapers are often sentimental but impractical. Babies can outgrow them in a matter of weeks, and many parents receive an overstock. Making your cake with size 2 or 3 diapers is a genuinely thoughtful move. It ensures your gift won’t be outgrown before the baby even comes home.
What If My Layers Are Wobbly?
A wobbly layer means it wasn’t tied tightly enough or the diapers weren’t packed snugly in the pan. Before stacking, you can gently squeeze the tied circle and re-tie the string tighter. The dowel will solve minor wobbles, but it can’t fix a loose, sloppy tier.
Can I Make Different Shapes?
Absolutely. The pan-mold principle works for any shape. For a pram diaper cake, you’d use a rectangular container for the base and a smaller round one for the hood. For a seasonal pumpkin diaper cake, you’d use a large, wide bowl to create a rounder, fuller shape and secure it with orange ribbon.
Handling and Transport.
Lift the cake from the bottom cake board, never from the top tier or the dowel. Place it on a flat, clear car seat or trunk floor. A slight shift is normal; the dowel will keep it intact. If you’re extra concerned, a few discreet dots of poster putty between the cake board and the car surface will prevent sliding.
Frequently Asked Questions
Can you really make a diaper cake without any rolling?
Yes, completely. The no-roll method uses pans as molds. You arrange the diapers folded-edge-out in a circle, tie the circle, and stack the tiers. It bypasses the individual rolling step entirely, saving significant time.
How many diapers do I need for a no-roll cake?
For a standard three-tier cake using 10-inch, 8-inch, and 6-inch pans, you need approximately 40 size 1 diapers (20 for the bottom, 13 for the middle, 7 for the top). Always buy a few extra. A 96-count box is more than enough and allows for a fuller cake.
What can I use if I don’t have the right size pans?
Any round, shallow container will work as long as its depth is less than half the diaper’s height. Mixing bowls, plastic food storage containers, or even sturdy cardboard rings can serve as molds. The springform pan hack mentioned in old tutorials—tying the layer inside the pan and then releasing the springform side—is brilliant for easy removal.
Is a no-roll diaper cake stable enough to transport?
It is often more stable than a rolled one. The central dowel rod locks all the tiers together into one unit. As long as you lift it from the base board and place it on a flat surface in your vehicle, it will travel perfectly. The dowel prevents the tiers from sliding sideways.
What’s a good alternative to a diaper cake?
If you want a different presentation of diapers as a gift, consider a diaper bouquet, where rolled diapers resemble flowers in a vase. For a more permanent, handmade gift, a diaper burp cloth is a useful sewing project, or you could tackle making a diaper bag for the new parents.
Before You Go
The no-roll diaper cake is the smart choice for a beautiful, practical, and fast baby shower gift. It respects the diapers as the useful core of the present while delivering a stunning visual impact. Remember the three rules: pack the pans tight, keep glue off the diapers, and run a dowel down the center. With forty diapers and thirty minutes, you can create a gift that will be the centerpiece of the party and a genuine help to the parents-to-be.
