
Learn How to Make a Stunning Pumpkin-Themed Diaper Cake
This post contains affiliate links. As an Amazon Associate, we learn from qualifying purchases
A pumpkin diaper cake is built in three layers around a central core, using 50-100 rolled diapers secured with rubber bands. The shape comes from compacting each tier into a tight circle, not a traditional cake stack. Decorate with orange, brown, or burlap ribbon and a stem topper to complete the pumpkin look.
The difference between a wobbly tower and a convincing pumpkin is radial pressure. A standard diaper cake is vertical; a pumpkin is round. You build out from a center, not up from a base.
What follows: the exact diaper count that prevents a loose middle, the ribbon trick that replaces failing glue dots, and how to choose a diaper size that keeps the gift useful for months, not weeks.
Key Takeaways
- Use Size 2 or Size 3 diapers for a pumpkin cake; babies outgrow Size 1 too fast for the gift to be practical.
- Build each tier around a paper towel roll core, this creates the pumpkin’s round shape and prevents collapse.
- Secure ribbons with hot glue at the seam only; getting glue on the diapers themselves ruins them.
- A tight, compact circle is non-negotiable; a loose ring of diapers will sag and destroy the pumpkin silhouette.
- Plan for 50-100 diapers total; a substantial pumpkin needs volume, not just height.
Choosing Your Diapers and Base
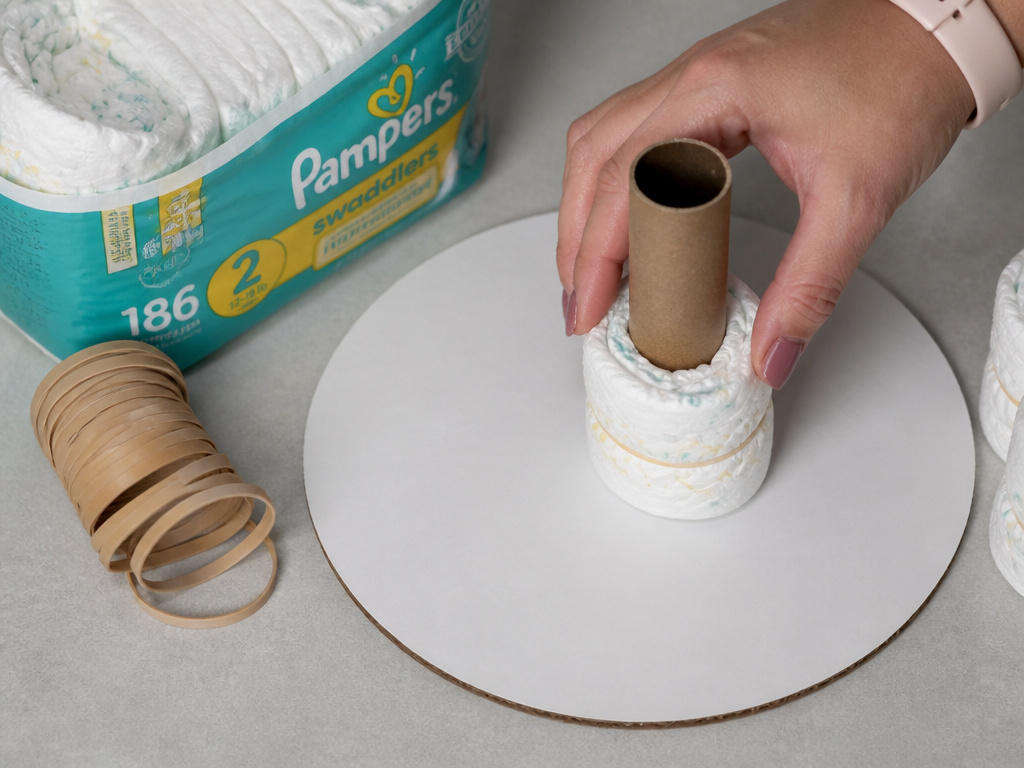 The diapers are the structure. Pick the wrong size or skimp on count, and your pumpkin looks deflated. This isn’t about cuteness. It’s about physics.
For a gift, skip Size 1 and newborn diapers. A baby might use them for only a few weeks. A 3-tier diaper cake built with Size 2 or 3 diapers stays useful for months, which is the whole point of a practical gift. The best diapers for structure are name-brand like Pampers or Huggies, their consistent fold and firmness make rolling and stacking predictable.
You need a central core. A paper towel roll or an empty wrapping paper tube is perfect. This isn’t just a guide; it’s the internal skeleton that gives the pumpkin its round shape and lets you lift the entire cake without it buckling. An 8-inch cake board or plate makes a stable foundation.
| Material | Purpose | What Happens If You Skip It |
|---|---|---|
| Paper Towel Roll | Central core for round shape | The tiers collapse inward; you get a lopsided mound, not a pumpkin. |
| Size 2 or 3 Diapers (50-100 count) | Primary building material | The cake looks sparse; the recipient runs out of diapers in two weeks. |
| 1-inch Wide Rubber Bands | Secures diaper rolls and tiers | The entire structure unravels when you try to move or decorate it. |
| Cake Board (8-inch minimum) | Stable foundation | The bottom tier shifts, stressing the upper layers until they topple. |
Gather your ribbons and decor now. You need about 2-3 yards of main ribbon (orange, burlap, or brown) per tier, plus accent ribbons. A hot glue gun is mandatory for securing ribbon ends. Have a stuffed gourd, a bundle of cinnamon sticks, or a green felt stem ready for the topper.
The 5-Step Assembly for a Sturdy Pumpkin
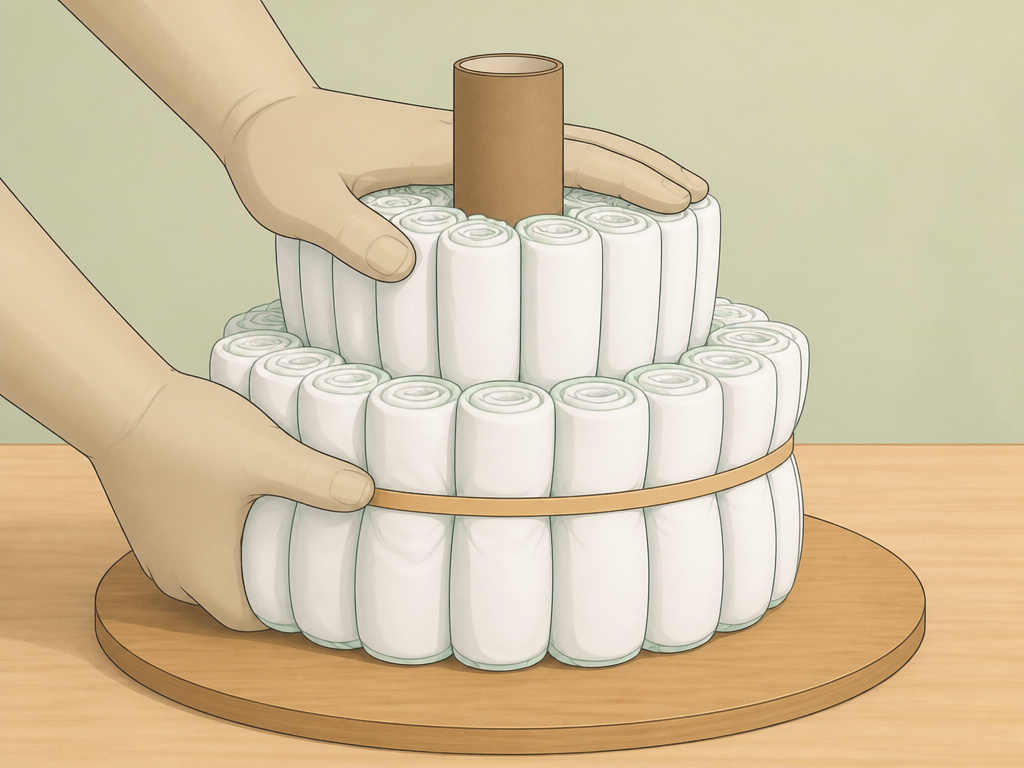 This process builds out, not up. Every diaper points toward the center. The goal is a dense, circular wheel.
Step 1: Roll Every Diaper.
Take each diaper and roll it tightly from the top (the waistband) down to the bottom folded edge. Secure each roll with a small rubber band. Roll all your diapers first, it’s a tedious 15-minute task, but trying to roll and build simultaneously guarantees a loose structure. The proper technique for rolling diapers keeps the design facing out for a clean, white exterior.
Step 2: Create the Bottom Tier.
Stand your paper towel roll upright on the cake board. Take 6-8 rolled diapers and arrange them snugly around the tube, design facing outward. Hold them in place and wrap a large rubber band around the entire group, positioning it at the midpoint of the diapers. This is your first ring.
Where this goes sideways: A loose bottom ring. If you can fit a finger between the diapers and the core, the whole tier will sag under the weight of the layers above. Compress it until the diapers touch each other and the tube.
Now, build outward. Add a second ring of diapers around the first, securing each new diaper to the one next to it with a rubber band. Continue until the bottom tier is the diameter you want, typically 8-10 inches for a substantial pumpkin. This bottom layer will use 30-45 diapers.
Step 3: Build the Middle and Top Tiers.
Repeat the process for the middle tier, using a smaller ring of diapers (about 20-30). The top tier is the smallest, often just 6-10 diapers arranged around the top of the tube. As you build each tier, periodically place it on top of the one below to check proportions. You want a rounded, squat pumpkin shape, not a tall cylinder.
Step 4: Compact and Shape.
Once all tiers are assembled on the core, you have a cylindrical cake. To form the pumpkin shape, you need to slightly compress each tier from the top and bottom. Gently press down on the top tier while pushing the sides of the bottom tier inward. The goal is a slightly squashed sphere. Wrap a final, very large rubber band around the entire height of the cake to hold this shape temporarily.
Step 5: Secure the Structure.
Before decorating, you must lock the shape. This is where many tutorials stop. Take a long length of wide ribbon or a strip of tulle and wrap it tightly around the entire circumference of the cake, covering the temporary large rubber band. Pull it taut and secure the ends with a knot or a discreet piece of tape. This outer wrap provides the constant radial pressure that defines the pumpkin and allows you to remove the temporary band.
Decorating Your Pumpkin Diaper Cake
The ribbon does two jobs: it hides the mechanics and it defines the pumpkin’s ridges. Glue is your enemy if it touches the diapers.
Start with your widest ribbon (2-3 inch burlap or orange satin). Wrap it around a tier, covering the structural ribbon or tulle. Overlap the ends by about an inch. Do not wrap the ribbon around the diapers themselves. You are covering the structural wrap.
Common mistake: Using glue dots or tape on the ribbon’s full length to stick it to the diapers. At a real baby shower, the glue dots failed, leaving the ribbon sagging. The fix was a safety pin hidden in the overlap, which held far better.
Use your hot glue gun only on the overlapping ribbon ends to create a seam. Hold the seam closed for 30 seconds until the glue sets. If you get hot glue on the diaper fabric, that diaper is ruined for use, the glue melts the top sheet and creates a hard, uncomfortable spot.
Add vertical “rib” lines. Take a thinner, contrasting ribbon (or jute twine) and run it from the top to the bottom of the cake, securing it at the top and bottom with a tiny dot of hot glue on the existing ribbon only. Space 6-8 of these ribs evenly around the cake.
| Decoration | Function | Risk If Done Wrong |
|---|---|---|
| Wide Burlap Ribbon | Hides structural bands, provides base color | Glue on diapers ruins them; loose application looks sloppy. |
| Thin Jute Twine | Creates pumpkin “ribs” | Too tight distorts the shape; too loose looks droopy. |
| Hot Glue Gun | Secures ribbon seams | Direct contact with diaper fabric melts it, making diapers unusable. |
| Stem Topper (Cinnamon sticks, felt) | Finishes the pumpkin illusion | A heavy topper can topple the top tier if not secured into the core. |
The topper is the final touch. A bundle of cinnamon sticks tied with jute makes a perfect stem. Insert it into the top of the paper towel roll. You can also use a small stuffed gourd, a fabric stem, or a cluster of artificial fall leaves. Secure it with a dab of hot glue inside the tube, not on the diapers.
For a decorative pram diaper cake or a diaper bouquet, the pumpkin method is a foundation. The radial build is what you’re learning here.
Solving the Two Biggest Pumpkin Cake Problems
You will face a loose base or a ribbon that won’t stay. These have direct fixes.
Problem 1: The bottom tier is wobbly and gaps are visible.
Cause: The first ring around the core wasn’t tight enough, or the outer rings weren’t secured to each other. Fix: Disassemble the bottom tier. Start over with the first 6 diapers, squeezing them tightly around the core until they are under tension. Use more rubber bands between rings, connecting each new diaper to two neighbors, not just one. The industry EDANA diaper testing protocol emphasizes consistent product conditioning for reliable performance, think of your first ring as “conditioning” the entire structure.
Problem 2: Ribbon won’t adhere and sags after an hour.
Cause: You relied on adhesive that doesn’t bond to the ribbon’s backing or the structural wrap. Fix: Abandon glue dots and double-sided tape. Use the safety-pin method: overlap your ribbon ends at the back, pin them together through the ribbon and the structural tulle underneath, and then hide the pin under a bow or an accent ribbon. It’s invisible and holds indefinitely.
I made a storybook-themed cake where the glue dots failed mid-shower. The ribbon slumped. I had to safety-pin it in a bathroom, hiding the pin under a scrap of lace. Now I start with the pin.
These aren’t theoretical issues. They happen when the cake sits at room temperature for a few hours, which is exactly what happens at a baby shower. Build for the event, not just for the photo.
How Many Diapers Do You Actually Need?
Numbers prevent a last-minute store run. A modest pumpkin uses about 50; an impressive, full one uses 96 or more.
Your count depends on tier diameter and diaper size. Size 2 diapers are smaller than Size 3, so you’ll need more rolls to achieve the same fullness. Here’s a reliable blueprint:
- Bottom Tier (8-10 inch diameter): 30-45 diapers
- Middle Tier (6-7 inch diameter): 15-25 diapers
- Top Tier (4-5 inch diameter): 5-10 diapers
Total Range: 50 to 80 diapers.
One documented 3-tier diaper cake used 96 size 1 diapers. For a pumpkin with Size 2, you might hit 80. For Size 3, you could be at 65. Buy an extra pack. Leftover diapers can be tucked into the center of the cake as a bonus gift.
The explanation of a diaper cake is that it’s a useful gift first, decoration second. Skimping on diapers flips that priority and leaves the parents with a cute pile that runs out too fast.
Frequently Asked Questions
Can you make a pumpkin diaper cake without rolling the diapers?
You can, but the pumpkin shape suffers. The no-roll method involves folding diapers flat and stacking them. This creates a blockier, more angular shape. For the round, full silhouette of a pumpkin, rolling is non-negotiable. It creates the uniform “building block” that stacks in a tight circle.
What’s the best way to transport a finished pumpkin diaper cake?
Lift it from the central core, not the sides. Slide one hand under the cake board and gently grasp the paper towel roll at the top with your other hand. Place it in a large box or a sturdy gift bag with high sides. Do not lay it on its side, the weight of the diapers will shear the rubber bands and the tiers will separate.
How long does a diaper cake last before the diapers expire?
Disposable diapers have a shelf life of about 2-3 years if stored in a cool, dry place. A diaper cake made for an immediate shower presents no issue. If you’re building for a business or stock, rotate your inventory and use the oldest diapers first. Never use diapers with compromised packaging.
Can I add other baby items to the pumpkin cake?
Yes, but strategically. Small items like pacifiers, socks, or a brush can be tucked into the ribbon or secured with a pin. Larger items like bottles can distort the round shape if attached to the outside. Consider placing them in the center of the cake board around the base, or giving them separately.
What if the parents are sensitive to scents or allergens?
Choose unscented, hypoallergenic diapers like Pampers Pure or Huggies Special Delivery. Avoid decorating with real dried flowers or anything dusty that could shed. Communicate the materials used, as precautions for diaper rash and skin sensitivity start with what touches the baby’s environment, even indirectly.
Before You Go
A pumpkin diaper cake wins because it’s thematic, substantial, and clever. The round build is the only technique that matters, radial pressure from a central core.
Use Size 2 or 3 diapers. Build tight circles. Secure ribbon with a hidden pin, not failing glue. That’s the recipe.
The result is a gift that looks like a centerpiece and functions as a month’s supply of essentials. That’s the balance every parent appreciates.
