
How to Make a Diaper Cake: The Ultimate Step-by-Step Guide
This post contains affiliate links. As an Amazon Associate, we learn from qualifying purchases
To make a diaper cake, you need diapers, rubber bands, a base, and decorations. Roll individual diapers tightly, secure them with rubber bands, and arrange them in concentric circles to form tiers. Stack the tiers, then decorate with ribbon and baby items, taking care never to use glue directly on the diapers so they remain usable.
That last clause is the line between a cute centerpiece and a ruined gift. A glued diaper is trash. The whole point is utility wrapped in celebration.
What follows is the physical build: how many diapers each tier actually holds, the rolling tension that changes your count, the one fastener that won’t slip, and how to attach decorations so everything can be taken apart and used. We’ll cover the standard rolled method, the flat alternative, and why the diaper size debate matters more than you think.
Key Takeaways
- Use 50 to 100 diapers for a standard cake; a tight-rolled three-tier build needs about 100, while a loose or two-tier design can use half that.
- Never use glue, tape, or pins directly on the diapers. Secure decorations only to each other or to ribbon, or you render the gift useless.
- Size 1 or Size 2 diapers are the practical choice. Size 1 offers a tighter roll; Size 2 lasts longer for the parents. Avoid newborn sizes.
- Individual rolling with rubber bands creates the sturdiest structure. For a quicker, looser build, the unrolled “wheel” method works but uses fewer diapers.
- A solid base and central support (like a bottle) are non-negotiable for a tall, multi-tier cake that needs to survive transport.
What Exactly Are You Building?
A diaper cake is a decorative stack of diapers meant as a baby shower gift and centerpiece. It’s not food. The core idea is that after the party, the parents can dismantle it and use every component—especially the diapers.
If that usability fails, the gift fails. This shapes every material choice you’ll make.
Before you start: You are working with a consumable product. Avoid any adhesive, ink, or puncture that contaminates or compromises the diaper. A hot glue strand on the outer sheet can fuse layers and cause leaks. A pin hole breaks the moisture barrier. Keep everything clean and reversible.
The Gear You Actually Need
You don’t need specialty craft supplies. The short list is diapers, fasteners, a base, and decor.
- Diapers: One to two large packs. For a classic three-tier cake, aim for 100 units if you’re rolling tightly. Brand is less critical than size. Pampers Swaddlers and Huggies are common picks because their designs are neutral.
- Fasteners: Small rubber bands for individual rolls (#19 size works). Larger rubber bands or spools of string/twine for securing entire tiers.
- Structural Support: A sturdy base—a cake board, a serving tray, a cardboard round. For cakes over two tiers, a central support like an empty paper towel tube or a tall, sealed bottle of baby shampoo.
- Decoration: Ribbon (1-2 inches wide), baby items (bottles, pacifiers, small toys), and perhaps a receiving blanket. A hot glue gun is for ribbon-ends only.
- Tool: Scissors.
The best diapers for this are unfussy and have a consistent shape. Avoid boxes with lotion liners or overly stiff tabs that don’t roll cleanly.
The Rolling Technique That Decides Your Diaper Count
This step seems simple, but the tension you apply changes everything. A tight, compact roll yields a firm tier but uses more diapers to fill the same diameter. A loose roll feels faster but creates a wobbly structure that can collapse.
Roll from the folded end. Lay the diaper flat, front design facing down. Start at the end with the folds and roll tightly toward the top where the tabs are. The goal is a firm, cylindrical roll about the size of a small burrito.
Secure it immediately with a small rubber band. Don’t double-wrap it; you just need to stop it from unfurling. Roll all your diapers first. It’s the most time-consuming part, but doing it in bulk makes assembly flow.
A “no rubber band” method exists where diapers are arranged flat in a circular “wheel.” This uses about 30% fewer diapers for the same tier size, but the tier is less stable and can’t be pre-assembled off-site. It’s a trade-off.
The diaper rolling technique is the foundation. Get it consistent, or your tiers will have gaps that require filler diapers and more rubber bands to cinch.
How Many Diapers? The Tier-by-Tier Numbers
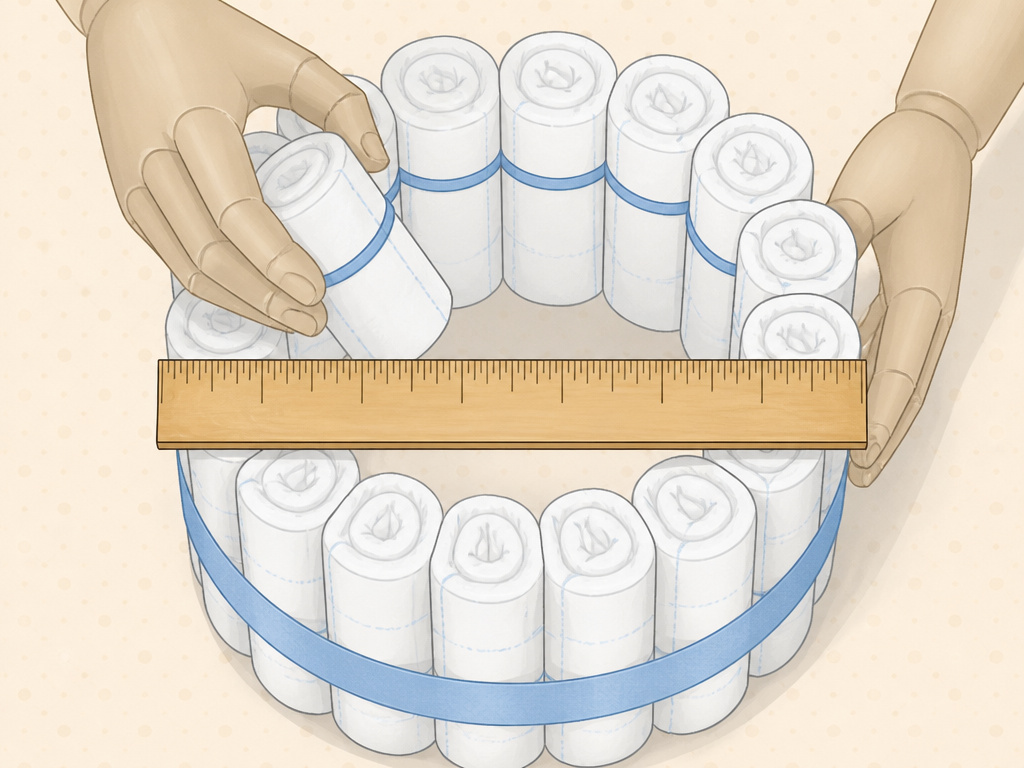 Generic guides say “50-75.” Real builds have specific counts. These numbers assume a tight roll with rubber bands.
| Tier | Diameter Goal | Tight-Roll Diaper Count | Loose/No-Roll Count |
|---|---|---|---|
| Top | 5–6 inches | 10–15 diapers | 7–10 diapers |
| Middle | 8–9 inches | 30–40 diapers | 20–25 diapers |
| Bottom | 10–12 inches | 45–55 diapers | 30–40 diapers |
| Total | — | ~100 diapers | ~60 diapers |
The Pampers guide for a themed cake can call for 72 to 102 diapers, corroborating the higher end of the tight-roll count. The variation comes from the roll density and how compact you make the final circle.
Why the count swings so wide: If you’re using a cake pan as a mold, you’ll pack diapers in until the pan is full, which naturally increases the count. If you’re building freehand, you might stop when the circle “looks right,” often ending up on the lower side. For your first cake, buy a 100-count box. You’ll have spares.
Assembling the Tiers: Two Proven Methods
 You have two main paths here: the freehand circle and the mold method. Both work; one is easier for solo builders.
Method 1: The Bottle & Circle (Best for Solo Building)
This method uses a central bottle as a support and a guide.
- Place your base. Stand your central support (a sealed bottle of lotion) in the middle.
- Start the core: Take three rolled diapers and arrange them around the bottle, tabs facing the bottle. Use a large rubber band to bind them together and to the bottle. They should stand on their own.
- Build outward: Add diapers one by one, placing each new roll so its curved side nestles into the gap between two existing rolls. Secure each new roll with a small band around its neighbor and the bottle. This creates a hexagonal packing pattern that is inherently stable.
- Complete the circle: Keep adding rolls in concentric circles until your tier reaches the desired diameter. Place the final outer roll, then wrap a very large rubber band or a length of twine around the entire tier’s circumference to unify it. Snug it tight.
Where this goes sideways: Skipping the final circumferential band. The individual rolls will shift during transport, the tier goes oval, and the one above it tumbles off. Cinch it.
Method 2: The Cake Pan Mold (Best for Perfect Symmetry)
This is the method shown in many video tutorials. You use a round cake pan as a temporary form.
- Select a cake pan for your desired tier diameter (e.g., a 10-inch pan for the bottom tier).
- Stand a bottle or tube in the center. Pack rolled diapers vertically into the pan, snugly around the center support. Fill the pan completely.
- While the diapers are still constrained by the pan, slide a large rubber band or tie twine around them.
- Carefully lift the entire tier out of the pan. The band holds the shape.
This method guarantees a perfectly cylindrical tier, but it requires having the right pan sizes on hand.
Once each tier is built, wrap it with ribbon to hide the bands. Glue the ribbon’s end to itself, not to the diapers.
The Great Diaper Size Debate: 1 vs. 2
Most guides recommend Size 1 or 2. Here’s what that choice actually does.
- Size 1 (8-14 lbs): The classic choice. They are smaller, so they create a tighter, neater roll. The cake looks more refined. The downside: a bigger baby might outgrow them within weeks. If the parents are gifted several boxes, some may go unused.
- Size 2 (12-18 lbs): The practical choice. The roll is slightly fatter, making the cake look more substantial. They have a longer usable lifespan, so the gift’s utility lasts longer. Some makers find the slightly larger size easier to handle.
The verdict? If the cake is for show and you know the parents are stocked on diapers, Size 1’s aesthetics win. If the cake is the diaper supply, Size 2’s longevity wins. Avoid newborn sizes—they are outgrown in days.
Decorating Without Damage
This is where philosophy meets craft. Every decoration must be removable.
Ribbon is your primary tool. Wrap a wide ribbon around each tier to cover the rubber bands. Overlap the ends and secure them with a dot of hot glue on the ribbon overlap only. If any glue seeps through, it’s on the back of the ribbon, not the diaper.
Attaching baby items. Use the ribbon as an anchor point. Tie pacifiers or small toys onto the ribbon with string or thin ribbon. Tuck bottles or brushes into the gaps between diaper rolls; they’ll hold by friction. For a pram diaper cake or other shape, use the items as structural elements tied together.
The glue rule bears repeating: No glue on the diapers. None. Not a dot. If you want to attach a felt shape or a paper flag, glue it to a toothpick and wedge the toothpick between rolls.
Common mistake: Gluing a ribbon directly to the diaper surface to stop it from sliding. The glue bonds to the top sheet and backing, creating a hard spot that can crack and leak. Use a tighter rubber band underneath instead.
For a different look, consider a diaper bouquet as an alternative gift. The principle is the same: secure without contamination.
Stacking, Transport, and Presentation
Once decorated, stack your tiers. Center each smaller tier on the one below it. If you used a central support bottle, the tiers should slide right down onto it, which locks the alignment.
For transport, the cake is top-heavy. Place it on the floor of the car, not the seat. A little slippage between tiers is fine; you can re-center them at the venue.
At the shower, it’s a centerpiece. Place it where people can see it but not accidentally bump the table. If you included a diaper raffle as a game, display the prize nearby.
Frequently Asked Questions
Can you make a diaper cake without rolling the diapers?
Yes. The unrolled method involves laying diapers flat in a circular pattern, like building a wheel. It’s faster and uses fewer diapers, but the resulting tiers are looser and don’t travel as well. It’s a good choice for a cake that will stay put on the gift table.
What is the best thing to use to hold the diaper cake together?
Rubber bands for the individual rolls. For the tier itself, large rubber bands or twine are best. Avoid duct tape, packing tape, or anything with a strong adhesive that will leave residue on the diapers.
How long does it take to make a diaper cake?
For a first-time builder, budget 60-90 minutes from unboxing diapers to final ribbon. The rolling takes the bulk of the time. With practice and a helper, you can assemble a standard three-tier cake in under 30 minutes.
Can I use cloth diapers to make a diaper cake?
You can, but it’s a different project. Cloth diapers are bulkier and often have snaps or Velcro that can snag. They also represent a much more specific gift for a family committed to cloth diapering. The same no-glue, no-puncture rules apply.
Before You Go
A diaper cake is a gesture of practical support. Its success isn’t in surviving the party intact, but in disassembling cleanly afterward. Focus on the mechanics: tight rolls, solid bands, and glue-free attachments. Choose Size 2 diapers if you want the gift to last. Remember the flat diaper cake alternative if time is short. However you build it, you’re giving a stack of necessities disguised as celebration. That’s the whole point.
