
How to Use Diaper Genie Classic | The Step Most Parents Miss
This post contains affiliate links. As an Amazon Associate, we learn from qualifying purchases
To use a Diaper Genie Classic, open the lid, push the soiled diaper through the internal clamp, close the lid, and twist the handle to seal the diaper inside a continuous plastic bag. The system traps odor by creating individual, twisted pouches. Success hinges on loading the refill cartridge correctly and ensuring the diaper passes completely through the clamp before twisting.
That clamp is the whole machine. It’s a spring-loaded gate that holds the bag open while you stuff a diaper through, then pinches shut to keep the smell locked inside the chamber while you twist the handle. If a diaper corner catches on the clamp, the seal fails and the nursery smells like a locker room by morning.
What follows is the full breakdown: how the mechanism actually works, the five-step disposal cycle with the step everyone skips, how to load refills without a tangle, and what to do when the thing jams. By the end, you’ll know the difference between a proper twist and a broken bag.
Key Takeaways
- The twist-tie clamp must close completely over the bag after each diaper is inserted; if it doesn’t, odor escapes immediately.
- Always push the diaper completely through the clamp until you feel it drop, stopping halfway is the main cause of jams.
- Load the refill cartridge with the bag’s sealed end down and the loose end fed through the clamp; getting this backward means the bag won’t advance.
- The deodorizing cartridge is not optional for the Classic model; it fits in a slot under the lid and needs replacement every 1-2 months.
- The system works only with official Playtex Diaper Genie Classic refills; generic bags are often too thin and tear during the twist.
How the Diaper Genie Classic Works
The Diaper Genie Classic isn’t a simple trash can. It’s a mechanical odor-trapping system that relies on a continuous plastic film bag and a twisting mechanism. You feed a diaper into an open clamp, close the lid, and turn a handle. That handle rotates a mechanism that twists the bag above the diaper, sealing it into an individual pouch, and then advances fresh bag material for the next use.
The system creates a chain of linked, twisted pouches, like sausage links, each containing one diaper. The twisting action and the clamp together create an airtight barrier that locks odors inside the plastic, not just inside the pail.
The real magic is in the clamp. When the lid is open, the clamp jaws are apart, held open by a lever. This lets you push the diaper into the bag chamber. Closing the lid releases that lever, allowing the spring-loaded clamp to snap shut, pinching the bag material closed between the diaper you just added and the next clean section of bag. This pinch is what keeps the chamber sealed. If the clamp doesn’t close fully because a diaper tag or corner is in the way, the seal is broken.
What You’ll Need Before You Start
You can’t run the system without the right supplies. This isn’t a place to improvise.
| Item | Purpose | What Happens If You Skip It |
|---|---|---|
| Diaper Genie Classic Pail | The main unit housing the mechanism. | Obviously, you need the pail. |
| Playtex Diaper Genie Classic Refills | The continuous bag cartridge. | Generic bags often jam or tear. The mechanism relies on the specific thickness and perforation of the official bags. |
| Diaper Genie Deodorizing Cartridge | Fits in a slot under the lid to neutralize odors in the bag chamber. | The nursery will develop a faint, persistent sour smell within a week, even with proper twisting. |
| Scissors | To cut the twisted chain of diapers when the bag is full. | You’ll struggle to remove the full bag, likely breaking the seal and releasing the concentrated odor. |
The deodorizer is the most commonly forgotten part. It slides into a dedicated slot on the underside of the hinged lid. If your nursery has a faint smell lingering around the pail, check that slot first, it’s probably empty.
Initial Setup and Bag Installation
If your pail is new or empty, you need to load a refill. This is where most operational problems begin.
- Open the pail and remove the inner bucket. Lift the lid and pull out the plastic inner bucket. You’ll see the twist-tie clamp mechanism at the top.
- Take the refill cartridge. Remove it from its packaging. One end is a sealed disc (the bottom of the future bag). The other end is a loose tail of plastic film.
- Place the cartridge. Drop the cartridge into the inner bucket with the sealed disc end down. The loose tail should be pointing upward.
- Thread the bag. Pull the loose tail of the bag up through the center of the clamp mechanism. Keep pulling until about 6 inches of bag emerges from the top of the clamp.
- Close the clamp. With the bag tail through it, close the clamp by pushing the lever or button (this mimics the lid closing). You should hear it click shut, gripping the bag.
- Replace the inner bucket. Carefully place the loaded bucket back into the pail, ensuring the bag tail isn’t caught on the sides.
- Tie the starting knot. Pull the bag tail up and tie it into a simple overhand knot. This knot sits outside the pail and is what you’ll hold onto when you eventually remove the full bag chain.
Common mistake: Loading the cartridge with the loose end down. If you do this, the bag cannot feed up through the clamp, and the mechanism will simply spin empty air when you twist the handle.
If you’re replacing an old bag, you must cut and remove the full chain of diapers first. Pull the chain up by the starting knot you tied, cut it off below the knot with scissors, and discard the full bag. Then follow the steps above to install bags for a fresh start. For visual guidance, our step-by-step setup guide covers this in detail.
The 5-Step Diaper Disposal Cycle
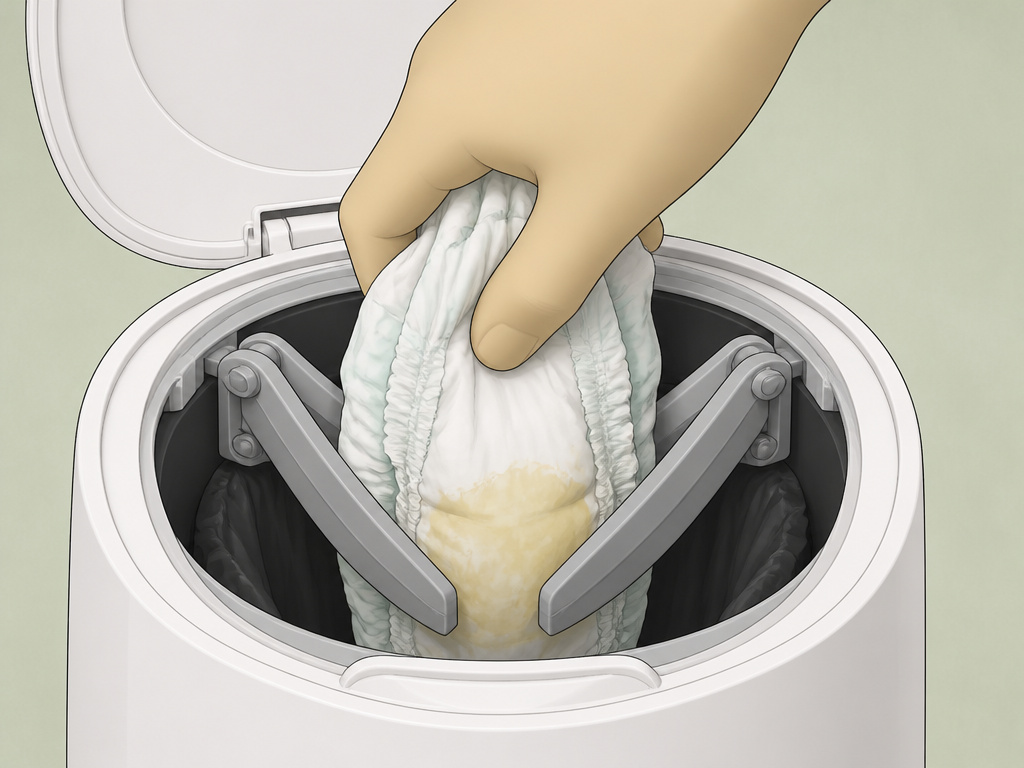 This is the daily routine. Do it right every time, and the pail is silent and smell-free. Miss one detail, and it complains.
Step 1: Open the Lid.
Lift the lid fully. You’ll hear a faint click as the internal mechanism releases, forcing the twist-tie clamp to open. Wait for it to open completely. If the lid feels stuck, don’t force it, something is jammed inside.
Step 2: Insert the Diaper.
Place the soiled diaper onto the open clamp. Now, push it straight down. Don’t drop it. Don’t toss it. Use the heel of your hand to shove the diaper through the open jaws until you feel it drop freely into the bag chamber below. This is the critical step. If the diaper is resting on the clamp when you close the lid, it will prevent the seal.
Step 3: Close the Lid.
Firmly close the lid until it latches. This action releases the lever, allowing the spring-loaded clamp to snap shut over the clean section of bag, pinching it closed between the new diaper and the bag tail.
Step 4: Twist the Handle.
Rotate the handle on the front of the pail 5-7 times, or until you hear a ratcheting sound stop. This action twists the bag material above the new diaper, creating the sealed pouch, and advances fresh bag from the cartridge up into the chamber. The used diaper is now locked in its own odor-proof compartment.
Step 5: Verify the Seal.
Briefly open the lid again (just a crack) and look inside. You should see a neatly twisted segment of bag above the clamp, and a fresh, open section of bag ready for the next diaper. If you see a diaper still visible or caught in the clamp, the seal failed. Close the lid and give the handle a few more twists.
Most common problems, jamming, bad smells, the handle not turning, stem from Step 2. The diaper didn’t clear the clamp. Developing the muscle memory to push through until you feel the drop fixes 80% of issues.
Maintenance and Odor Control
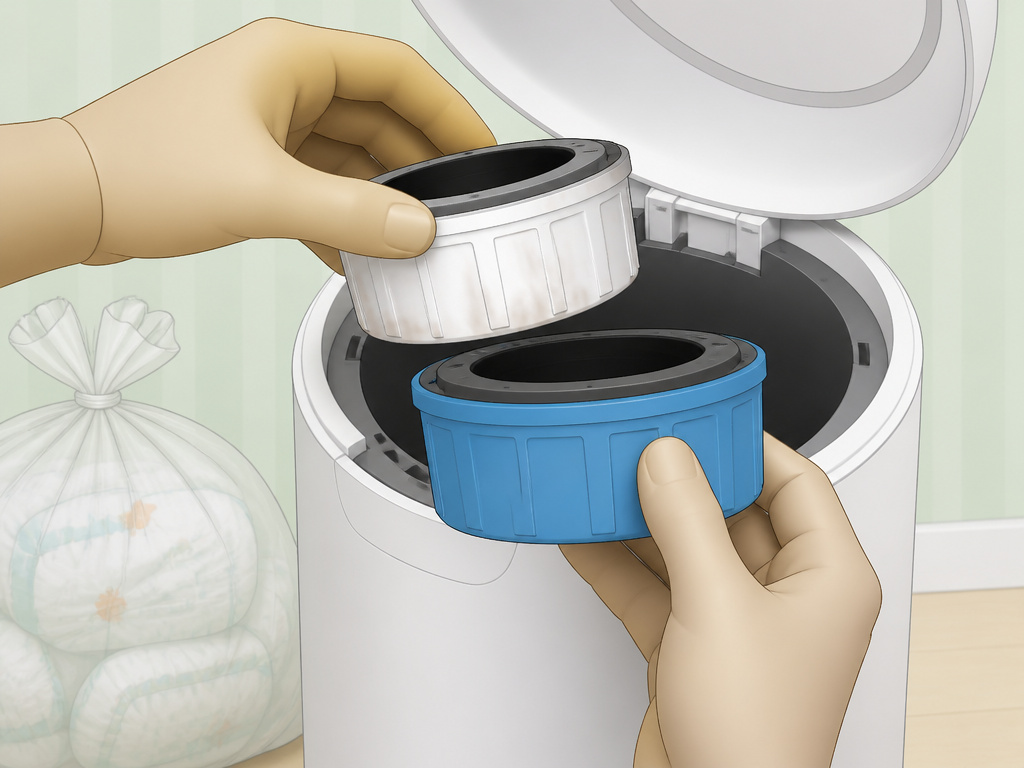 The Diaper Genie Classic needs a little upkeep to stay fresh. It’s not a set-and-forget appliance.
Regular Tasks:
- Deodorizer Cartridge: Check the slot under the lid monthly. The blue gel will fade to white when exhausted. A spent deodorizer won’t harm the mechanism, but it will lose the fight against ammonia smells. Swapping it is part of any good refill and deodorizer process.
- Exterior Wipes: Wipe down the outside of the pail and the lid with a disinfectant wipe weekly. Diaper cream and little hands leave residue.
- Inner Bucket Rinse: When you change the bag, take the empty inner bucket to the sink and rinse it with warm water and a dash of dish soap. Let it air dry completely before reloading. This prevents a sticky film from building up.
When the Bag is Full:
The pail holds about 25-30 newborn diapers. You’ll know it’s full when the handle becomes very hard to twist, or diapers are visibly packed near the top. 1. Open the lid. 2. Pull the entire chain of diapers up by the starting knot you tied. 3. Use scissors to cut the chain off below the knot. 4. Tie the new end of the dangling bag into a knot to seal the full chain. 5. Dispose of the sealed chain. You can now reload a fresh cartridge.
> Where this goes sideways: Letting the pail get overfull. Once the bag chamber is packed tight, the twisting mechanism can’t work. The handle will lock up, and you’ll have to manually cut and remove diapers to relieve the pressure, which almost always breaks the odor seal.
For persistent smells, a deep clean is needed. Remove the inner bucket and the refill cartridge. Wash the bucket. Then, inspect the clamp area inside the pail itself. Use a cotton swab dipped in vinegar or rubbing alcohol to clean the clamp jaws and the surrounding channel where the bag runs. Built-up residue here can hold odor and cause the bag to stick.
Diaper Genie Classic vs. Other Pail Types
The Classic is a specific tool. It’s not the right choice for every situation, especially if you use cloth diapers.
| Pail Type | How It Works | Best For | Drawback |
|---|---|---|---|
| Diaper Genie Classic | Continuous bag twisted into individual pouches. | Parents who want strong odor control for disposable diapers and don’t mind buying proprietary refills. | Requires specific refills. Mechanism can jam if not used correctly. |
| Step-Can Pails (e.g., Ubbi) | Simple metal pail with a sealing lid. Uses any standard kitchen trash bag. | Parents who want flexibility, use cloth diapers, or dislike proprietary bags. | Odor can escape when the lid is opened, as there’s no internal sealing. |
| Advanced Air-Tight Systems (e.g., Diaper Genie Platinum) | Motorized system that wraps each diaper in film automatically. | Parents who want maximum convenience and are willing to pay a premium for it. | More expensive. More complex, so more can break. Still uses proprietary refills. |
The Classic wins on proven, mechanical odor control without batteries or motors. The Ubbi and similar cloth diaper pails win on cost-per-use and bag flexibility. If the Classic’s mechanism feels like too much work, a simple sealed diaper trash can might be a better fit for your routine.
Frequently Asked Questions
Why won’t my Diaper Genie Classic lid close?
The diaper is almost certainly caught in the twist-tie clamp. Open the lid, reach in, and push the offending diaper completely down into the bag chamber. You may need to use a pen to poke it through if it’s tightly wedged. Never force the lid shut.
Can I use generic bags in the Diaper Genie Classic?
You can try, but you shouldn’t. The mechanism is calibrated for the thickness and perforation strength of official Playtex refills. Generic bags are often thinner and tear during the twisting process, causing a mess and releasing odor. They also jam more frequently.
How often should I replace the deodorizer?
Replace the deodorizing cartridge every 1-2 months, or as soon as the blue gel crystals turn completely white. It’s a consumable part, not a permanent filter.
My handle turns but the bag doesn’t twist. What’s wrong?
The bag is likely not threaded through the clamp correctly, or the refill cartridge is empty. Open the pail, remove the inner bucket, and check that the bag is securely gripped by the clamp and that there is still film left on the cartridge. This is a core part of understanding the basic operation.
How do I get rid of a bad smell coming from the pail?
First, replace the deodorizer. If the smell persists, the inner bucket or the clamp area needs cleaning. Remove the bucket and any bag, wash the bucket with soapy water, and use a cotton swab with vinegar to clean the clamp jaws inside the pail itself. For a full reset, follow our guide on how to deodorize a diaper pail.
Is the Diaper Genie Classic hard to assemble?
No. Most of the assembly is just snapping the foot pedal onto the base and placing the inner bucket inside. The only tricky part is the initial bag loading, which takes two minutes once you know how.
Before You Go
The Diaper Genie Classic is a workhorse. It controls smell through simple mechanics: a clamp, a twist, and a continuous bag. Your job is to load the refill correctly and push each diaper fully through the gate. Do those two things, and it runs for years. Forget them, and you’ll be wrestling with jams and wondering why the nursery smells. For disposable diapers, it’s still one of the most effective odor-locking systems you can buy. Just feed it the official refills it was designed for.
