
Understanding How a Diaper Genie Works and the Issue It Ended
This post contains affiliate links. As an Amazon Associate, we learn from qualifying purchases
A Diaper Genie works by using a foot pedal to open a internal clamp, through which you push a soiled diaper. The system then wraps that diaper in a scented, 7-layer plastic film and twists the film above it, creating an individual odor-locked pouch. A full bag of these pouches, the “diaper sausage”, is removed by cutting the film, tying it off, and disposing of the sealed bundle.
That wrapping-and-twisting action is the entire point. It’s the solution to a problem so persistent it shows up in patent documents from competing brands, which repeatedly cite the “major inconvenience” of earlier systems that required manually tying knots. The Diaper Genie automates the seal.
What follows is not just a description of the steps. It’s a look inside the mechanism that makes those steps possible, the one part that breaks first, and the two things most owners never do that guarantee the smell comes back.
Key Takeaways
- The core mechanism is a set of internal clamps that grab and twist the plastic film above each diaper, creating an individual seal. This is the patented fix for manual knot-tying.
- The 7-layer refill film is a barrier, not just a bag. It’s designed to lock in moisture and odor; using generic bags defeats the system.
- The carbon filter isn’t for the sealed diapers. It scrubs the air in the head space of the pail between uses. Replace it every 3 months or it becomes inert.
- If the lid won’t open or the diaper won’t push through, the pail is almost certainly full. Forcing it risks jamming the spring-loaded clamps.
- Model matters. The Diaper Genie Complete has a removable canister for easier cleaning. The Classic requires disassembly.
The Core Mechanism: Clamp, Film, and Twist
Forget the foot pedal and the outer lid for a second. The real work happens inside the black plastic head of the unit. When you press the pedal, you’re activating a simple lever that opens two spring-loaded clamps. These clamps normally hold the tail of the plastic film from the refill cartridge tightly closed.
The Diaper Genie system uses a rotating clamp mechanism to twist the flexible film above each deposited diaper, forming an individual odor-locked pouch. This automated twist replaces the manual knot-tying required by earlier disposal pails, a process cited in U.S. Patent 7434377B2 as a “major inconvenience.”
You push the diaper through these open clamps. When you release the pedal, the clamps snap shut below the new diaper, but above all the previously deposited diapers. Here’s the critical bit: as the clamps close, a geared mechanism inside the head rotates them one full turn. This rotation twists the film tightly, sealing the new diaper into its own isolated chamber of film below the clamps. The old “diaper sausage” is pushed further down into the pail.
This is the innovation. Competing patents from the early 2000s, like those from Munchkin Inc., explicitly frame their own designs as solutions to the hassle of “Diaper Genie™ type pails” where “it is necessary to manually tie both ends of the tubing.” The automatic twist was the fix.
The 7-Layer Film: More Than a Plastic Bag
The refill isn’t just a roll of plastic. It’s a multilayer film with barrier technology. The official manuals call it a 7-layer film engineered to “lock in germs.” This isn’t marketing fluff. The layers typically include: * A scent layer (that baby-powder smell). * A strength layer to resist puncture. * Barrier layers to prevent odor molecules and moisture vapor from passing through.
Using a standard kitchen trash bag or a non-Diaper Genie brand refill compromises this barrier. Odor will seep out because the film isn’t designed to contain the specific gases and moisture from decomposing diaper contents. The system is only as good as its weakest seal.
Step-by-Step: From Diaper to “Diaper Sausage”
Let’s walk through a full cycle with a Diaper Genie Complete, the model that best shows the process.
- Insert a Diaper: Press the foot pedal to open the lid and the internal clamps. Drop in a soiled diaper (rolling it first helps). Release the pedal. You’ll hear a faint whirring or click as the clamps twist shut.
- The Seal Forms: Inside, the twisted film now encapsulates that diaper. The weight of the new diaper pushes the previous, already-sealed diaper further down into the collection canister.
- Repeat: This happens 270 times (if using newborn-sized diapers, per the manual).
- Empty the Pail: When the pail is full or the lid becomes hard to open, press the canister release button. Pull the entire inner canister out.
- Cut and Tie: Reach in, grab the film above the stack of diapers, and pull up several inches. Feed this film into the built-in cutter, a plastic slot with a sharp edge, and pull up to cut. Tie the cut end into a knot. You now have a sealed chain of diapers, the “diaper sausage,” ready for disposal.
- Restart the System: After removing the full bag, you must knot the fresh film tail left in the clamps and pull it down to the bottom of the empty canister. This “primes” the system. Missing this step means the next diaper has no film beneath it to be sealed in.
Where this goes sideways: Not pulling enough fresh film down after emptying. If the film is taut, the next diaper stretches it and the twist can’t seal fully. Odor escapes within hours.
The Carbon Filter’s Real Job
That little charcoal disc in the lid isn’t cleaning the air inside the sealed diaper pods. That’s the film’s job. The carbon filter cleans the air in the head space, the area between the lid and the top of the diaper stack, every time you open and close the pail. It catches residual odors that escape during the half-second the clamps are open.
The manual for the Diaper Genie Complete states: “Replace carbon filter, every 3 months or when they lose effectiveness.” After three months, the charcoal pores are saturated. The filter stops working and you’ll notice a smell when you’re near the closed pail. It’s a maintenance item, not a permanent fixture.
Diaper Genie Models: Complete vs. Classic vs. Platinum
The core clamp-and-twist mechanism is consistent, but the execution changes. Your user experience depends on which model you have.
| Model | Key Differentiator | Best For | Common Gripes |
|---|---|---|---|
| Diaper Genie Complete | Removable inner canister. | Easy cleaning. No lifting the heavy, full pail. | The canister can detach from the main body if bumped. The manual says this is normal. |
| Diaper Genie Classic | Original twist-top design. | Lower upfront cost. Simpler mechanics. | Requires manual twisting of the lid 2-3 times per diaper. The full bag is removed from the bottom. |
| Diaper Genie Platinum | Hands-free motion sensor lid. | Ultimate convenience, germ avoidance. | Battery dependency. More electronic parts to potentially fail. |
The Diaper Genie Classic is the one most people picture. You open the lid, put the diaper in a mouth, close the lid, and twist a rim 2-3 times. That twisting action manually rotates the film cartridge, creating the seal. It’s more manual labor but has fewer mechanical parts to break. The Platinum replaces the foot pedal with a motion sensor, but the internal sealing process is identical to the Complete.
If you need to set up a new pail or assemble one after cleaning, the process is straightforward but has one non-negotiable step. For the Complete, you must press the front two snap areas on each side of the head until you hear “an audible snap.” If you don’t hear it, the head isn’t secure and the clamps won’t align.
What Breaks (And How to Fix It)
 These are appliances with moving parts. They fail in predictable ways.
- The Lid Won’t Open: This is almost always because the pail is overfull. The column of sealed diapers has risen so high it’s pressing against the closed clamps, creating too much pressure for the pedal mechanism to overcome. Solution: Empty the pail. If it’s not full, check for a film jam.
- Film Jam / Diaper Won’t Push Through: A diaper got caught sideways or the film spool tangled inside the refill cartridge. Solution: Open the canister, clear the obstruction, and re-thread the film. You may need to change the bag entirely.
- Weak or No Twist: The internal gears that rotate the clamps are either worn, jammed with hardened film residue, or broken. Solution: This often requires disassembling the head for cleaning. If a plastic gear is stripped, Playtex typically does not sell individual parts, they recommend full unit replacement.
- Persistent Odor: First, check the carbon filter. Is it older than 3 months? Replace it. Second, are you using official Diaper Genie refills? Third, did you clean the inner canister? Biofilm builds up. Wipe it down with a disinfectant monthly.
The part nobody mentions: The spring that tensions the internal clamps can fatigue. After a few years, it may not close the clamps with enough force to create a tight twist. This leads to slow, insidious odor leaks. It’s the most common reason for a pail that “just doesn’t work like it used to.”
For most issues, a thorough clean and a fresh refill the Diaper Genie cycle will solve it. For mechanical failures, our guide on how to fix common issues with your pail walks through deeper diagnostics.
Why the System Beats a Trash Can
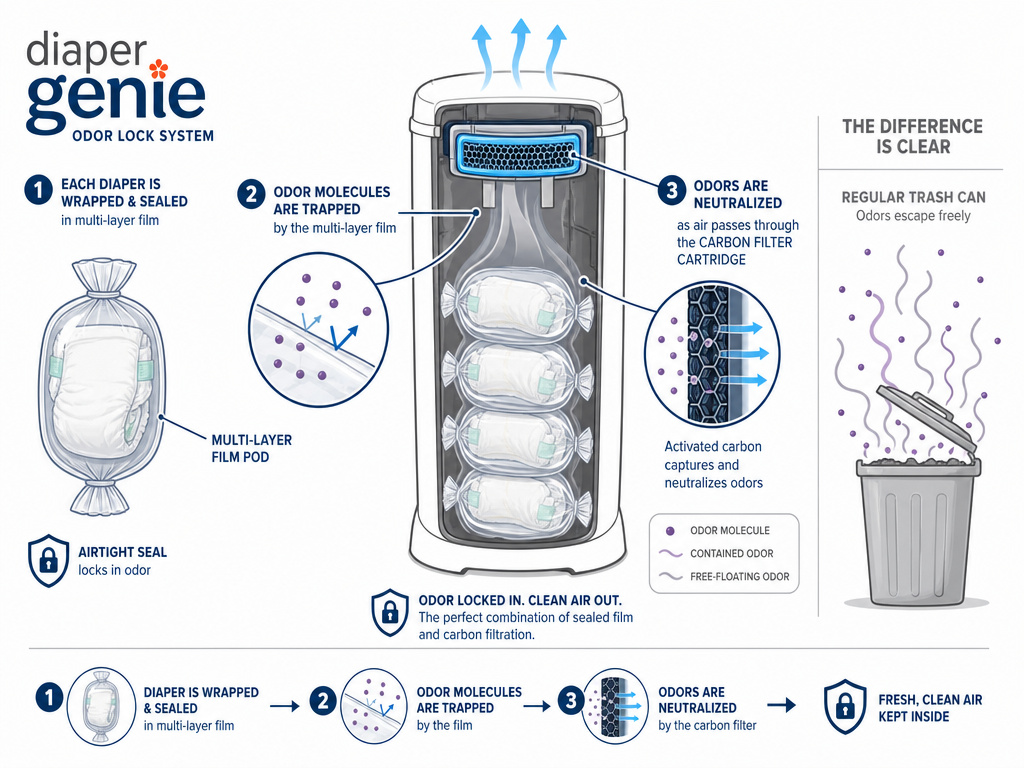 It’s about containment versus collection. A trash can collects diapers, allowing odors and bacteria to mingle and spread into the room air. The Diaper Genie isolates each diaper in an impermeable film, creating a physical barrier. This is why you can store a week’s worth of diapers in a nursery without overwhelming smell, if the system is maintained.
The carbon filters provide a second stage of defense for ambient air. It’s a two-tiered approach: seal the source, then scrub any escapees. This is also why you shouldn’t use the pail for non-diaper waste like food scraps. The acids and bacteria can differ and degrade the film or overwhelm the filter faster.
Frequently Asked Questions
How many diapers fit in a Diaper Genie?
Standard Diaper Genie bag holds up to 270 newborn-sized diapers, as stated in the official manual. For larger sized diapers (like size 3 or 4), count on roughly 180-200. The pail itself will feel full and resist opening well before you hit the theoretical max.
Can you use any bags in a Diaper Genie?
No. You must use Diaper Genie refills designed for your specific model. The width, thickness, and spool core size are precise. Off-brand or generic bags may not feed correctly, are more prone to tearing, and lack the 7-layer odor barrier. They void the point of the system.
How often should you empty it?
Empty the pail every 5-7 days, or when the lid becomes difficult to open. Even with perfect seals, microbial activity continues inside the pods. Letting a full “diaper sausage” sit for weeks can lead to potent smells when you finally cut the film.
How do you stop the Diaper Genie from smelling?
Follow this checklist: 1) Replace the carbon filter every 3 months. 2) Use only official refills. 3) Wipe the inner canister with a disinfectant every time you empty the pail. 4) Ensure you pull enough slack film after each bag change so the clamps aren’t straining. Odor is almost always a maintenance failure.
What’s the difference between the Diaper Genie and a Diaper Dekor?
The mechanism is different. The Diaper Dekor uses a cartridge system that drops each diaper into a long, continuous bag without individual twists. You press a pedal to advance the bag and create a new compartment. It’s often quieter and has fewer mechanical parts, but some users report less effective odor containment over time compared to the Genie’s individual seals.
The Bottom Line
The Diaper Genie works because it automates a seal. That simple twist, driven by a spring and a few plastic gears, is what separates it from a glorified trash can. Its entire value hinges on that mechanism staying clean, tensioned, and fed with the correct film.
Ignore the carbon filter schedule or use cheap bags, and you’ve bought an expensive, complicated bin. But follow the manual, replace the filter quarterly, clean the canister monthly, and install bags correctly, and it does exactly what it promises: it makes a messy, smelly problem disappear. For most parents, that’s worth the price of the refills.
