
Diaper Genie Platinum: How to Empty It the Right Way | Tips
This post contains affiliate links. As an Amazon Associate, we learn from qualifying purchases
To empty a Diaper Genie Platinum, press the front canister button to tilt the pail open, pull the filled bag up through the internal cutter to separate it, tie it off, and install a fresh length of film from the refill. The process hinges on three things: emptying at the three-quarters-full mark, using the built-in cutter correctly, and ensuring the new film is pulled taut to the bottom to engage the odor-sealing clamps.
The “three-quarters-full” mark isn’t a suggestion. It’s the point where the foot pedal starts to resist and the lid seal weakens. Waiting for the manufacturer’s stated 47-diaper capacity strains the spring latch and lets ammonia smells leak into the nursery within a day.
What follows: an eight-step walkthrough with the timing most parents skip, the two warranty-voiding mistakes, and the fix for a lid that won’t click shut.
Key Takeaways
- Empty the pail when it’s three-quarters full, not completely full. This prevents overstuffing, which jams the mechanism and breaks the odor seal.
- Always use the built-in shielded cutter to separate the bag. Scissors or tearing can misalign the film and cause the next bag to fail.
- Pull the new film taut to the bottom of the pail after tying the knot. Slack film prevents the internal clamps from sealing, which is the main cause of persistent smells.
- Replace the carbon filter every 3 months, as per the Diaper Genie Complete manual. A spent filter stops working, no matter how fresh your bag is.
- The one-year limited warranty does not cover damage from overstuffing or improper assembly. Keep your receipt.
When Is It Actually Time to Empty?
The Diaper Genie Platinum holds up to 47 newborn diapers. If you wait for that number, you’ve waited too long.
Where this goes sideways: Waiting for the “full” indicator. The foot pedal gets stiff by the 35th diaper, the lid doesn’t seal tightly, and odors escape within 12 hours.
The physical signs arrive before the capacity light. The foot pedal requires more pressure. The lid sits a millimeter proud and doesn’t latch with its signature click. You might see a slight bulge in the stainless steel body. These are the pail’s signals that the bag sausage is pressing against the internal clamps, compromising the seal.
For a newborn, this point hits every 2 to 3 days. For an older baby with fewer changes, it might be weekly. The community-driven rule is to empty at the three-quarters-full mark. This isn’t just about neatness; it’s about preserving the spring mechanism and the warranty. The Diaper Genie warranty explicitly excludes damage from “abnormal use,” which their adjudicators can interpret as chronic overstuffing.
The 8-Step Emptying Process (With Photos)
Gather a new trash bag and a disinfectant wipe. Do this near your main trash can.
Step 1: Press the Canister Release Button
Locate the large, round button on the front of the pail, just below the lid. Press it firmly. The entire inner canister will tilt forward, separating from the main body. This gives you access to the long, filled bag of diapers inside.
Skip this, and you’ll struggle to pull the bag free, likely tearing it above the cutter.
Step 2: Pull the Bag Up to Expose Film
Reach into the open canister and grasp the plastic film above the knotted top of the filled diaper bag. Pull upward to draw more film out of the refill cartridge. You need about 12 inches of clean film above the cutter to work with.
Step 3: Thread Film Through the Cutter
Guide the loose film into the slot of the built-in, shielded cutter on the side of the canister opening. The cutter is a small, gray plastic piece with a slot.
Common mistake: Using scissors. The cutter is designed to leave a clean edge and proper tail length for the next bag. Cutting elsewhere misaligns the entire refill.
Step 4: Cut and Remove the Full Bag
Pull the film gently and firmly upward. The blade will slice through it cleanly. The filled bag of diapers is now detached. Lift it out of the canister and set it aside.
Step 5: Tie Off the Full Bag
Double-knot the top of the bag you just removed. This contains odors immediately. Dispose of it in your main outdoor trash.
Step 6: Prepare the New Bag
You now have a fresh tail of film coming from the refill. Tie a knot at the very end of this film.
Step 7: Seat the New Film
Press the foot pedal to open the internal clamps inside the pail. Take the knotted end of the new film and push it down through the center hole of the clamps. Pull it all the way to the bottom of the empty pail. This step is non-negotiable.
If you leave slack, the clamps cannot grab and seal the film after each diaper insertion. This is the number one reason for odor complaints. For a secure seal, you must follow a precise diaper genie bag installation each time.
Step 8: Close and Reset
Release the foot pedal to let the clamps close on the film. Push the inner canister back into the main body until it clicks shut. Wipe the exterior with a disinfectant cloth.
Troubleshooting Common Problems
The process is simple until it isn’t. Here are the fixes for when things go wrong.
| Problem | Likely Cause | Immediate Fix |
|---|---|---|
| Lid won’t click shut | Overfilled bag jamming latch; debris in spring. | Empty the pail. Inspect the latch area for stray wipes or film. |
| Persistent odor | Old carbon filter; slack film; bag not tied. | Replace carbon filter. Re-seat film tightly. Double-knot bag. |
| Cutter doesn’t cut | Film jammed in slot; dull blade. | Clear debris with a dry cloth. Don’t use lubricant. |
| Foot pedal is stiff | Overfilled pail; mechanical strain. | Empty immediately. Check for obstruction under pedal. |
| Canister won’t open | Release button not fully engaged. | Press button harder while tilting canister forward. |
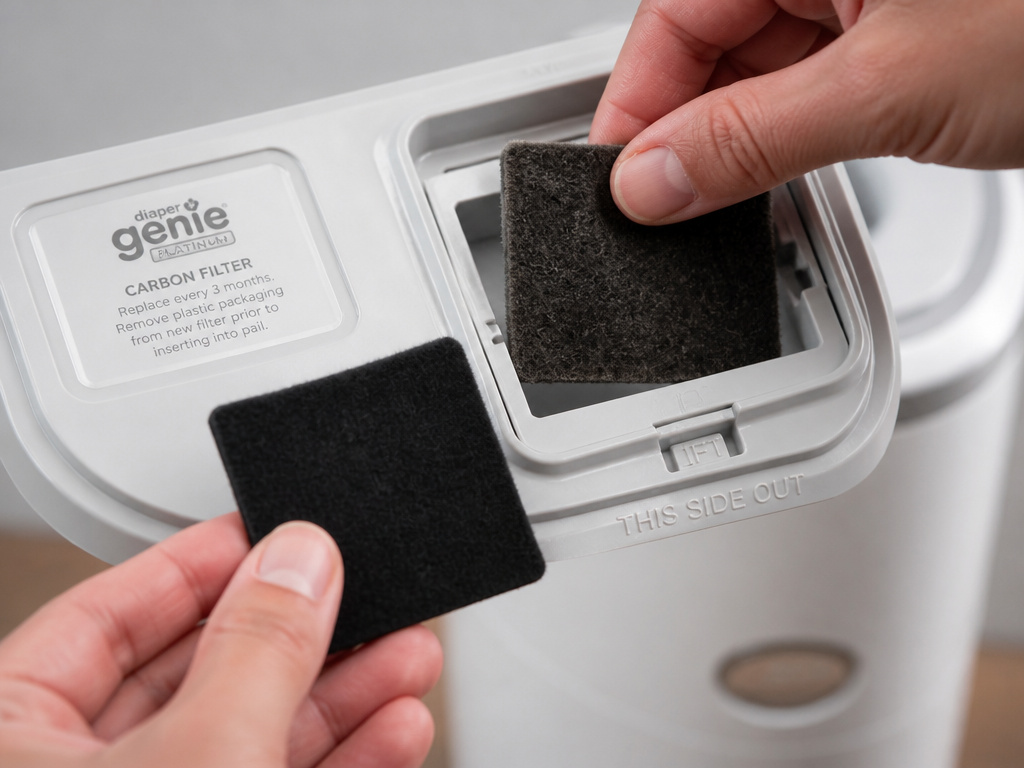
The part nobody mentions: The carbon filter. That little charcoal square in the lid isn’t decoration. Per the Diaper Genie Complete manual, you must replace the carbon filter every 3 months or when it loses effectiveness. A clogged filter can’t absorb gases, so smells bypass the bag seal entirely. It’s a $10 part that changes everything.
If your problems persist after these checks, you may need a deeper diaper genie troubleshooting session for mechanical issues.
The Odor-Control System (And Why It Fails)
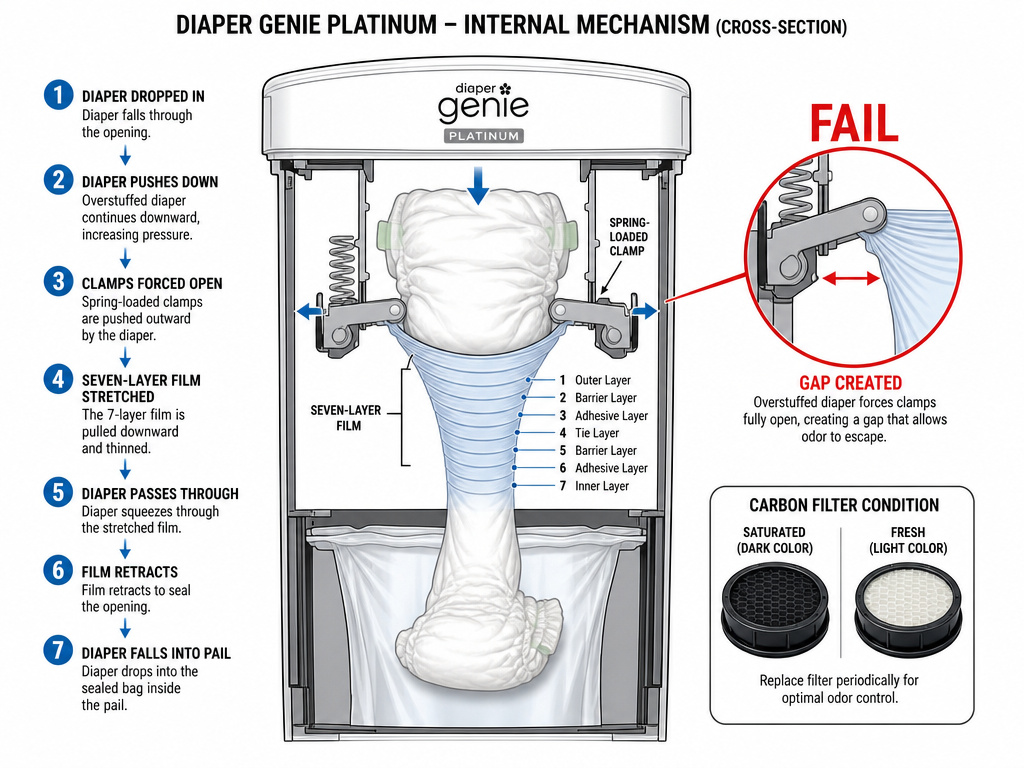
The Diaper Genie Platinum doesn’t just bag diapers. It seals them in a seven-layer film with an odor-locking barrier, then uses spring-loaded clamps to create an airtight chamber. Understanding this diaper genie mechanics is key to maintaining it.
The failure chain is predictable: 1. Overstuffing stretches the film, forcing the clamps open. 2. Slack film prevents the clamps from closing fully after a diaper is inserted. 3. An old carbon filter saturates and stops absorbing ammonia and sulfur gases. 4. Result: odors permeate the nursery within a day.
The system works only if all parts are in spec. That’s why the three-quarters-full rule and the 3-month filter change aren’t optional optimizations. They are the spec.
Maintenance Beyond Emptying
Emptying the bag is the main task, but two other routines keep the pail functioning for years.
Monthly Wipe-Down: Every few weeks, after emptying, wipe the interior canister, the cutter slot, and the lid’s inner rim with a disinfectant wipe. Remove any sticky residue or dust. This prevents grime from hardening and interfering with the moving parts.
Quarterly Filter Swap: Mark your calendar. The carbon filter behind the lid grill has a finite capacity. After 90 days of continuous use, it’s mostly done. Swapping it is a 30-second task: pop the old one out of its holder and slide a new one in. This single step resolves more vague odor issues than any other.
For a thorough refresh, a periodic deep cleaning of the entire unit is wise, especially before storing it or using it for a new baby.
What About the Warranty?
The Diaper Genie Platinum carries a one-year limited warranty for manufacturing defects. It’s a residential-use-only warranty for the original owner in the USA and Canada, and it’s non-transferable.
It does not cover damage from overstuffing, improper assembly, or “abnormal use.” If you force a lid closed on an overstuffed pail and break the latch, that’s on you. If you don’t assemble the diaper genie correctly per the manual and a part fails, that’s also not covered.
Keep your sales receipt. To make a claim, you’ll need the model number (UM979846A), purchase date, retailer name, and a copy of that receipt.
Frequently Asked Questions
How many diapers fit before emptying?
The Diaper Genie Platinum holds up to 47 newborn-size diapers. However, for optimal odor control and mechanism health, empty it at the three-quarters-full mark, which is around 35 diapers.
Why does my Diaper Genie Platinum smell immediately?
Check three things in order: 1) Is the new film pulled taut to the bottom so the clamps seal? 2) Is the carbon filter older than 3 months? 3) Did you double-knot the full bag before tossing it? A slack film is the most common culprit.
Can I use off-brand refill bags?
You can, but you shouldn’t. The warranty states that damage from use of non-Diaper Genie refills is not covered. More importantly, the thickness and polymer blend of official refills are designed for the specific cutter and clamp tension. Off-brands can jam, tear, and fail to seal.
How do I clean the cutter if it’s jammed?
Unplug the pail (if applicable) and press the canister button to open it. Use a dry cloth or a cotton swab to clear any stuck plastic film from the cutter slot. Do not use water, oil, or metal tools, as this can damage the blade or housing.
Is the Diaper Genie Platinum hands-free?
The lid operation is hands-free via the foot pedal. Opening the canister to empty it requires pressing the front button with your hand, and loading a new diaper genie refill is a manual process.
Before You Go
Emptying a Diaper Genie Platinum is straightforward: open, cut, tie, reload. The real skill is in the timing and the tension. Empty at three-quarters full, pull the new film tight, and change the carbon filter on schedule. Forget those three things, and you’re just putting diapers in a fancy stainless steel bucket.
Stick to the official Easy Roll refills. Keep your receipt. And if the lid ever sticks, check for an overstuffed bag before you force it. That click is the sound of the seal working.
