
Proper Diaper Genie Assembly for Snap and Snap-Free Units
This post contains affiliate links. As an Amazon Associate, we learn from qualifying purchases
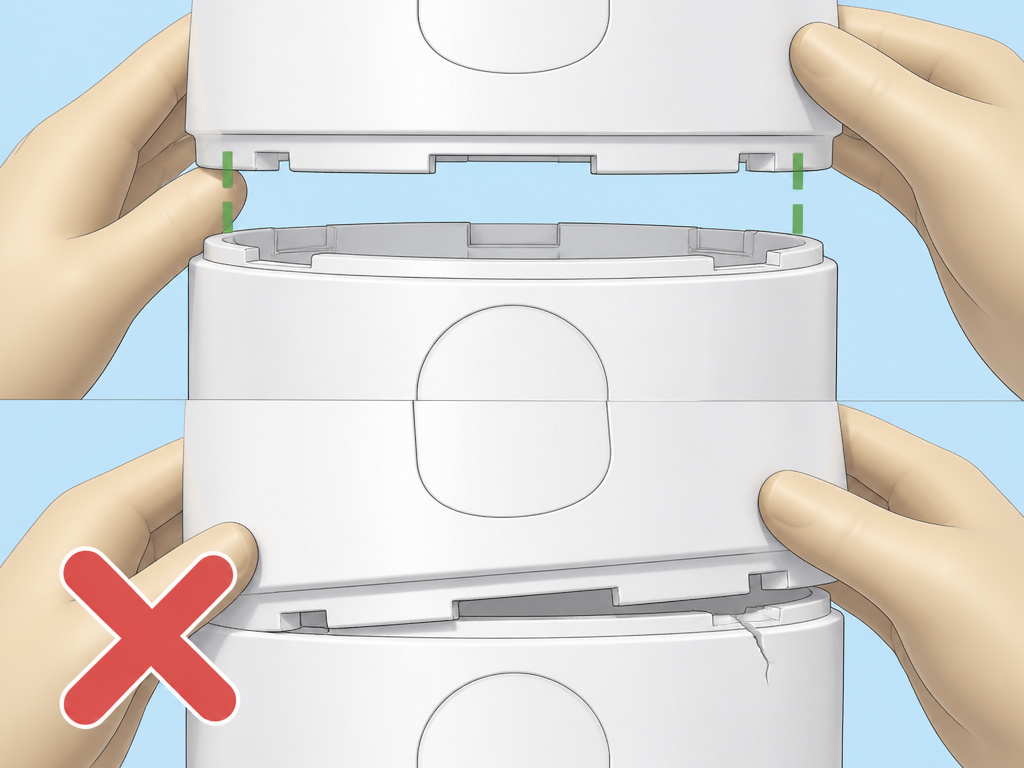
To assemble a Diaper Genie, first identify your model. For the classic “snap-together” version, align the head with the main body and press down firmly on the two front snap areas on each side until you hear an audible click. For newer “fully assembled” models, your only task is to remove the tape adhesive strip from the head. Both models require you to then install the carbon filter and thread the starter bag liner through the center hole before use.
That audible snap is not a suggestion. It’s the manufacturer’s verification point. Miss it, and the internal clamp mechanism sits out of alignment, which can cause the foot pedal to stick or the bag seal to fail within the first week.
What follows is the breakdown the manuals assume you’ll read: the two distinct assembly paths, the one warranty-voiding mistake, and the setup steps that actually matter for odor control. By the end, you’ll know which of the two main Diaper Genie Complete models you have and the five-minute routine to get it sealing diapers correctly.
Key Takeaways
- There are two Diaper Genie Complete models: one requires a physical snap assembly, and newer “fully assembled” versions only need tape removed.
- Incorrect assembly is explicitly excluded from the one-year limited warranty. A broken snap or forced connection is a wear-and-tear issue, not a defect.
- The carbon filter must be installed immediately and replaced every three months to maintain advertised odor control.
- When threading the starter bag, you must pull “a little extra film” from the refill to prevent stress on the internal clamp, a spec directly from the OEM manual.
- A slight visible gap between the canister and the main body on “fully assembled” models is normal and does not affect performance.
The Two Assembly Paths: Snap-Together vs. Fully Assembled
Your first job is to identify which version of the Diaper Genie Complete you have. This isn’t a minor detail. The assembly process, and what counts as a correct setup, is completely different.
The classic model, covered by manual 93014896 (dated 09/01/2015), requires you to physically snap the head onto the main body. The newer “fully assembled” model, covered by manual 93022190 (dated 02/06/17), ships pre-connected. Your only task is to remove a tape adhesive strip.
Where this goes sideways: Assuming all Diaper Genie pails snap together. Forcing the head onto a “fully assembled” model can crack the plastic housing around the clamp mechanism. The repair requires a full unit replacement, as Playtex does not sell individual internal parts like springs or clamps to consumers.
Here’s how to tell them apart at a glance:
| Model Type | Assembly Required | Key Identifier | Primary Manual |
|---|---|---|---|
| Snap-Together | Yes | Head (A) is separate from Main Body (B) in the box. | 93014896_rev03_092815 |
| Fully Assembled | No | Head is already attached; a tape strip runs across the seam. | 93022190_rev02_022117 |
If your pail is out of the box and the head is already firmly attached to the base, you have the “fully assembled” type. Do not try to pull it apart. If the head is loose or packed separately, follow the snap-together instructions.
This initial setup process determines everything that follows, from how you’ll install bags to how you troubleshoot future issues.
Step-by-Step: The Snap-Together Model
For the classic snap-together Diaper Genie Complete, assembly is a three-part sequence: snap, check, filter.
- Align and Press. Place the head (A) on top of the main body (B). Align them evenly. Press down firmly across the top of the head to seat it initially.
- Engage the Front Snaps. Locate the two front snap areas on each side of the head. Press down on these specific points, one side at a time, until you hear and feel a distinct audible snap. This sound is the manufacturer’s confirmation that the internal latch hooks have engaged.
- Consequence if skipped: The head will seem attached but will wobble. The foot pedal linkage won’t engage properly, causing the lid to open sluggishly or the internal clamps to miss the bag film.
- Test the Mechanism. Press the foot pedal (G) several times. The lid (D) and the internal clamps should open and close smoothly. If they bind or stick, the head is not fully seated. Re-check the snap points.
Step-by-Step: The “No Assembly” Model
For the newer “fully assembled” Diaper Genie Complete, the process is about verification, not connection.
- Remove the Tape. Locate the adhesive tape strip that runs across the seam connecting the head (A) to the main body (B). Peel it off completely.
- Check for Detachment. The canister (C) might be loose. If it has detached from the main body, place it back into the base at an angle and push it forward until it clicks into place.
- Understand the Gap. Look at the seam where the canister meets the main body. A slight spacing or gap here is normal. The 2017 manual states this “will not impact product odor performance.” Do not force it closed.
- Test the Mechanism. Press the foot pedal to ensure the lid and clamps operate freely.
With the physical assembly complete, the next steps are identical for both models and are critical for the odor-trapping system to function.
The Non-Negotiables: Filter and First Bag
Assembly isn’t just about plastic parts. The Diaper Genie’s claim to contain smells hinges on two consumables you must install now: the carbon filter and the starter refill bag. Skip either, and the pail is just a decorated trash can.
Installing the Carbon Filter
The carbon filter (H) is a small charcoal-filled packet that absorbs odors as air circulates. It is not optional.
- Remove the filter from its plastic wrapper.
- Slide it into the carbon filter holder (I), which is typically a slot on the side or back of the head.
- Set a reminder. Replace this filter every three months. The manual specifies “or when they lose effectiveness.” In a nursery, assume three months is the maximum. A spent filter smells like nothing, but the room won’t.
The part nobody mentions: That filter holder is designed for a specific Diaper Genie brand filter. Third-party filters that are too thick won’t slide in, and ones that are too thin let unfiltered air bypass the carbon. The fit matters.
Threading the Starter Refill Bag
This is the most common point of user error. The bag isn’t just dropped in; it must be threaded to prepare the internal sealing mechanism.
- Orient the Refill. Ensure the Diaper Genie 7-layer refill (J) is right-side up (the printed side usually faces out). Pull the plastic tab to remove the outer seal.
- Pull and Thread. Pull the clear film up and out of the refill cartridge. Push the end of this film down through the center hole in the pail’s base.
- Knot the End. Tie a single knot at the very end of the film you pushed through. This knot sits below the clamps.
- Secure the Refill. Press the foot pedal to open the lid. Place the entire refill cartridge into the pail and press down slightly so it sits securely. Release the pedal.
- Pull Slack for the Clamp. Press the canister button (F) to open the inner chamber. Grab the knotted film from between the closed clamps and pull it down to the very bottom of the pail.
- Critical Step: The manual instructs you to “Pull a little extra film to prevent stress on the clamp for optimal functionality.” This gives the clamping mechanism enough material to grab and twist without straining. About 3-4 extra inches is sufficient.
You have now completed the initial setup. The system is ready for diapers. To use it, press the foot pedal, drop in a rolled diaper, and release. The operating principle twists the film to seal it.
What “Correct Assembly” Actually Means for the Warranty
 The one-year limited warranty from Edgewell Personal Care is specific about assembly. It’s worth reading because it changes how you should approach a problem.
The warranty does not cover “products assembled incorrectly or subjected to abnormal use.” It also excludes “normal wear and tear, misuse, negligence, improper handling, accident, abuse, neglect, or alteration of the product.”
In practice, this means: * If the plastic snap on a “snap-together” model breaks during your initial assembly, that could be considered a manufacturing defect, if you followed the manual. * If the same snap breaks because you forced the head on sideways, that’s “improper handling” and is not covered. * If the internal clamp fails because you never pulled the extra film and it strained against every diaper, that’s “abnormal use.”
Before you start: The warranty is for the original owner only, requires proof of purchase, and is for residential use. Keep your receipt. If you need to fix something, your first step is to check your assembly against the manual.
TL;DR: Correct assembly is your first line of warranty defense. Document it.
Troubleshooting Assembly and Early Operation
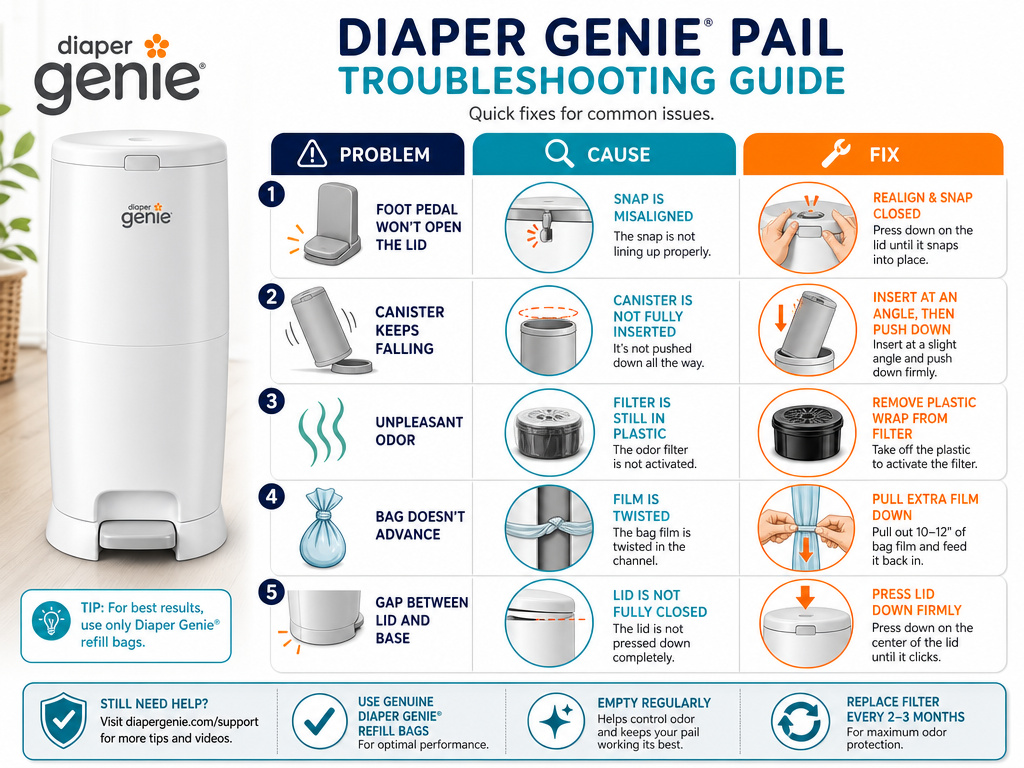 Even with perfect assembly, you might hit a snag in the first few days. Here are the fixes for the most common post-assembly issues.
| Problem | Likely Cause | Immediate Fix |
|---|---|---|
| Lid won’t open with foot pedal. | Head not fully snapped (snap model) or tape residue binding (no-snap). | Re-engage front snaps firmly. Clean tape residue with rubbing alcohol. |
| Canister (inner chamber) falls out. | Not locked into base at the correct angle. | Remove canister, insert at a 45-degree angle, push forward until it clicks. |
| Bad odor immediately. | Carbon filter not installed or still in plastic. | Install or replace filter. Ensure holder slot is clear. |
| Bag doesn’t seal/twist. | Not enough “extra film” pulled during setup. | Empty pail, pull 3-4 more inches of film down, re-knot. |
| Visible gap between canister and body. | Normal on “fully assembled” models. | None needed. This is by design per the 2017 manual. |
If problems persist after these checks, your next resource is the guide on common problems, which delves into jammed mechanisms and refill errors.
Frequently Asked Questions
Do all Diaper Genie models require assembly?
No. Since around 2017, many Diaper Genie Complete models have been sold as “fully assembled.” You only remove a tape strip. Always check the box or manual before forcing parts together.
How tight should the Diaper Genie head be?
For snap-together models, it should be tight enough that there is no side-to-side wobble. The fit is secured by the internal latches, not by crushing the plastic. If you’re applying significant body weight, you’re doing it wrong.
Can I reassemble my Diaper Genie after cleaning?
Yes. The snap-together model is designed to be taken apart for deep cleaning. Just press the release tabs (usually inside the head near the snaps) to detach it. Reassemble by following the original snap procedure.
Why is there a gap between the canister and the base?
On models marked “fully assembled,” a slight gap is a documented normal condition. It does not affect the seal or odor control. Trying to force it closed can misalign the internal components.
What happens if I never replace the carbon filter?
The filter becomes saturated and stops absorbing odors. After about three months, smells will begin to escape from the pail even when it’s closed. It’s a maintenance item, like a water filter.
My model isn’t the “Complete.” Do these steps still apply?
The core principles, securing the head, installing a filter, threading the bag with slack, apply to most Diaper Genie models, including the Classic and Platinum. Always consult your specific model’s manual for details.
Before You Go
Assembling a Diaper Genie is a five-minute task with a two-model rule. Identify yours: snap or no-snap. For the snap version, listen for the click. For the no-snap version, just peel the tape. Then, without fail, install the carbon filter and thread that first bag with extra slack for the clamp.
Those steps, direct from the OEM manuals, are what stand between you and a functional diaper pail. They’re also what protect your warranty. Now you know how to change the bag when it’s full and how to empty the pail safely. The rest is just dropping in diapers.
