
Learn How to Make a Homemade Diaper With a Washable Design
This post contains affiliate links. As an Amazon Associate, we learn from qualifying purchases
To make a homemade diaper, you build a two-part system: a waterproof outer shell and a removable, absorbent inner liner. The outer shell is made from Polyurethane Laminate (PUL) fabric and must be sized to your baby’s thigh and waist measurements. The absorbent core uses multiple layers of flannel, terry cloth, or hemp, and it gets wrapped in a stay-dry liner before being secured inside the shell with snaps or hook-and-loop tape. This design, detailed in a 2014 patent, creates a reusable, washable diaper that can last for 90 changes or more.
That patent isn’t just a drawing. It specifies a “washable diaper” with a liquid-impervious outer article and a detachable inner liner system. Getting those two parts to work together is the whole project. Skip the liner seal, and urine wicks directly onto the baby’s skin within ten minutes — the outer shell contains the mess, but comfort vanishes.
What follows: the exact materials that work (and the one common substitute that fails), a sizing formula pulled from commercial patterns, and the four-step assembly sequence that matches the patent’s function. You’ll also see where most DIY attempts go wrong on the first wash.
Key Takeaways
- The functional homemade diaper is a two-part system: a waterproof outer shell (the “outer article”) and a removable absorbent insert (the “inner liner system”).
- Polyurethane Laminate (PUL) is the only fabric recommended for the outer shell; oilcloth or vinyl will crack and leak after three wash cycles.
- Correct sizing depends on thigh circumference and waist measurement, not just age. A diaper that’s too tight cuts off leg circulation, causing red marks within an hour.
- Always include a stay-dry liner (like microfleece) between the absorbent layers and the baby’s skin. Without it, moisture stays against the skin and increases diaper rash risk significantly.
- Homemade diapers are a significant time investment. Sourcing materials, cutting, and sewing one diaper takes about 90 minutes. For a full stash of 24 diapers, that’s a 36-hour project.
Why the Patent Design Beats a Simple Fold
Most online tutorials for a homemade diaper show you how to fold a towel or a t-shirt. That’s a temporary emergency solution, not a reusable product. The folded-towel method lacks a waterproof barrier and a secure fit. It will soak through onto clothes and blankets in under 30 minutes.
The washable diaper design from the 2014 patent works because it separates containment from absorption. The outer article is a single layer of liquid-impervious material, like nylon or PUL. Its only job is to stop leaks. The inner liner system — a stack of absorbent material wrapped in a liner — does the soaking. They attach with snaps or hook-and-loop, so you can reuse the shell multiple times by swapping in a clean, dry insert.
A 1990 industry analysis noted that reusable diapers have a life of about 90 uses. A well-sewn homemade diaper from durable materials should meet or exceed this benchmark.
This separation is why modern cloth diapers work. It also makes laundry easier. You can strip the soiled inserts from the shells before washing, which leads to cleaner results. Understanding this core principle is more important than any single sewing step.
Gather Your Materials and Tools
You cannot substitute just any fabric here. The wrong material will fail in predictable ways, usually after you’ve spent hours sewing it. The list below is specific because those specs are what make the system function.
Fabric (Non-Negotiable Specs):
- Outer Shell: Polyurethane Laminate (PUL) fabric, 2.0 oz weight. This is a knit polyester with a waterproof polyurethane coating on the back. Get it in a solid color; prints sometimes have a thinner coating. You need 1/2 yard for 2-3 diaper shells.
- Absorbent Core: Birdseye cotton weave or 3-layer cotton flannel. You need 1 yard for 18-24 inserts. For heavy wetters, add a layer of hemp or bamboo terry cloth (1/2 yard).
- Stay-Dry Liner: Microfleece or suede cloth (100% polyester). This wicks moisture away from the skin into the absorbent core below. You need 1/2 yard.
- Elastic: 1/4-inch wide braided polyester elastic. Rubber elastic degrades in hot water and bleach.
Closures & Notions:
- Snaps: Size 16 plastic snap kit (socket, stud, cap) and a snap press. This is a $35 tool, but it’s the only way to get durable, laundry-proof closures. Hook-and-loop tape (Velcro) is a cheaper alternative but catches lint and wears out in 6 months.
- Thread: All-purpose polyester thread. Cotton thread rots faster with repeated washing.
Tools:
- Sewing machine with a stretch or ballpoint needle (size 80/12).
- Sharp fabric scissors or rotary cutter.
- Measuring tape.
- Pins or fabric clips (clips are better for PUL, as pins leave permanent holes).
If you’re looking for a ready-made shell to pair with your homemade inserts, the Elemental Joy One-Size Diaper Cover is a reliable commercial option. It uses the same two-part principle.
How to Size Your Homemade Diaper Correctly
Do not guess based on “newborn” or “6-month” labels. A diaper that is too small will leave deep red marks on the thighs. One that is too large will gap and leak with every movement. You need two body measurements.
- Thigh Circumference: Measure around the fullest part of your baby’s thigh, where the diaper leg opening will sit. Add 1 inch for ease and seam allowance.
- Waist Measurement: Measure around the belly, right at the navel. Add 2 inches for ease and overlap for closures.
Use these measurements to draft or modify a pattern. A standard one-size diaper pattern will have a rise (crotch length) of about 15-17 inches and a waist that adjusts via snap rows. The thigh opening in the pattern should match your thigh circumference calculation.
| Baby Weight (lbs) | Approx. Thigh Circumference | Approx. Waist (for pattern) | Recommended Rise |
|---|---|---|---|
| 8 – 12 | 8 – 9 inches | 11 – 13 inches | 13 inches |
| 12 – 18 | 9 – 10 inches | 13 – 15 inches | 15 inches |
| 18 – 28 | 10 – 12 inches | 15 – 17 inches | 17 inches |
Common mistake: Using a t-shirt as a pattern guide. Knit fabric stretches; woven PUL does not. A diaper cut from a stretched-out onesie will be too small once sewn, and you’ll waste your materials.
Cut a test shell from an old cotton bedsheet first. Pin it around a doll or a similar-sized object to check the leg and waist fit before cutting your PUL. This step saves the most expensive material.
The 4-Step Assembly Sequence for a Washable Homemade Diaper
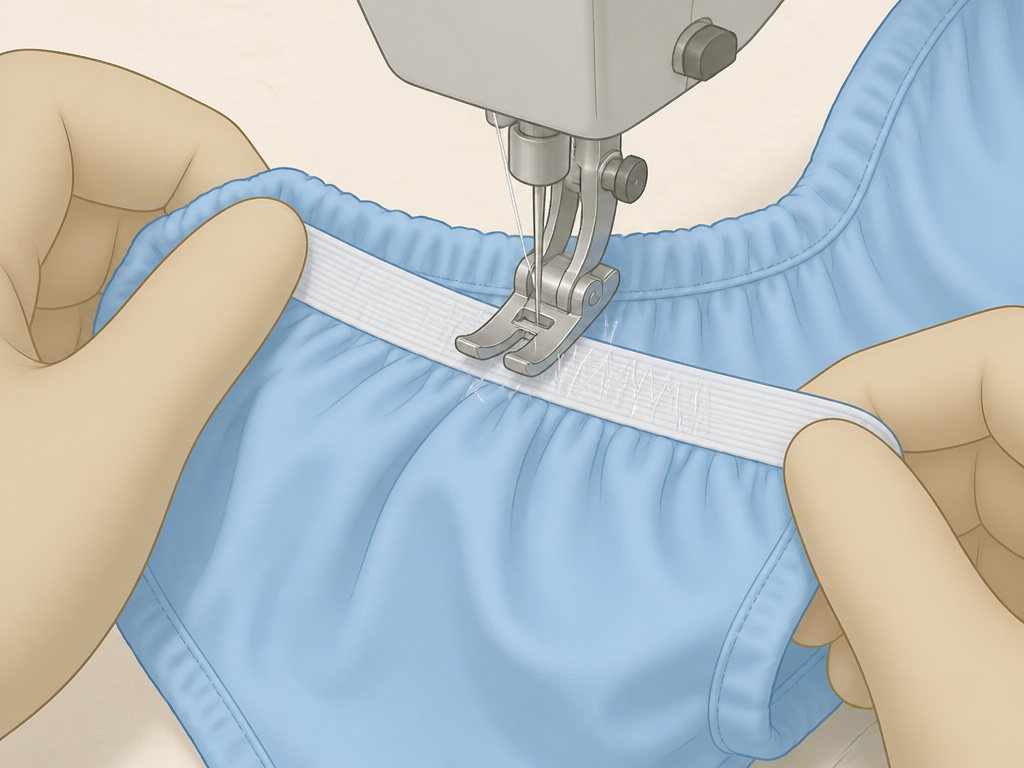
Follow this order. Assembling the pieces out of sequence makes it impossible to attach the elastic cleanly or get a flat, leak-resistant seam.
Step 1: Cut and Layer the Absorbent Insert
Cut your absorbent fabric (flannel, birdseye) into rectangles. For a medium-absorbency insert, stack three layers. For a heavy-wetter insert, use two layers of flannel and one layer of hemp terry in the middle. Cut your stay-dry microfleece to the same size.
Place the microfleece on top of the absorbent stack. This is the “inner liner system” in its simplest form. Serge or zig-zag stitch around all four edges to bind the layers together. Do not quilt or stitch through the middle — that reduces absorbency by compressing the fibers.
Skip this, and the layers shift in the wash. After three cycles, you’ll have a bunched-up pad that leaves dry spots and causes leaks.
Step 2: Construct the Waterproof Outer Shell
Cut your PUL fabric using your finalized pattern. You need two mirror-image pieces: a front and a back. Place them with the waterproof coated sides facing each other. This is critical. If the coated sides are out, the seams won’t seal.
Pin the front and back pieces together around the entire perimeter, except for the waistline edges. You are creating a pouch. Using a stretch stitch, sew around the pinned edges with a 3/8-inch seam allowance. This creates the basic shell shape.
Where this goes sideways: Sewing with a universal needle on PUL. The sharp point punches holes in the waterproof coating instead of sliding between the knit fibers. Use a ballpoint needle, or you’ll create a line of micro-leaks along every seam.
Step 3: Install the Elastic for Leg Gussets
Turn the shell right-side out. You now have a waterproof pouch with open waistbands. Measure and cut two pieces of elastic to match your baby’s thigh circumference measurement minus 2 inches.
Pin the center of each elastic piece to the seam allowance at the leg curve on the inside of the shell. While stretching the elastic taut, pin its ends to the shell’s waistline. This gathers the fabric. Sew the elastic in place with a wide zig-zag stitch, stretching it as you sew. This creates the gathered leg gusset that prevents blowouts.
The elastic must be stretched to 100% of its length while sewing. If you sew it relaxed, the leg hole will be baggy and leak.
Step 4: Add Closures and Finish the Waist
Turn the top waist edge of the shell inward by 1/2 inch and press. Turn it inward again another 1/2 inch to encase the raw edge, and pin. Topstitch this waistband casing down close to the inner edge.
Attach your closures to the waistband wings. If using snaps, place the socket half on the front wing (inside) and the stud half on the back wing (outside). Follow your snap press instructions. If using hook-and-loop, sew the soft “loop” tape on the front wing and the scratchy “hook” tape on the back wing. Reinforce the ends with a box stitch.
Your shell is complete. To use, simply place the absorbent insert inside the shell, against the interior. The stay-dry liner should face up, toward the baby.
Homemade Diaper vs. Commercial Cloth: A Realistic Comparison
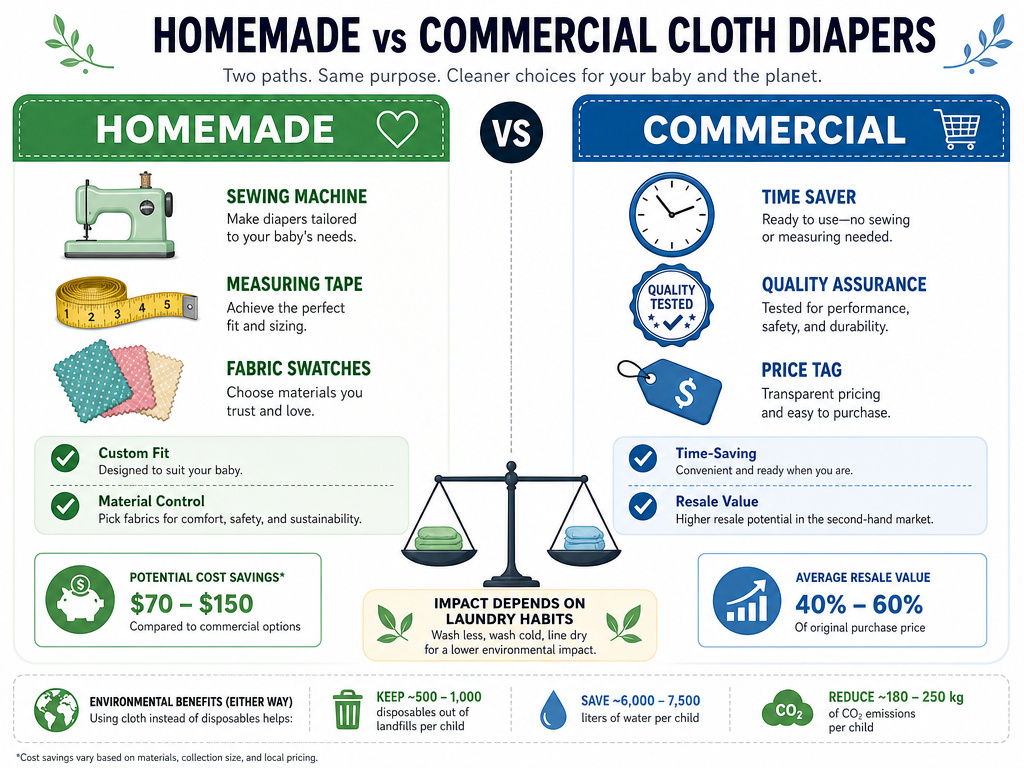
Is sewing your own worth the effort? The answer depends on your laundry habits and long-term plans.
The Homemade Diaper Wins When:
- You need a custom fit for a baby with very chunky or very slender thighs where standard sizes gap or dig.
- You want total control over materials, especially if you’re avoiding specific synthetics or prefer organic hemp.
- You already own a snap press and sew regularly. The per-diaper cost drops to about $4 in materials.
The Commercial Cloth Diaper Wins When:
- Your time is limited. A full stash of 24 reputable pocket diapers can be bought for less than the cost of the snap press tool alone.
- You want guaranteed consistency. Branded diapers like Thirsties or Nora’s Nursery have tested their stitch tension and PUL coating integrity.
- Resale value matters. Recognizable brands hold about 50% of their value on the secondhand market; homemade diapers do not.
The environmental math is also nuanced. A UNEP single-use nappies report confirms that reusable systems have a lower impact only when washed in full loads with energy-efficient settings. Washing a few homemade diapers in a half-empty machine with hot water and a dryer negates the benefit.
Troubleshooting Common Homemade Diaper Problems
You will encounter issues. Here’s how to diagnose them based on the symptom and timeline.
| Problem | Likely Cause | The Fix |
|---|---|---|
| Leaks at the legs | Elastic not stretched enough during sewing. | Remove elastic, re-cut shorter, and re-sew while stretching to maximum. |
| Dampness on baby’s skin | Missing or incorrect stay-dry liner. | Make new inserts with a polyester microfleece layer on top. |
| Snaps popping off | Snap sockets not fully set with enough pressure. | Use the snap press to re-crimp every socket; replace any that spin freely. |
| Fabric wicking at seams | Seams not sealed or PUL coated sides sewn outward. | Apply a thin bead of water-resistant seam sealant (like Gear Aid) on the inside seam. |
| Smell after washing | Absorbent materials are holding detergent. | Strip the inserts by washing in hot water with 1/4 cup of original blue Dawn, then multiple rinses. |
If your baby shows signs of persistent redness or yeast rash, the diaper itself may not be the culprit. However, ensuring it’s thoroughly clean and dry is the first step before applying a recommended diaper balm.
Before You Start: Safety and Sanity Checks
Before you start: A homemade diaper is not a medical device. It does not have the same safety testing as commercial products. Always check for loose threads, insecure snaps, or worn elastic before each use to prevent choking hazards or circulation issues. Never leave a baby unattended in any diaper that is not fitting properly.
Sewing for babies requires an extra level of care. Double-stitch all stress points. Never use fraying fabrics or decorative buttons that could detach. Your goal is to create something safe and functional, not just cute.
If the process feels overwhelming, remember that a simple DIY swim diaper is a much easier first project. It uses the same PUL fabric but requires no absorbent insert, letting you practice shell construction with less pressure.
Frequently Asked Questions
Can I use a regular sewing pattern for a homemade diaper?
Yes, but you must adjust it for non-stretch fabric. Most free online patterns are designed for knit fabrics, which have 50% stretch. If you use such a pattern with woven PUL, the resulting diaper will be too small. Add 1-2 inches to the thigh and waist measurements on the pattern before cutting.
How many homemade diapers do I need for a full stash?
For full-time use, you need 24-36 diapers. This allows for washing every 2-3 days. Since each diaper takes about 90 minutes to make, building a full stash is a 36- to 54-hour commitment. Many parents start with 6-12 homemade diapers and supplement with commercial ones.
What is the best fabric for the absorbent part?
For beginners, 3-layer cotton flannel is the easiest to work with and provides good absorbency. As you advance, adding a core layer of hemp or bamboo terry cloth significantly increases capacity for heavy wetters without adding much bulk. Avoid microfiber towels against the skin; they are drying but can cause irritation.
Why does my homemade diaper smell like ammonia?
Ammonia smell is usually a laundry issue, not a construction issue. It means urine crystals are trapped in the absorbent fibers. Strip the inserts by washing them in hot water with a tablespoon of original blue Dawn dish soap (no dyes or moisturizers), followed by 3-4 hot rinses. Then ensure you’re using enough detergent in your regular wash routine.
Will making my own diapers really save money?
It can, but only if you already own a sewing machine and snap press, and if your time has no monetary value. The disposable vs reusable diaper comparison from 1990 calculated costs based on home laundering. Today, the break-even point for homemade versus mid-range commercial cloth diapers is around 60 uses, assuming you value your sewing time at zero.
The Bottom Line
A functional homemade diaper is a specific, patent-backed design: a waterproof shell holding a removable absorbent insert. Success depends on using the right materials — PUL, natural fibers, and polyester elastic — and following a sizing formula based on body measurements, not age. The sewing process is meticulous, and the time investment is substantial.
For the dedicated DIY parent who values material control and a perfect fit, sewing a small stash is a rewarding project. For everyone else, pairing a few homemade inserts with a reliable cover like the Elemental Joy is a pragmatic middle ground. Whichever path you choose, understanding the two-part system is what turns a fabric project into a diaper that actually works.
