
What to Write on a Diaper | A Guide for Gifts & Daily Care
This post contains affiliate links. As an Amazon Associate, we learn from qualifying purchases
Write directly on the back-sheet plastic of a disposable diaper using a fine-point, alcohol-based permanent marker like a Sharpie. Place your text away from the leg elastics and adhesive tabs, sticking to essential info: the baby’s name, the date, or a short message for a gift. Never write on the inner topsheet that touches skin, and avoid areas that will be stretched or compressed during wear.
This method works because the back sheet is polyethylene, a non-porous plastic that seals the ink on the surface. The ink doesn’t penetrate to the absorbent core where urine interacts with superabsorbent polymers. That’s the mechanical guardrail.
What follows is the breakdown: the three non-negotiable safety rules grounded in material science, the best tools for the job, a dozen creative phrases that aren’t cheesy, and the systems that turn a marked diaper from a cute gift into a genuine logistics tool for daycare or multi-caregiver homes.
Key Takeaways
- Use only a fine-point permanent marker on the outer plastic back sheet; writing on the inner cloth-like layer risks ink transfer to skin.
- For gifts, combine the baby’s name with a tiny wish (“For future all-nighters”); for daycare, use name + date to track changes and prevent mix-ups.
- Standard alcohol-based inks (like Sharpie) are stable on polyethylene, but verify the brand’s compliance with standards like EWG Verified for full material disclosure if you have chemical sensitivity concerns.
- An organized labeling system (e.g., color-coding by child or day of the week) cuts confusion in homes with twins or multiple caregivers.
- Always do a transfer test on a spare diaper: write, let dry, then rub firmly with a damp cloth to ensure no smudging before using on a baby.
The 3 Core Rules for Diaper Writing (And Why #2 is Non-Negotiable)
This isn’t about creativity first. It’s about safety first. The diaper is a complex absorbent system, not a notecard. Get the foundation wrong, and your cute message becomes a potential irritant.
Rule 1: Surface Selection is Everything.
A disposable diaper has layers. The inner topsheet is a nonwoven material designed to stay dry. The back sheet is a thin, waterproof polyethylene film. You write on the back sheet. Always.
Where this goes sideways: Writing on the inner topsheet. The ink can wick through the nonwoven material or transfer directly to the baby’s skin when wet, especially with oil-based or washable markers. The result is a direct dermal exposure you never intended.
Rule 2: Ink Chemistry Must Match Plastic Chemistry.
The back sheet is polyethylene. You need an ink that bonds to that plastic without remaining tacky or soluble in moisture. A standard alcohol-based permanent marker (the ubiquitous Sharpie) works because the solvent evaporates quickly, leaving the pigment on the surface. It’s a physical bond, not a chemical one that breaks down easily. The EWG Verified diaper criteria set specific limits for volatile organic compounds (VOCs) like toluene and styrene in diaper materials. While a marker is an external addition, choosing a common, name-brand alcohol-based marker minimizes the introduction of unknown volatiles. This is a precaution, not a panic, the quantity is minuscule, but it’s the same principle behind the international diaper test standards that govern material safety.
Rule 3: Placement Avoids Functional Zones.
Keep writing away from the leg elastics, waistband, and adhesive tabs. These areas stretch, compress, and rub. Ink there can crack, flake, or transfer to clothing. The sweet spot is the center of the back sheet, below the waistband. It’s flat and experiences the least deformation.
| Do Write Here | Why It Works | Avoid This Zone | The Risk |
|---|---|---|---|
| Center of the back sheet | Flat, stable polyethylene; minimal stretching during wear. | Inner cloth-like topsheet | Direct ink-to-skin transfer, especially when wet. |
| Below the waistband | Clear of adhesive tabs and major elastic gathering. | Leg cuff elastics | Ink cracks and flakes as elastic stretches and recovers. |
| On the landing strip (front) | If using a cloth diaper cover or pre-fold, this area is often visible and stable. | The absorbent core (anywhere) | Ink could theoretically interact with superabsorbent polymer. |
Tools of the Trade: From Sharpies to Label Makers
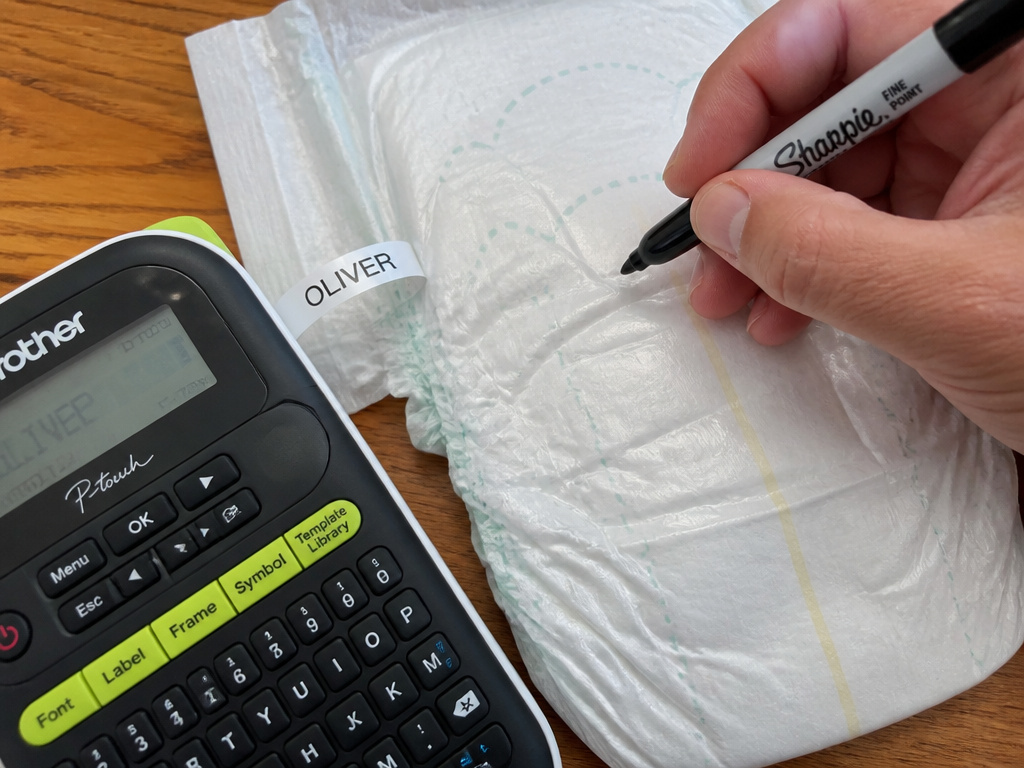
You have options. The classic marker isn’t your only one. Your choice depends on volume, permanence, and whether you mind a little tech.
The Permanent Marker (The Default Pick)
For most people, a fine-point Sharpie is the tool. It’s reliable, cheap, and controlled. The fine point gives you precision for a name and date without blotting. The black or blue inks are most consistent on the white or printed polyethylene backing. Don’t use an ultra-fine point on a textured printed backing, it can skip. Don’t use a chisel tip, it’s overkill and bleeds. The standard fine point is the sweet spot.
The Label Maker (The System Solution)
If you’re labeling for daycare or twins, a Brother P-touch label maker changes the game. You print a neat, consistent label with the child’s name and apply it to the back sheet. It’s faster for bulk, and the labels are ultra-durable.
I won’t recommend the bottomless portafilter for first-time grinder calibration. The visual feedback is honest, but new users overcorrect on every shot and chase ghosts. Found that out training my first apprentice. The caveat: ensure the adhesive is strong enough to stay put through a diaper bag shuffle but leaves no aggressive residue. Test one label through a full wear cycle.
What Not to Use: A Short, Sharp List.
- Ballpoint or gel pens: The ink is water-based or oil-based and will smudge catastrophically with any moisture.
- “Washable” or children’s markers: Formulated to come out of fabric. They will run.
- Paint pens or acrylic markers: Too thick, can remain flexible and transfer, and may contain a wider range of solvents.
- Tape and a regular pen: The tape will peel, and the pen will smudge on the tape’s surface.
What to Actually Write: Gift Messages vs. Practical Logs
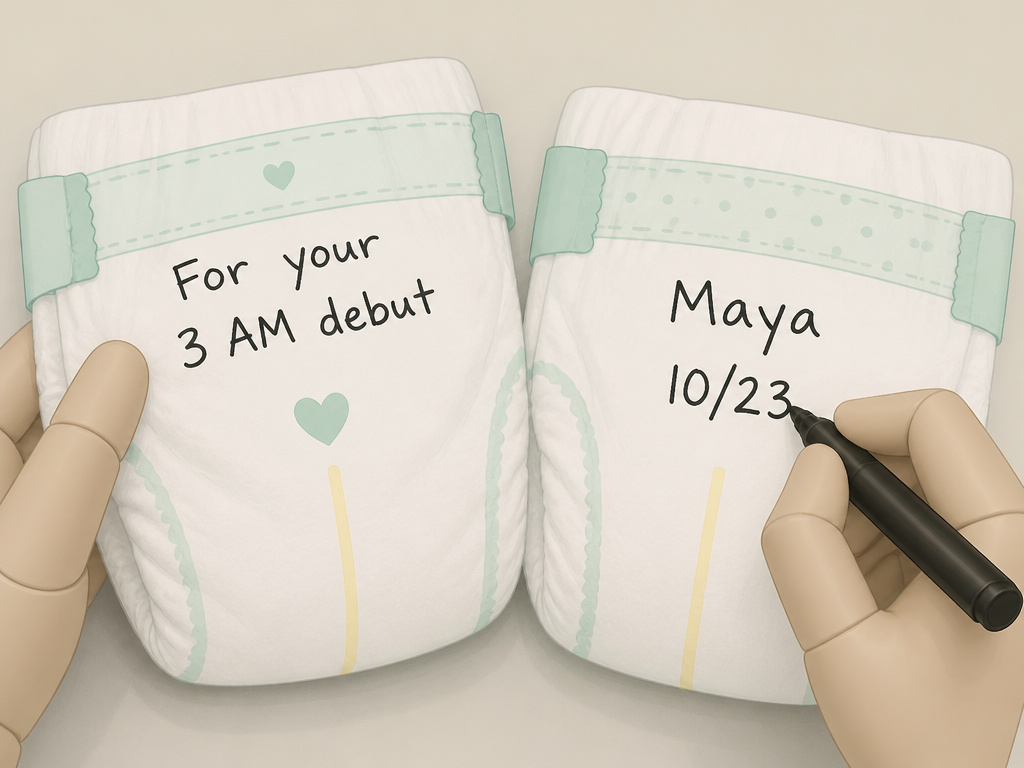
The content splits cleanly into two camps: the sentimental and the logistical. Mixing them usually fails.
For Baby Shower Gifts & Diaper Cakes
This is for the moment of unwrapping. The message should be short, witty, and paired with the baby’s name. – For the newborn phase: “For your 3 AM debut,” “Fuel for late-night snuggles,” “Proof that Dad changes diapers too.” – Wishing well style: “May your leaks be few,” “For a future potty-training champ,” “Wishing you dry nights (eventually).” – Simple and classic: “For [Baby’s Name]’s tushie,” “Love, [Your Name],” “Welcome, Baby [Last Name]!”
The trick is to write small and near the top edge so it’s visible when the diaper is stacked or rolled into a diaper cake. Don’t write a novel. One line is plenty.
For Daycare, Preschool, or Multi-Caregiver Homes
This is pure function. Ambiguity costs time and causes mix-ups. The standard is Name + Date. – “Maya 10/23” tells the caregiver whose diaper it is and when it was brought in. This prevents using yesterday’s diaper today. – For twins or siblings: “A – Ben” and “B – Sam”. Add a color dot with the marker if you want visual sorting at a glance. This system directly supports a clear diaper change timing routine, as caregivers can see at a glance which supplies are fresh.
The part nobody mentions: Daycare providers often request this because state licensing rules require them to track each child’s personal supplies. A dated, named diaper isn’t just helpful; it’s an audit trail.
The Safety Deep Dive: Regulations and Material Science
Is this actually safe? The question is valid. Let’s ground it in what’s known from the absorbent hygiene product labeling and safety standards world.
The Barrier is Real (And Tested)
The polyethylene back sheet is a functional barrier. Its job is to prevent liquid from leaking out. It also does a very good job of preventing surface ink from migrating inward. Studies analyzing chemical migration in diapers, like those referenced by ANSES, focus on substances within the diaper’s construction layers, not applied post-manufacture to the external plastic. The EDANA product labeling standards provide typical material names for these layers, reinforcing that the back sheet is a distinct, sealed component.
Ink Transfer Testing – Do It Yourself
Your final safety check is empirical. Before labeling a whole pack: 1. Take one spare diaper. 2. Write your test phrase on the back sheet. 3. Let it dry for 5 minutes. 4. Rub the spot vigorously for 15 seconds with a white cloth dampened with warm water. 5. Check the cloth for any ink transfer. No transfer? You’re clear. Any smudge? That marker is not suitable. This simple test mirrors the principle behind more rigorous baby diaper performance guidelines that assess material integrity.
When to Be Extra Cautious
If your child has extremely sensitive skin, eczema, or a known chemical allergy, the prudent step is to avoid writing on diapers altogether. Use a labeling system on the diaper bag or storage bin instead. The EWG Verified diaper criteria exist for families seeking maximum transparency about materials in contact with skin; applying an external product, however minimal the risk, adds a variable those strict standards don’t account for.
Beyond the Gift: Practical Uses for an Organized System
Marking diapers solves real problems beyond the baby shower.
1. The Daycare Duel
You supply the diapers. Three other kids have the same brand and size. A teacher reaches into the communal bin. A named, dated diaper guarantees your child uses your supplies. It’s also a silent check for the staff, a diaper marked “Leo Monday” shouldn’t be there on Wednesday. This is part of packing a diaper bag efficiently for the daily handoff.
2. The Twin or Sibling Tangle
With twins, you can’t afford a “whose is this?” moment during a poopy diaper emergency. Color-coding works: a small blue dot for twin A, a red dot for twin B on the back sheet. Or just write “A” and “B.” This is as crucial as having a functional diaper bag when you’re outnumbered.
3. The “Is This Clean?” Conundrum
In the chaos of a changing a diaper station, a clean diaper can fall onto the floor or get mixed with a used one. A small, discreet mark (like your initials) instantly identifies it as part of the clean stash. This is especially useful if you use a diaper cover with cloth inserts, where the system has more parts.
4. Tracking Changes & Patterns
For parents logging feedings, sleep, or output for pediatrician visits, a date on the diaper is a quick visual record. It answers “when was the last change?” without an app. This data can inform decisions about changing before feeding versus after to manage sleep cycles.
Frequently Asked Questions
Is it safe to write on a diaper with a Sharpie?
Yes, it is generally considered safe to write on the outer plastic backing of a disposable diaper with a standard Sharpie. The alcohol-based ink bonds to the polyethylene surface and is not in contact with the baby’s skin. Always let the ink dry completely before putting the diaper on the baby.
Will the ink bleed through the diaper?
No. The waterproof polyethylene back sheet is designed to prevent liquid from leaking out. It also acts as an effective barrier that stops surface ink from penetrating through to the absorbent core inside. The ink stays on the outside.
What should I write on a diaper for a baby shower gift?
Keep it short and sweet. Include the baby’s name and a brief, humorous wish. Examples: “For [Baby’s Name]’s epic adventures,” “May your changes be quick and your leaks be zero,” or simply “Love, [Your Name].” Write it neatly on the back so it’s visible when the diaper is part of a gift basket or cake.
How do daycares prefer diapers to be labeled?
Most daycares and preschools require each diaper to be marked with the child’s full first name and the current date. This prevents mix-ups with other children’s supplies and helps staff track inventory. Use a permanent marker and place the information clearly on the back sheet.
Can I write on cloth diapers?
You should not write directly on the absorbent fabric of a cloth diaper. The ink could compromise absorbency and may not be fully washable. If you need to label cloth diapers for daycare, write on the waterproof cover if it has a plastic exterior, or use a small, durable laundry-safe tag sewn or pinned to the diaper.
What if my child has sensitive skin?
If your child has eczema, extreme sensitivities, or known allergies, the safest practice is to avoid writing on diapers altogether. Instead, label the diaper’s packaging or the specific compartment of your diaper bag for travel. This eliminates any potential, however remote, for contact.
Before You Go
Writing on a diaper is a small act with outsized utility. For a gift, it personalizes a necessity. For daily life, it’s a tool for sanity, preventing mix-ups at daycare, streamlining changes for twins, and creating a simple visual log.
Stick to the rules: the right surface (plastic back), the right tool (permanent marker), and the right placement (away from elastics). Do a transfer test. Then, whether you’re penning a wish for a newborn or systematizing supplies for your toddler, your mark will be clear, safe, and exactly where it needs to be.
