
What Is a Diaper Cover? Your Complete Guide to Types & Uses
This post contains affiliate links. As an Amazon Associate, we learn from qualifying purchases
A diaper cover is a waterproof, reusable outer shell worn over an absorbent diaper insert, like a fitted cloth diaper or a prefold, to contain moisture and prevent leaks. Its sole job is to create a barrier; the absorbent work is done by the separate insert inside it. This two-piece system is the foundation of traditional cloth diapering and is defined by materials like polyethylene backsheets and elastic leg gathers for fit.
That separation of duties, barrier versus absorption, is what makes the system work. It’s also what most first-time parents get wrong when they assume a cover is just a thinner diaper. The cover’s material science is a decades-long engineering puzzle, balancing waterproofness against breathability, a challenge documented in patents since the 1980s.
What follows: a breakdown of the three material layers every cover uses, the specific standards that certify them as safe for skin, and the practical arithmetic of how many covers you actually need versus inserts. We’ll also trace the design history back to a patent that solved the “stuffy versus leaky” dilemma, giving you the context to spot a well-made cover from a marketing claim.
Key Takeaways
- A diaper cover is only a waterproof shell; it requires a separate absorbent insert (like a fitted or prefold) to function.
- Look for the Oeko-Tex Standard 100 Class 1 certification, it’s the highest safety tier for textiles touching babies aged 0–3.
- The cover-to-insert ratio is not 1:1. Plan for 1 cover for every 3–5 inserts; you’ll change the soaked insert multiple times before the cover needs washing.
- Leg elastic and waistband fit are more critical than brand. A gap of more than a finger’s width at the leg invites leaks within two changes.
- High-quality covers use bonded seams, not stitched ones, to prevent wicking, a lesson from 1984 patent documentation that still applies.
The 3-Layer Breakdown (How a Diaper Cover Actually Works)
A diaper cover isn’t just a piece of plastic. It’s a engineered sandwich where each layer has a specific, non-negotiable job. The industry nomenclature from standards like ISO 9949 breaks it into the backsheet, the leg and waist elastics, and the fastening system. Get one layer wrong, and the whole assembly fails.
The outer layer, or backsheet, is your waterproof barrier. It’s almost always a film or laminate of polyethylene or polypropylene. This layer doesn’t breathe much, and it’s not supposed to. Its only metric is absolute liquid hold. The inner layer, the part that touches the insert, is usually a soft non-woven fabric like polyester. This layer provides a tiny bit of cushion and helps wick moisture from the insert into the absorbent core, not back onto the skin.
A diaper cover’s functional components, per ISO 9949 nomenclature, include a liquid-impermeable backsheet, containment flaps with elastic, leg gatherers, and a fastening system. The backsheet is typically a film of synthetic polymers like polyethylene, while elastics are made from materials like polyurethane or synthetic elastic threads to maintain fit and prevent leakage.
The magic, and the most common point of failure, happens at the seams and the leg holes. This is where the third functional layer, the elastic system, comes in. Elastic leg gatherers and waistbands are not just for comfort. They create a gasket. If the elastic is too loose, urine escapes along the thigh. If it’s too tight, it leaves red marks and compromises circulation. The correct tension leaves no gap when you gently pull the leg opening away from the skin.
Where this goes sideways: Assuming any waterproof fabric will do. A cheap vinyl cover might hold liquid, but it will also trap every bit of moisture vapor next to the skin. The result is a damp, clammy baby and a higher risk of diaper rash within a day or two. The engineering goal, as outlined in patents like US Patent 4425128, is to be air-permeable and waterproof, a balance that prevents the “foul or stuffy” environment of early, purely plastic designs.
Anatomy and Materials: From PUL to OEKO-TEX
When you’re holding a diaper cover, you’re holding a product of textile regulation and polymer science. The materials are chosen for specific physical properties, and the best ones carry certifications that are more than marketing.
The industry standard for the waterproof layer is Polyurethane Laminate, or PUL. It’s a polyester knit fabric with a thin, waterproof polyurethane film laminated to one side. The polyester side faces out, the plastic side faces in. PUL is durable, withstands repeated washing, and retains slight breathability. Its main alternative is TPU (Thermoplastic Polyurethane), which is similar but often softer and more eco-friendly. Wool covers are a natural, highly breathable option, but they require lanolin treatment to be water-resistant, not waterproof.
For parents, the most critical label is Oeko-Tex Standard 100. This is a global independent certification that tests for harmful substances. Class I is the strictest level, reserved for products for babies up to 3 years old. A cover with this certification, like the Teby Freedom Cover, has been verified to contain no unsafe levels of heavy metals, pesticides, or allergenic dyes. It’s a baseline trust signal.
| Material / Component | Primary Function | Key Thing to Check |
|---|---|---|
| PUL (Polyurethane Laminate) | Waterproof barrier; durable, machine-washable. | Look for “3-layer PUL” for best durability. |
| TPU (Thermoplastic Polyurethane) | Softer, more elastic waterproof barrier; often more eco-conscious. | Can be less durable than PUL over 200+ washes. |
| Leg & Waist Elastic | Creates a gasket to contain leaks; provides fit. | Elastic should be fully encased to prevent wear and snagging. |
| Snaps or Hook & Loop | Fastening system for secure closure and adjustability. | Snaps outlast Velcro; hook & loop is easier for quick changes. |
| Reinforced Seams | Prevents wicking and leakage at stress points. | Bonded (welded) seams are superior to stitched seams. |
The difference between a good cover and a great one often comes down to seam construction. Cheaper covers use conventional sewing, which punches tiny holes in the waterproof layer. Over time, liquid can wick through these holes. Better covers use high-frequency bonding or welding to seal seams without needles. That 1984 patent we mentioned specified that bonded seams needed a tensile strength exceeding 2.5 kg/3 cm to be effective, a standard that remains relevant.
Diaper Cover vs. All-in-One & Pocket Diapers
This is where choice gets real. A diaper cover is one piece of a modular system. It’s fundamentally different from an All-in-One (AIO) or a Pocket diaper, and the right choice depends entirely on your laundry tolerance and desire for simplicity.
A diaper cover is just the shell. You add your own absorbent insert, a prefold, a fitted diaper, or a flat, and the two pieces work together. When the insert is wet, you remove it and can often reuse the cover if it’s still clean. An All-in-One (AIO) diaper has the absorbent layers sewn directly inside the waterproof shell. It’s used, soiled, and washed as a single unit, convenient, but slower to dry and harder to get truly clean. A Pocket diaper is a hybrid: it has a waterproof shell with a fabric lining that creates a “pocket” where you stuff absorbent inserts. The shell gets washed every time, but you can customize the absorbency.
So which wins? For simplicity and speed, AIOs. For customization and ease of washing, pocket diapers. For ultimate flexibility, cost-effectiveness, and the fastest drying time, the traditional diaper cover and insert system is unbeatable.
The part nobody mentions: Drying time. A soaked AIO can take two full cycles in the dryer. A cover and a separate insert can be line-dried in a few hours. In humid climates or for back-to-back babies, that difference is a laundry game-changer.
The cover system’s flexibility is its superpower. A single cover can be used with a thin insert for a newborn, a bulky hemp insert for a toddler’s nap, or a special doubler for overnight. With AIOs or pockets, you’re locked into that diaper’s built-in absorbency. If your heavy wetter outgrows it, you need a whole new set of diapers.
How to Use a Diaper Cover: The Leak-Proof Method
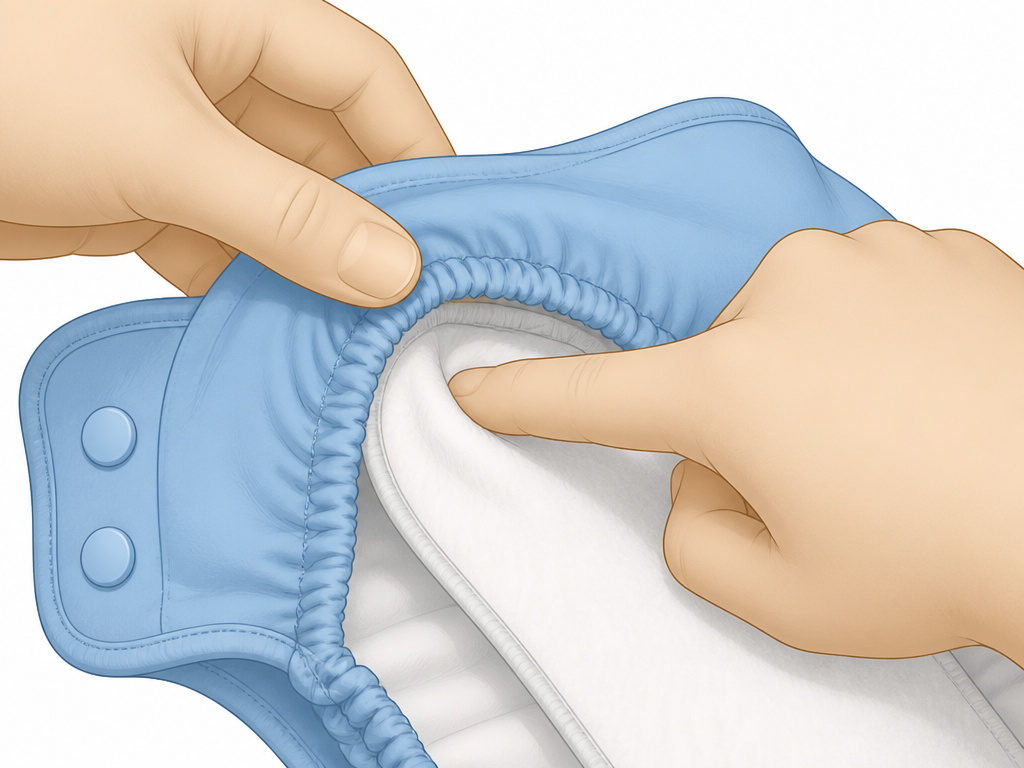
The process is simple, but three specific mistakes cause 90% of leaks. It’s not about strength; it’s about placement and fit.
First, prepare your absorbent insert. This could be a prefold folded into thirds, a fitted diaper snapped to size, or a flat diaper folded into a pad. The insert must be fully contained within the cover’s waterproof area. If any part of the absorbent fabric peeks out of the leg or waist elastic, it will wick moisture directly onto your baby’s clothes. That’s leak number one.
Second, place the cover underneath the insert-laden baby. Bring the front of the cover up between the legs, then bring the wings or side panels around the waist. Fasten the snaps or hook & loop securely, but not tightly. You should be able to fit two fingers comfortably between the waistband and your baby’s skin. Now, run your finger around the inside of each leg elastic. Tuck any stray insert material inward to ensure the elastic is making direct contact with the baby’s skin, forming a seal.
Common mistake: Fastening the cover over a bulky insert without checking the leg gaskets. The elastic rests on the insert, not the skin. The first substantial wetting will flood the gap and leak out the leg hole. This happens immediately.
When the insert is wet, unfasten the cover. Remove the soiled insert and place it in a wet bag. If the cover’s interior is still clean and dry, which it often is, you can wipe it with a damp cloth and reuse it for the next change. This is why the recommended ratio is 1 cover for every 3–5 inserts. You are not washing the shell every single time.
Sizing, Fit, and How Many You Actually Need
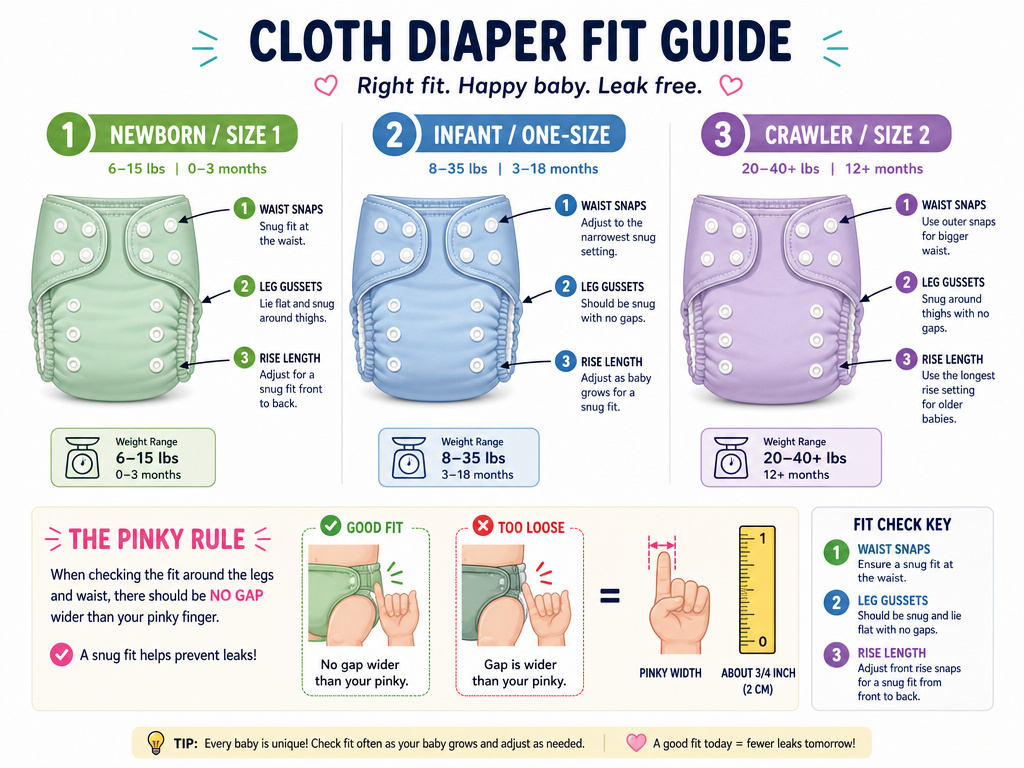
Sizing charts are a guideline, but fit is a physical reality. A cover that’s too big will gap at the legs. A cover that’s too small will leave red marks and compress the insert, reducing its absorbency. Weight ranges are a starting point; your baby’s shape (long torso, chunky thighs) is the final judge.
Most brands offer two to three sizes. A common system is Size 1 (newborn to ~6 months) and Size 2 (6 months to toddler). Some, like the Teby Freedom Cover, size directly to their fitted diaper line: Size 1 for fitteds in sizes 1 and 2, Size 2 for fitted size 3. One-size-fits-most covers with multiple rows of snaps claim to fit from birth to potty training. They often work, but a newborn can be swallowed by them, and a robust toddler might be at the very last snap setting.
Here’s the practical arithmetic for building a stash. Let’s assume you change diapers 8-10 times a day.
- For a full-time cloth diapering stash: Start with 6-8 covers and 24-36 inserts. This allows you to use 1-2 covers per day while others are in the wash, and always have a clean, dry insert ready.
- For a part-time or trial stash: 3-4 covers and 12-15 inserts is enough to diaper for a full day and see how the system works for you.
- The one-step nobody skips: Always do a fit check after snapping. Lift the baby’s legs gently. Look for gaps at the thighs. If you see a space wider than your pinky finger, go down a snap setting or try a different size.
| Baby’s Weight / Age | Recommended Cover Size | Critical Fit Check |
|---|---|---|
| Newborn (5-12 lbs) | Newborn or Size 1 | Ensure leg holes are snug but not digging in; the rise should be at or just below the navel. |
| Infant (12-18 lbs) | Size 1 or One-Size (on smallest settings) | The waist should fasten on the middle or outer snap row; no gaping at the legs when baby sits. |
| Crawler/Toddler (18-30+ lbs) | Size 2 or One-Size (on largest settings) | Check that the rise (length from waist to between legs) is still adequate to cover the insert fully. |
The bottom line: buy one or two covers in a couple of sizes first. Test the fit with an insert you plan to use. Then buy the rest of your stash. An ill-fitting cover is a leaky cover, no matter how highly it’s rated.
Frequently Asked Questions
Can you use a diaper cover with disposable inserts?
Yes. This is a hybrid approach. You place a biodegradable or standard disposable insert inside the waterproof cover. When soiled, you toss the insert and can often reuse the cover. It cuts down on laundry and can be a good transition option or solution for travel.
How do you wash diaper covers?
Wash them in warm water with a small amount of cloth-diaper-safe detergent. Avoid fabric softeners, bleach, and stain removers, as they can degrade the waterproof laminate and elastics. Tumble dry on low heat or, better yet, air-dry. High heat is the fastest way to delaminate PUL and cause cracks in the waterproof layer.
Why does my diaper cover smell after washing?
Persistent ammonia or barnyard smell is usually due to detergent or mineral buildup, not the cover itself. The synthetic materials of the cover hold onto residues. Strip-wash your entire stash (including inserts) by running a series of hot washes with no detergent, or use a commercial diaper stripper. Ensure you’re using enough water in your wash cycle, a top-loading machine is often more effective than a high-efficiency (HE) front-loader for bulky cloth diaper loads.
Are diaper covers and wraps the same thing?
Generally, yes. “Wrap” is a common term used in the UK and by some brands to describe a diaper cover, especially one that uses hook & loop (Velcro) closures. Functionally, they are identical: a waterproof outer shell.
How long does a diaper cover last?
With proper care, a quality PUL or TPU cover should last through the diapering of multiple children, anywhere from 2 to 4 years of regular use. Failure points are usually worn-out elastics or delamination of the waterproof layer from repeated high-heat drying.
The Bottom Line
A diaper cover is not a diaper. It’s the reusable, waterproof manager of a two-part system, directing moisture into the absorbent insert and sealing it in. Its value is in flexibility and economy, you need far fewer covers than inserts. Ignore the marketing and focus on three tangible things: an Oeko-Tex Class 1 certification for safety, fully encased elastics for durability, and bonded seams to prevent wicking. Start with a couple of recommended covers like the Thirsties Duo Wrap or a Blue Snail cover, pair them with a set of cotton prefolds, and see how the system works. It’s the most repairable, adjustable, and cost-effective way to cloth diaper, and its design hasn’t changed much in forty years because the engineering already works.
