
How to Install Diaper Genie Bags and Avoid Common Mistakes
This post contains affiliate links. As an Amazon Associate, we learn from qualifying purchases
To install a Diaper Genie bag, you match the refill shape to your pail, pull the film through the center hole, tie a knot, and seat the refill canister. The critical step everyone misses is pulling an extra 6-8 inches of film down to the pail floor after knotting. That slack prevents the internal clamps from tearing the bag on the first diaper, which is why so many new installations leak smell immediately.
That “pull extra film” instruction is in the OEM manual for a reason. The clamp mechanism needs loose material to grab and twist. If the film is taut from the knot to the clamp, the metal teeth strain against it. You get a weak seal, or a rip.
What follows is the breakdown for every common model. Complete, II, Platinum, plus what to do when the foot pedal does nothing, and how often you actually need to swap the hidden carbon filter.
Key Takeaways
- Match the refill shape. Square refills go in square slots; round ones go in round slots. Using the wrong shape jams the film path.
- Pull slack after the knot. Once the bag is knotted and seated, open the canister and pull 6-8 inches of extra film down to the pail’s bottom. This prevents clamp strain.
- The carbon filter lives in the head. It slides into a holder behind the button panel. Change it every three months, or it stops absorbing odors.
- A non-opening lid usually means a full bag. If the foot pedal is stiff, the bag is likely full and needs to be cut and tied off.
- Roll diapers tight. A tightly rolled diaper lets the clamp seal properly and maximizes the bag’s 270-diaper capacity.
The Universal 5-Step Installation Method
The core process is the same whether you have a Diaper Genie Complete, II, or an older Classic. The differences are in the refill shape and how you access the interior. Start here.
Before you start: Unplug or move the pail away from the wall. You’ll be handling the plastic film bag, which can be slippery. Have scissors handy in case the built-in cutter is stiff. Keep the carbon filter out of reach of children.
First, press the foot pedal to open the lid and clamps. If they move freely, you can proceed. If the pedal is stuck, see the troubleshooting section later.
Step 1: Remove the head or canister.
For the Diaper Genie Complete, press the button on the front of the head to open the inner canister. Lift the entire canister out. For the Diaper Genie II, you often lift the head straight off the base. This gives you clear access to the refill compartment.
Step 2: Prepare the new refill.
Take the new refill cartridge. Find the plastic tab and pull it to remove the outer seal. Pull the starter film up and out of the cartridge. Feed this film down through the center hole in the pail’s mechanism until a tail of about 18 inches hangs out the bottom.
Step 3: Tie the starting knot.
Gather the film hanging beneath the pail and tie a simple overhand knot. This knot sits below the clamping mechanism. Pull it snug.
Step 4: Seat the refill and close up.
Place the refill cartridge into its compartment in the head or base. Press down gently until it clicks or feels secure. Close the canister or replace the head onto the base.
Step 5: Create critical slack.
This is the step that prevents failure. Open the inner canister again (or lift the lid). Reach in, grab the knotted film from the closed clamps, and pull it down toward the bottom of the pail. You want 6-8 inches of extra film between the knot and the clamp.
The OEM manual states this slack “prevent[s] stress on the clamp for optimal functionality.” Without it, the clamp strains against a taut bag. The first diaper you push through can tear the film at the clamp points. That tear vents odor directly into the nursery.
| Step | Action | What Happens If You Skip It |
|---|---|---|
| 1. Remove Head/Canister | Clear access to refill slot. | Cannot properly seat the refill cartridge. |
| 2. Pull Starter Film | 18+ inches of film through the hole. | Not enough length to tie a secure knot. |
| 3. Tie the Knot | Secures bag below clamp. | Film retracts into mechanism; diapers fall through. |
| 4. Seat Refill | Cartridge locks into place. | Film feeds unevenly, causing jams. |
| 5. Pull Slack | Add 6-8″ of loose film. | Clamp strains and tears bag; odors leak immediately. |
Square vs. Round Refills: Why Shape Matters
Not all Diaper Genie bags are the same. The two main types are square refills and round refills. Your pail is designed for one or the other.
- Square Refills: Used in Diaper Genie Complete and Platinum models. The cartridge is a rectangular box.
- Round Refills: Used in older Diaper Genie II and Classic models. The cartridge is a cylinder.
Common mistake: Forcing a round refill into a square slot. The cartridge won’t seat flush, and the film will feed at an angle. It jams within the first five diapers.
You cannot interchange them. The film path from the cartridge, through the twisting mechanism, and out the clamp is engineered for a specific feed angle. The wrong shape misaligns everything. When your starter refill runs out, check the shape of the empty cartridge before you buy replacements.
How the Odor Lock Actually Works (And How to Help It)
The magic isn’t just the bag. It’s a three-part system: the 7-layer film, the clamping mechanism, and the carbon filter. Understanding this tells you where your installation can go wrong.
The film is a multilayer plastic designed to be odor-proof. When you push a diaper through the clamp, the mechanism twists the film directly below it, creating a sealed pod. That pod drops into the larger containment bag below.
The carbon filter is your backup. It’s a small charcoal pad housed in the head of models like the Diaper Genie Complete. Its job is to absorb any gaseous odors that might permeate the film over time. The official manual mandates replacement every three months.
Where this goes sideways: Installing a refill but forgetting the carbon filter. After three months, the saturated filter does nothing. You’ll smell a faint, persistent odor near the pail even with a fresh bag. Slide the old filter out and snap a new one in.
This is why a complete diaper genie bag change involves checking the filter too. It’s part of the system’s rated performance.
Troubleshooting: When the Installation Doesn’t Take
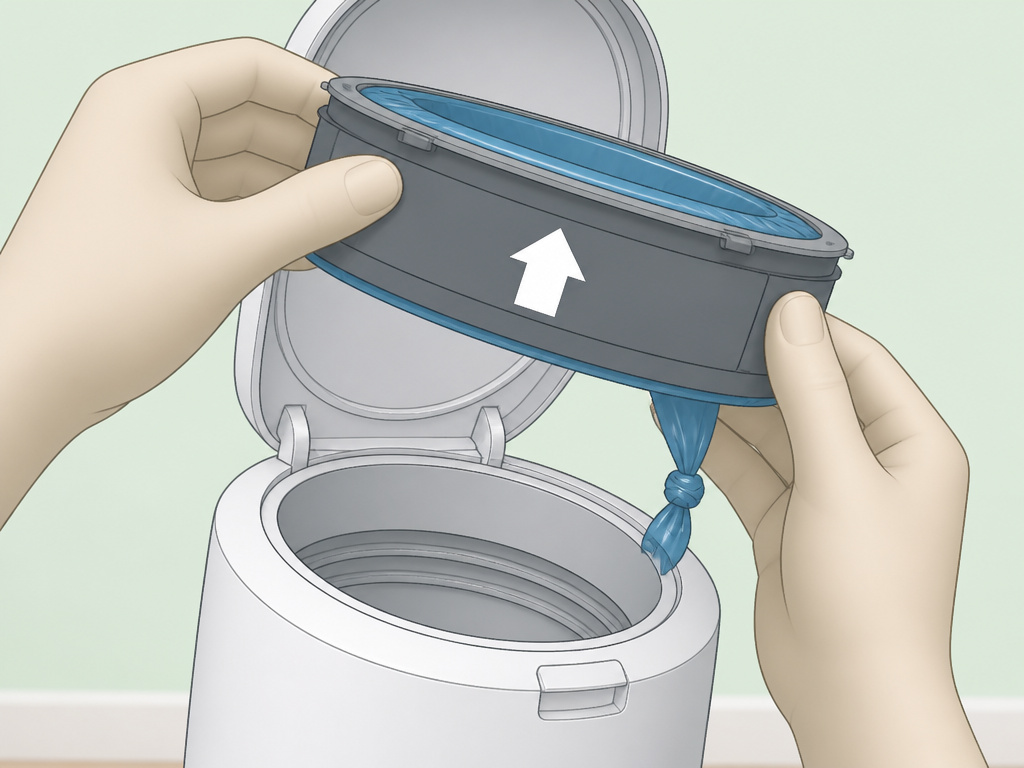
Sometimes, you follow the steps and the pail still doesn’t work. Here are the two most common failures and their fixes.
The Foot Pedal Does Nothing
You press it, and the lid doesn’t budge. Don’t force it.
- Check if the bag is full. This is the most likely cause. A overfull bag creates back-pressure that the clamp can’t overcome. You need to empty the pail.
- Ensure the head is attached. On some models, if the head isn’t fully snapped onto the base, the pedal linkage disengages. Remove and re-attach the head, listening for a click.
- Inspect for film jams. A piece of cut film might be caught in the clamp gears. You’ll need to open the canister and clear it manually.
The Bag Won’t Feed or Twists Unevenly
The film feeds crookedly, or the clamp doesn’t twist a clean seal.
- Verify refill shape. You are likely using the wrong shape refill for your model. See the section above.
- Re-seat the refill cartridge. Remove it and put it back in, ensuring it’s oriented correctly (there’s usually an “UP” arrow).
- Check the starter knot. If the knot is too big or too close to the clamp, it can obstruct the film path. A smaller knot pulled further down often fixes this.
For persistent mechanical issues, our guide on how to fix a diaper genie covers gear resets and part replacements.
The Maintenance Schedule You’ll Actually Follow
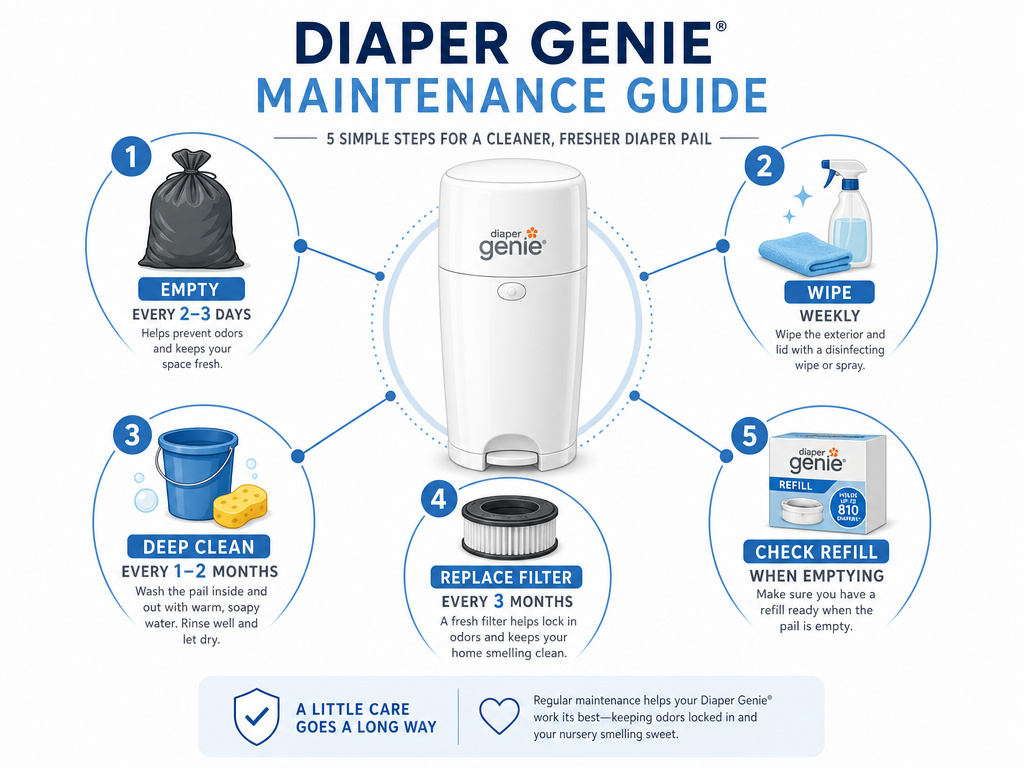
A Diaper Genie isn’t a set-it-and-forget-it item. To keep it odor-free, sync a few simple tasks with your routine.
| Task | Frequency | Why It Matters |
|---|---|---|
| Empty the Bag | Every 2-3 days (or when full) | Prevents overfilling, which strains the clamp and lid. |
| Wipe Exterior | Weekly with a damp cloth | Removes surface germs and sticky residues. |
| Deep Clean Pail | Every 1-2 months | Eliminates odor-causing bacteria on the inner pail walls. |
| Replace Carbon Filter | Every 3 months | Maintains the secondary odor-absorption layer. |
| Check Refill Level | When emptying | Ensures you have a new refill ready before the old one runs out. |
Deep cleaning is straightforward. Take the pail apart, wash the plastic components with warm, soapy water, and let them air dry completely. Never reassemble a damp pail, it promotes mildew. This routine, combined with a correct diaper genie refill process, keeps the system reliable.
Frequently Asked Questions
Why does my new Diaper Genie bag smell immediately?
The clamp is likely straining against a taut film. You didn’t pull the extra 6-8 inches of slack after tying the knot. Open the canister, grab the film just below the clamp, and pull more down into the pail. This gives the mechanism the loose material it needs to grip and twist without tearing.
Can I use generic bags in my Diaper Genie?
You can, but performance varies wildly. The Diaper Genie’s odor-trapping system is calibrated for the thickness and plasticity of its proprietary 7-layer film. Generic bags are often thinner. They may not twist-seal as effectively, and they tear more easily at the clamp, leading to odor leaks. For guaranteed results, OEM refills are the call.
How do I know when the carbon filter is bad?
Mark your calendar three months from installation. If you forget, the tell-tale sign is a faint, constant dirty-diaper smell in the room even with a fresh, properly installed bag. The filter is saturated and can’t absorb more odor. Swap it out.
My Diaper Genie Classic has a different setup. What do I do?
The principles are identical. For the Diaper Genie Classic, you typically lift the entire head off, drop the round refill into the base, pull the film through, and tie the knot. The lack of a removable inner canister means you create the slack by manually feeding more film down into the pail before closing the lid.
What’s the difference between installing bags in the Platinum vs. The Complete?
The process is nearly identical, as both use square refills. The main difference is the head design. The Platinum may have a slightly different latch for the inner canister. Our specific guide for Diaper Genie Platinum installation covers that model’s nuances.
The Bottom Line
Installing a Diaper Genie bag correctly comes down to three things: using the right-shaped refill, tying a secure knot, and, critically, pulling that extra half-foot of slack into the pail. That slack is the difference between a sealed odor pod and a torn bag that vents smell into the nursery after the first diaper.
Stick to the OEM refills and change the carbon filter every three months. Sync a quick deep clean with your monthly chores. If the pedal sticks, empty the bag. It’s a simple system that works well when you follow its logic. Now you know how it actually works.
