
How to Get Diaper Gel Out of Washer With a Simple Salt Method
This post contains affiliate links. As an Amazon Associate, we learn from qualifying purchases
To get diaper gel out of a washer, you need to dissolve the sodium polyacrylate beads. Shake out the large chunks, then run a hot wash with 1-2 cups of plain salt, not detergent. Salt breaks the ionic bonds holding the gel together. Immediately after, dry the wet, gel-speckled clothes; the dryer will desiccate the remaining beads into a dry powder that collects in the lint trap. Finish with a washer cleaning cycle.
The salt step is the pivot. Diaper gel is a super-absorbent polymer designed to trap water. Detergent and bleach can’t break it down, and using them first just spreads a sticky film. Salt changes the water’s chemistry, forcing the gel to release its moisture and shrink back into a manageable solid you can wash or vacuum away.
What follows: the exact 20-minute method parents actually use (not the generic manual advice), the one mistake that can burn out a front-loader motor, and the monthly maintenance cycle that stops gel from ever bonding to your machine again.
Key Takeaways
- Use plain table salt or water softener salt in a hot wash to dissolve diaper gel; detergent and bleach are ineffective and can make the mess worse.
- Put gel-covered clothes directly into the dryer on a high-heat cycle, the heat and airflow turn wet beads into a dry powder that collects in the lint trap.
- Never run a rinse or spin cycle after discovering gel; this forces tiny beads into the pump and between the inner and outer drum, where they can harden and cause mechanical damage.
- For front-load washers, manually wipe out the rubber door gasket and run the “Tub Clean” or “Sanitary” cycle with bleach after cleaning to prevent mold and gel residue.
- Prevent future incidents by running a monthly cleaning cycle with bleach or a washer cleaner to break down any residual detergent or polymer film.
Why Diaper Gel Is a Different Kind of Mess
Diaper gel isn’t a stain. It’s thousands of tiny beads of sodium polyacrylate, a super-absorbent polymer that can hold hundreds of times its weight in water. When a diaper goes through the wash, the outer lining shreds and these beads flood the drum. They don’t dissolve. They just swell up, turning into a slippery, translucent gel that coats every surface.
Detergent molecules are designed to break down organic soils like grease and food. Sodium polyacrylate is a synthetic polymer chain with a strong ionic charge that actively attracts and traps water molecules. Detergent can’t disrupt that bond.
If you try to wash gel away with more soap, you’re just adding surfactants to an already slick mess. The gel beads roll around, avoiding the drain, and eventually settle into the drum’s crevices or the pump filter. In a front-load washer, they get forced between the inner spinning drum and the outer stationary tub. When the machine stops, those beads begin to dry. What’s left is a concrete-like crust that can jam the drum or, as one parent reported, seize the motor drive entirely after the beads hardened.
The 20-Minute Salt & Dryer Method
This isn’t the generic “run an empty cycle” advice. This is the field-tested sequence from parents who’ve done it multiple times. The goal is to dissolve, dry, and evacuate, in that order.
Before you start: Unplug the washer from the electrical outlet. You’ll be reaching inside to remove debris, and this eliminates any risk of the machine starting accidentally.
Step 1: The Manual Clean-Out (3 Minutes)
Open the washer and grab a small trash bag. Pull out the sopping wet clothes, shaking each item over the drum to dislodge large gel chunks. Pick out any visible pieces of the diaper’s outer lining. Don’t worry about getting every single bead. Toss all the solid debris into the trash bag. This prevents a clog in the drain pump.
Step 2: The Salt Wash (10 Minutes)
Leave the wet, still-gel-speckled clothes in a pile. You will not rewash them yet. Close the washer lid. 1. Pour 1 to 2 cups of plain salt into the detergent dispenser or directly into the drum. Use inexpensive table salt, rock salt, or water softener pellets. Do not use detergent, bleach, or vinegar. 2. Set the washer to the hottest water temperature available and the longest wash cycle (e.g., “Heavy Duty” or “Sanitary”). 3. Start the cycle and let it run for 5-10 minutes to agitate and dissolve the gel, then pause or cancel it. You don’t need a full cycle; you just need the hot, salty water to scour the drum.
The salt works through a chemical process called ion exchange. The sodium ions in the salt overwhelm the polymer’s structure, breaking its grip on the water molecules. The beads shrivel and release their water.
Step 3: The Dryer Rescue (7 Minutes)
Here’s the non-intuitive part that works. Take the pile of wet, gel-speckled clothes and put them directly into the dryer. Run a high-heat cycle for at least 30 minutes.
Where this goes sideways: Trying to rinse the gel off clothes first. The dryer’s heat and airflow will suck the moisture out of the gel beads, turning them into a dry, paper-like substance. This material will either flake off the clothes or be pulled directly into the lint trap. Check and empty the lint trap halfway through the cycle.
When the dryer finishes, the clothes will be clean. Any remaining gel residue will be a dry powder that brushes off. You can then rewash the clothes normally for peace of mind, as you would when dealing with any other fabric stains.
| Step | Action | Why It Works | If You Skip It |
|---|---|---|---|
| Manual Clean-Out | Remove large gel chunks & diaper lining. | Prevents physical clogs in the pump and drain hose. | Gel binds into a solid mass, risking a $200 service call. |
| Salt Wash | Hot water + 1-2 cups salt, no detergent. | Salt ions break the gel’s water bonds, dissolving it. | Gel remains sticky and adheres to the drum, attracting dirt. |
| Dryer First | Dry gel-covered clothes on high heat. | Desiccates gel into inert powder captured in lint trap. | Gel stays wet and gummy, re-spreading in the next wash. |
| Final Washer Clean | Run “Tub Clean” or sanitary cycle with bleach. | Removes dissolved gel residue and sanitizes the drum. | Residual gel creates a film that leads to mold and odors. |
What Not to Do: Two Mistakes That Make It Worse
The panic response usually points toward more soap or more rinsing. Both are wrong.
Mistake 1: Running a Rinse or Spin Cycle Immediately
When you discover the mess, hitting “rinse and spin” seems logical. It’s the worst thing you can do. The force of the spin cycle drives tiny gel beads into places they shouldn’t be: deep into the weave of clothes, behind the drum’s baffles, and worst of all, into the narrow gap between the inner and outer tub of a front-loader. Once there, they dry into a cement-like substance. This is the primary cause of the “diaper ruining a washer” scenario, where the drum seizes and the motor burns out.
Mistake 2: Using Bleach or Detergent for the First Wash
Bleach is for sanitizing and stain removal, not breaking down polymers. Detergent adds surfactants that can actually encapsulate the gel beads, making them even slicker and harder to flush away. Always start with salt. Save the bleach for the final cleaning cycle after the gel is already dissolved.
Front-Loader vs. Top-Loader: Critical Differences
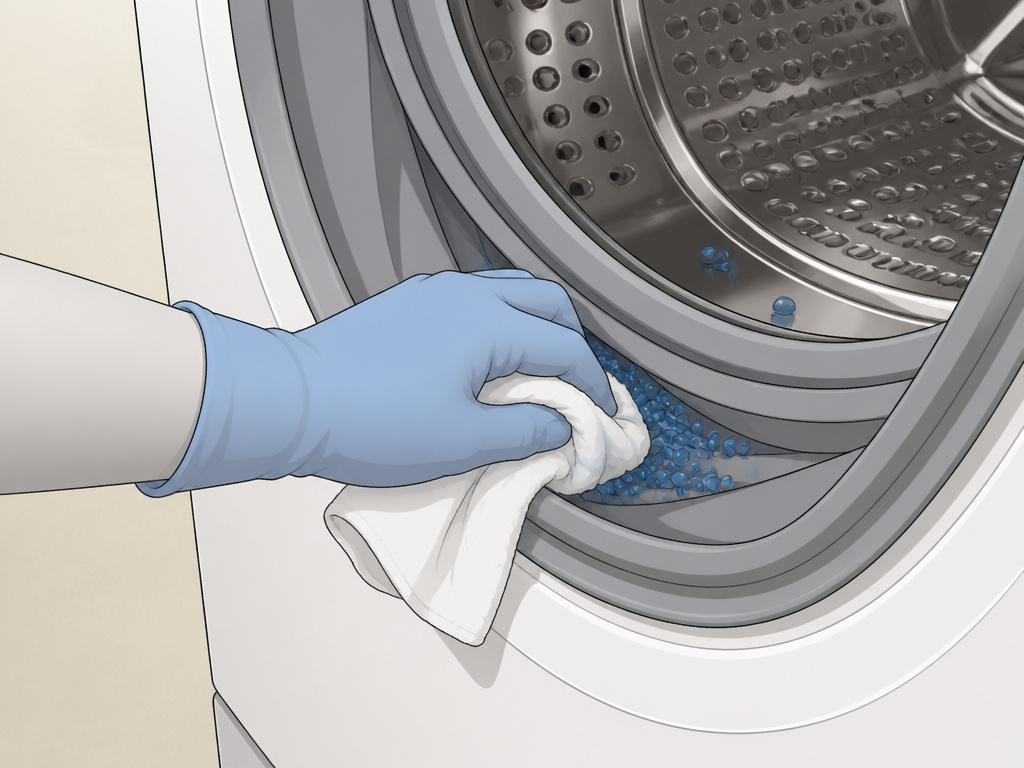
The core method is the same, but the risk profile and cleanup detail differ.
Front-Load Washers: High Risk, Extra Attention Needed
The sealed door and horizontal drum make front-loaders more vulnerable. Gel easily gets trapped in the rubber door gasket (bellows). After the salt wash, you must: 1. Manually wipe out the entire gasket with a damp cloth, pulling back the folds. 2. Run the manufacturer’s “Tub Clean” cycle (like the one specified in the LG WT7700H*A manual) with bleach to sanitize and flush the hidden plumbing. 3. Leave the door and detergent dispenser open to air dry completely.
Top-Load Washers: Easier Access, Lower Risk
The vertical drum and open top make manual cleanup easier. Gel is less likely to get trapped between drums. Still, after the salt wash, use a cloth to wipe down the agitator or center column and the top rim of the drum before running a final clean cycle.
How to Clean Your Washer After the Gel Is Gone
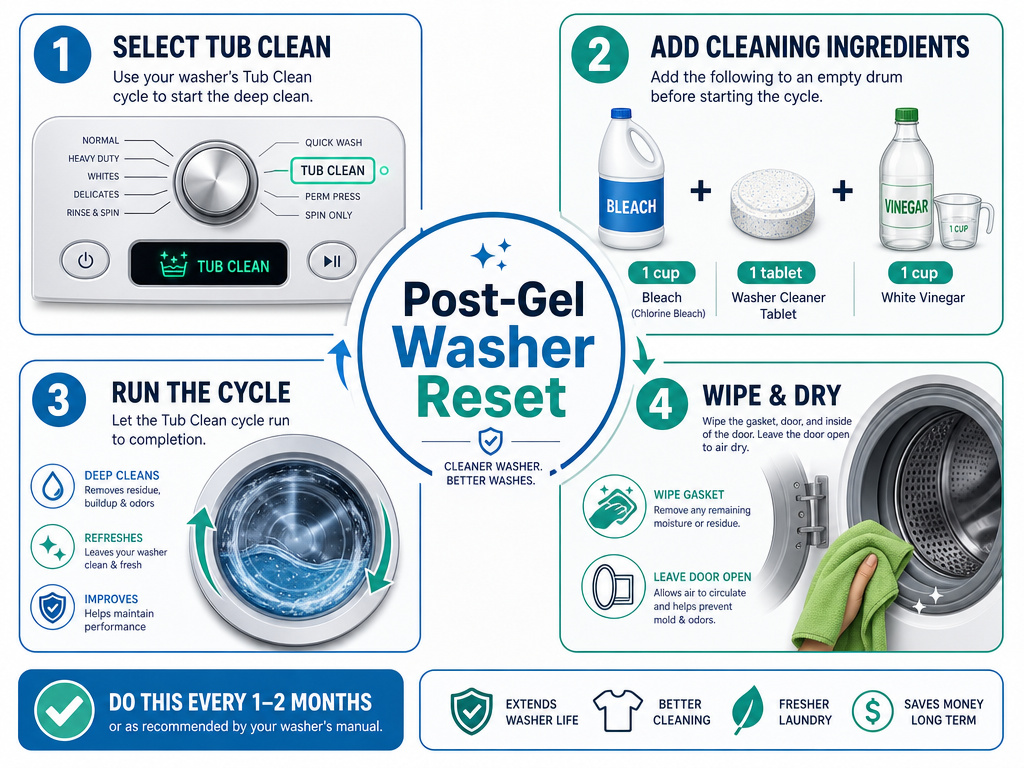
Once the gel is dissolved and the clothes are dealt with, you need to reset the machine. This isn’t optional, it prevents odors and ensures your next load is clean.
- Select the Cleaning Cycle. Use the “Tub Clean,” “Clean Washer,” or “Sanitary” cycle. If your machine lacks this, set it to the hottest water temperature and longest cycle.
- Add Cleaner. Pour 1 cup of bleach into the detergent dispenser. Alternatively, use a washing machine cleaner tablet or 1 cup of distilled white vinegar.
- Run the Cycle. Let it complete. This flushes dissolved gel residue from the drain lines and sanitizes the drum.
- Wipe and Dry. Wipe the door gasket, drum, and detergent dispenser with a dry cloth. Leave the door open for several hours.
Making this a monthly habit, as LG recommends, creates a hostile environment for any stray gel or detergent film, making future accidental wash incidents much easier to manage. It’s the same principle behind keeping a clean diaper pail, routine maintenance prevents big problems.
Preventing Diaper Gel Disasters
An ounce of prevention is worth hours of cleanup. Build these three habits.
Habit 1: The Pre-Wash Check
Always check pockets, cuffs, and the folds of pajamas. A common culprit is a pull-up tucked inside a pair of kids’ pajamas. Establish a rule: all disposable diapers and training pants go directly into a sealed trash can, not a hamper.
Habit 2: Use a Laundry Bag for Small Items
Wash baby socks, mittens, and delicate items in a zippered mesh laundry bag. If a gel bead escapes, it’s contained within the bag.
Habit 3: Monthly Washer Maintenance
Schedule it. Run the cleaning cycle with bleach on the first of every month. This breaks down any invisible residue from detergent, fabric softener, or stray polymers, keeping your machine performing like new and preventing the kind of damage from diapers that shortens its life.
Frequently Asked Questions
Can diaper gel ruin my washing machine?
Yes, but typically only if it’s ignored or cleaned incorrectly. The main risk is gel hardening between the inner and outer drum of a front-load washer, which can seize the drum and burn out the motor. Following the salt-and-dryer method immediately after the incident prevents this damage.
Why does salt work and not detergent?
Diaper gel (sodium polyacrylate) is held together by ionic bonds that trap water. Salt (sodium chloride) floods the system with sodium ions, breaking those bonds and causing the gel to release its water. Detergent lacks this ionic action and cannot break the polymer chain.
Should I call a repair person?
Not for the gel alone. If you’ve completed the cleaning process and the washer is making grinding noises, won’t spin, or won’t drain, then gel may have caused a mechanical obstruction. At that point, a service call is needed to inspect the pump and tub.
How do I get gel out of the dryer?
The dryer is the easiest part. The gel turns into a dry powder. Simply empty the lint trap thoroughly during and after the cycle. Wipe the inside of the drum with a damp cloth to remove any fine dust, and you’re done.
The Bottom Line
A diaper in the washer is a rite of passage for parents. It looks catastrophic, but the fix is straightforward chemistry and a little counterintuitive courage. Grab the salt, not the detergent. Trust the dryer with wet clothes. And commit to that monthly cleaning cycle. Your machine will handle hundreds of messy kid-related loads, this one just needs the right 20-minute intervention.
