
Learn How to Use an Ubbi Diaper Pail | Simple Setup & Tips
This post contains affiliate links. As an Amazon Associate, we learn from qualifying purchases
To use a Ubbi diaper pail, you install a standard kitchen trash bag, lock the lid after every use, and empty it every 2-3 days. The steel construction and tight seal are designed to trap odor, but they only work if the bag is seated correctly and the lid fully engages.
That seal is the whole game. A Ubbi doesn’t use magic filters or proprietary bags. It relies on a physical barrier, metal against a fitted plastic liner, to contain smell. Get the bag installation wrong, and you’ve built a very expensive, very smelly box.
What follows is the real procedure, not the marketing copy. We’ll cover the six-step setup most people skip, the correct way to change a bag so it doesn’t tear, and the cleaning rhythm that actually keeps the pail from becoming a science project.
Key Takeaways
- The Ubbi’s odor control depends entirely on a perfect seal between the lid and a tightly fitted bag.
- Always lock the lid after dropping in a diaper; an unlocked lid is just a suggestion to smells.
- Use standard 13-gallon kitchen bags, but cinch the excess bag tightly around the inner rim before snapping the lid shut.
- Empty the pail every 2-3 days, without exception. Waiting longer lets ammonia gases permeate the steel.
- A monthly deep clean with vinegar or a bleach solution is non-negotiable; surface wipes don’t touch the residue that causes permanent stink.
How an Ubbi Diaper Pail Actually Works
Most diaper pails use a proprietary cartridge or a twisting mechanism. The Ubbi diaper pail does neither. It’s a powder-coated steel bucket with a locking, gasket-lined lid. The design assumes you’ll use your own bags.
The Ubbi’s effectiveness hinges on a simple principle: a completely airtight environment. When the lid locks, a silicone gasket compresses against the top of your installed bag, creating a seal that volatile odor molecules cannot easily escape.
This is why bag fit matters more than the bag’s brand. A loosely draped bag leaves gaps. A bag stretched too thin over the sharp inner rim will tear. Your goal is a drum-tight liner that makes full contact with the gasket around the entire circumference. When that happens, the only smell you get is a brief puff when you open the lid to add a diaper. If you smell it from across the room with the lid closed, the seal has failed.
The 6-Step Setup for Odor-Free Use
Don’t just unbox it and throw in a bag. These six steps, done in order, configure the pail for maximum containment. Skip one, and you’ll be troubleshooting smells within a week.
- Unlock and fully open the lid. Press the two large buttons on the front simultaneously and lift. Listen for a definitive click, this means the lid mechanism is fully engaged in the open position and won’t unexpectedly drop.
- Remove the inner bucket. Lift it straight out. This is the part you will eventually need to clean the Ubbi thoroughly.
- Install your first bag. Take a standard, unscented 13-gallon kitchen trash bag. Unfold it completely and lower it into the main steel body. Push it down so it conforms to the bottom corners.
- Cinch and fold the excess. This is the critical step everyone misses. Gather all the excess bag material above the rim. Twist it once, then fold the twisted portion down inside the pail, around the inner circumference. You’re creating a thick, padded ring of plastic.
- Replace the inner bucket. Seat it firmly down onto the folded bag ring. This weight helps hold the bag in place and creates a smoother surface for the lid gasket to seal against.
- Test the seal. Close the lid and press down until you hear the lock click. Run your finger around the seam between the lid and the base. You should not feel any loose bag material protruding.
Common mistake: Letting the bag drape over the outer rim. The lid crushes it into an uneven seal, and odors leak from the creases within two days.
If you’ve ever struggled with how to open an Ubbi diaper pail that feels stuck, it’s often because a poorly installed bag has gotten caught in the hinge or latch. This setup prevents that.
How to Change the Bag (Without the Tear)
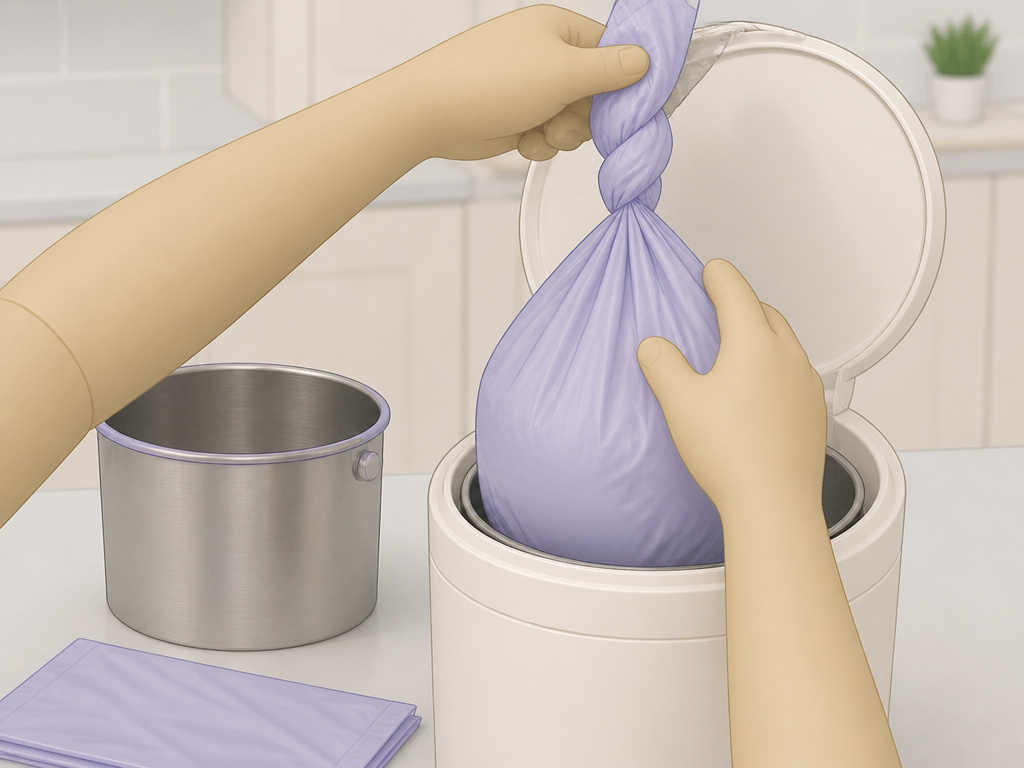 You’ll do this every 2-3 days. The process is simple, but force is the enemy. Rushing leads to ripped bags and leftover debris that spoils your fresh start.
- Unlock and open the lid.
- Lift the inner bucket out and set it aside.
- Gather the top of the full bag and twist it closed. Lift it straight up and out. If it resists, don’t yank. Reach in and dislodge any diaper corners stuck to the side with a finger.
- Inspect the empty steel interior. Wipe out any obvious debris or moisture with a paper towel. This five-second habit is what prevents a lingering sour smell.
- Install the new bag using the cinch-and-fold method from the setup steps above. The key is ensuring the new bag sits inside the pail, with no material over the metal rim where the lid closes.
This routine for liner replacement is your main defense. A diaper pail is only as good as its last bag change.
Daily Use: The Open, Drop, Lock Rhythm
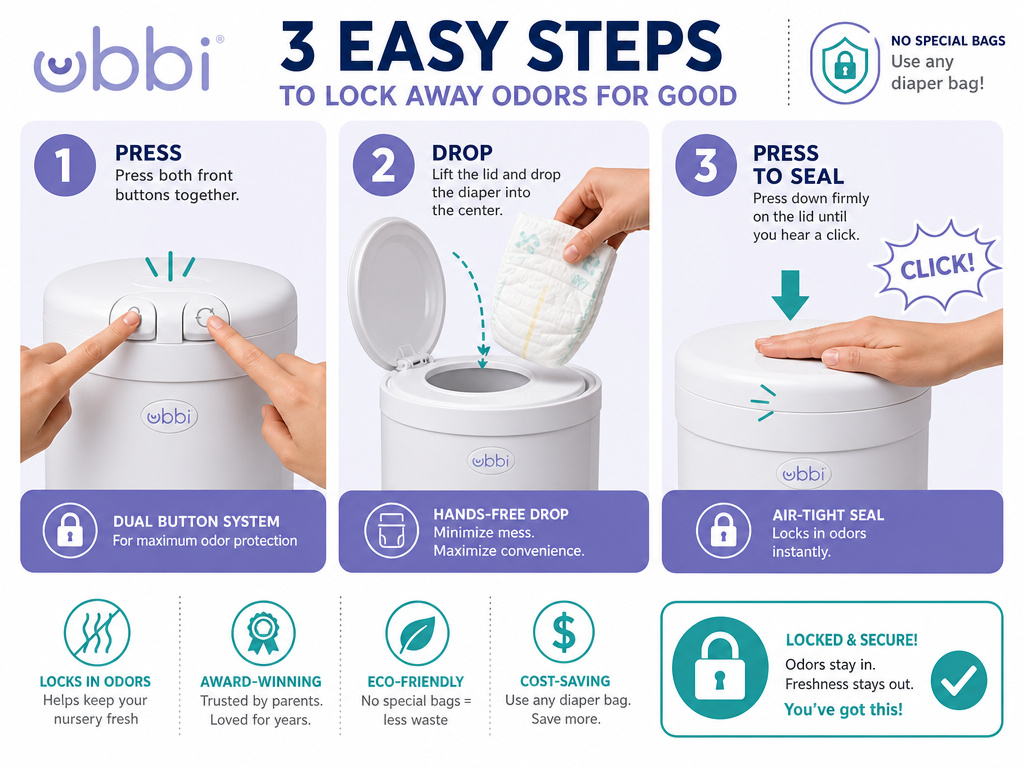 The Ubbi is not a step-can. You don’t press a pedal. You use your hands. This becomes muscle memory, but there’s a right way.
- Press the two front buttons to unlock and open the lid.
- Drop the diaper. Aim for the center.
- Immediately close the lid and press down firmly until you hear the lock click.
Always lock it. An unlocked lid sits slightly ajar, breaking the seal. Think of the lock not as a security feature for toddlers, but as the “on” switch for the odor barrier. This is the core habit for effective diaper pail odor control.
Beating the Odor: Cleaning vs. Deodorizing
There is a difference. Cleaning removes the physical residue that bacteria feed on. Deodorizing temporarily masks the smell they produce. You need both, on different schedules.
| Task | Frequency | Product | Why It Works |
|---|---|---|---|
| Interior Wipe-Down | With every bag change | Disinfecting wipe or damp paper towel | Removes surface moisture and debris before they bake onto the steel. |
| Deep Cleaning | Every 3-4 weeks | 1:1 vinegar/water solution or dilute bleach | Dissolves the invisible urea and ammonia film that causes permanent, baked-in stink. |
| Deodorizing | As needed between cleans | Baking soda, commercial diaper pail deodorizer, or dryer sheet | Absorbs or neutralizes odor molecules in the air space of the pail. |
Deep cleaning a pail is mandatory. Here’s how: 1. Take the entire pail to a bathtub or utility sink. 2. Remove the inner bucket and the lid. The lid usually detaches by pulling it upward off its hinge pins. 3. Wash all parts (steel body, inner bucket, lid, locking mechanism) with warm, soapy water. A bottle brush helps with the steel body’s corners. 4. For disinfecting, soak parts in your vinegar solution for 15 minutes, or wipe with a dilute bleach solution (1/2 cup bleach per gallon of water). Rinse thoroughly. 5. Let every part air-dry completely before reassembling. Moisture is the enemy.
If a faint smell persists after cleaning, that’s when you reach for a recommended deodorizer. A tablespoon of baking soda in the bottom of a fresh bag, or a dedicated product like Munchkin Arm & Hammer Diaper Pail Refills, can bridge the gap.
Troubleshooting Common Ubbi Problems
The Ubbi is simple, but a few issues pop up repeatedly.
- Lid won’t open or feels stuck: This is almost always a bag problem. A piece of plastic has gotten caught in the latch. Force will break it. Open the Ubbi pail lid by pressing the buttons and gently wiggling the lid up while pulling any visible bag material free from the seam.
- Odor leaks when closed: Check the seal. Is the bag cinched tightly inside? Is the lid locking with a solid click? Wipe the silicone gasket on the lid with a damp cloth, dried residue can prevent a tight seal.
- Bag keeps tearing: You’re likely pulling it too tightly over the sharp inner rim during installation. Use the cinch-and-fold method to create a buffer. Also, avoid ultra-thin, discount bags.
- Inner bucket is difficult to remove: It can get suctioned in place. Twist it slightly as you lift to break the seal.
Frequently Asked Questions
Can you use any bag in an Ubbi?
Yes, that’s the main selling point. Standard 13-gallon kitchen trash bags are perfect. The best ones are unscented and of medium thickness, not the flimsy dollar-store kind, not the heavy-duty contractor bags that are too rigid to fold neatly.
How often should you empty an Ubbi diaper pail?
Every 2 to 3 days. This isn’t about capacity; it’s about chemistry. After about 72 hours, the bacteria in soiled diapers produce significant ammonia gas. That gas can eventually permeate even a good seal and linger in the steel.
Why does my Ubbi still smell after I clean it?
The smell has likely absorbed into the plastic of the inner bucket or the silicone gasket. After your usual clean, try soaking just those plastic parts in a strong vinegar solution overnight. If that fails, sunlight is a powerful deodorizer, let the inner bucket sit outside on a sunny day.
Is the Ubbi worth it compared to other systems?
It depends on your priorities. The Ubbi wins on long-term cost (no proprietary bags) and proven odor seal when used correctly. Systems like the Diaper Genie are more convenient for single-handed use but lock you into ongoing cartridge costs. For a detailed breakdown, see our reviews on the best diaper pail systems.
Before You Go
Using an Ubbi diaper pail correctly comes down to three things: a perfectly installed bag, a religiously locked lid, and a strict cleaning schedule. It’s a tool, not a miracle worker. Treat it well, cinch that bag, click that lock, empty it on time, and it will keep your nursery noticeably fresher. Neglect any of those, and you’ll wonder why you bought a steel can. The choice is that straightforward.
