
The Guide on How to Deodorize Your Diaper Pail for Good
This post contains affiliate links. As an Amazon Associate, we learn from qualifying purchases
To deodorize a diaper pail, you need a monthly deep clean with baking soda or vinegar, a 2–4 hour sun cure, and daily habits like frequent emptying. Plastic pails can absorb odors permanently after 12–18 months of heavy use, at which point replacement is the only fix. Steel pails like the Ubbi don’t absorb smells, making them a longer-term solution.
The permanent saturation point is what most guides miss. You can follow every step perfectly, but if your plastic pail is past that 18-month mark with heavy use, the funk is in the material itself. No amount of scrubbing will pull it out.
What follows is the full breakdown: the deep clean that works, the daily moves that prevent the need for it, and the hard truth about when to stop cleaning and start shopping. We’ll cover specific instructions for brands like the Momcozy Triple-Seal, the Diaper Genie Complete, and the Ubbi, because their mechanics change the game.
Key Takeaways
- Plastic diaper pails can absorb odors into their material permanently after 12–18 months of heavy use. If a deep clean doesn’t work, the pail is saturated.
- A true deep clean requires disassembly, a baking soda or vinegar soak, a thorough rinse, and a 2–4 hour sun cure in direct UV light to kill odor-causing bacteria.
- Empty the pail every 2–3 days, or daily in summer. A half-full pail emptied often smells far better than a full one changed weekly.
- For plastic pails, sprinkle 2–3 tablespoons of baking soda in the bottom with each new bag. For systems like the Momcozy, use their clip-in deodorizer pack.
- Steel pails like the Ubbi do not absorb odors into their material. A simple wipe-down and sun cure keeps them fresh indefinitely.
Why Your Diaper Pail Smells (It’s Not Just the Diapers)
Bacteria and ammonia are the primary culprits, but the pail itself often becomes the problem. Every wet diaper introduces moisture and urea. Bacteria feast on this, producing ammonia gas and acidic compounds that cling to surfaces.
Plastic is porous at a microscopic level. Over months, those ammonia and fecal compounds seep into the material. Think of it like a kitchen sponge that holds onto garlic smell no matter how you rinse it. After about a year of heavy use, that sponge is the smell. This is the permanent saturation point noted in third-party testing. A standard clean a diaper pail routine won’t fix it.
Steel pails like the Ubbi present a different issue. The steel itself doesn’t absorb odors, but residue builds up on the interior surface and, more critically, in the rubber gaskets around the door. The smell lives on the pail, not in it.
Where this goes sideways: Assuming a quick wipe is enough. Residue builds up in seams, under rim lips, and inside mechanical parts like the Momcozy’s rotating observation ball. Skip a full disassembly, and you’re just cleaning the visible 20% where 80% of the smell lives.
The Monthly Deep Clean Process
This isn’t a wipe-down. It’s a full disassembly, chemical treatment, and UV sterilization. Set aside an afternoon when you can let parts air dry completely. Damp reassembly breeds new bacteria instantly.
Before you start: Wear gloves. Never mix vinegar and bleach—it creates toxic chlorine gas. Work in a well-ventilated area, and keep all cleaning solutions away from children.
First, empty the pail and take it outside or to a utility sink. Strip it down. For a Momcozy Triple-Seal DP01, this means using a cross-head screwdriver to remove the screws on the handle and taking out the rotating observation ball. For a Diaper Genie Complete, pop out the carbon filter holder and remove the interior clamps if possible. An Ubbi steel pail has fewer parts, but you should remove the bag holder and the rubber door seal if it detaches.
Wash all parts with hot, soapy water to remove loose debris. Now apply your deodorizing agent.
| Cleaning Agent | Best For | How to Use | Sit Time |
|---|---|---|---|
| Baking Soda Paste | Deep-set, acidic odors (ammonia smell). | Mix ½ cup baking soda with enough water to form a spreadable paste. Coat the entire interior, focusing on stained areas. | 10–15 minutes |
| White Vinegar Solution | Mineral deposits, mildew, and general bacteria. | Mix 1 part white vinegar with 2 parts warm water in a spray bottle. Soak all surfaces. | 5–10 minutes |
| Mild Dish Soap | Initial grease and soil removal. | Use as a first pass before applying a deodorizer. | Scrub and rinse immediately |
Scrub every inch, especially under rims and inside channels. A soft-bristle brush or old toothbrush is essential. Rinse every part with clean water until no soap or paste residue remains.
Now, the most important step: the sun cure. Leave every part in direct sunlight for 2–4 hours. UV rays are a natural sterilizer that kills odor-causing bacteria and breaks down residual compounds cleaning agents can’t reach. For plastic pails, this helps pull odors from the porous surface. For steel pails, it sanitizes the rubber gaskets. Let everything dry completely before reassembling.
A monthly deep clean with a sun cure is non-negotiable for odor control. The UV light does what scrubbing cannot.
Daily Habits That Stop Smell Before It Starts
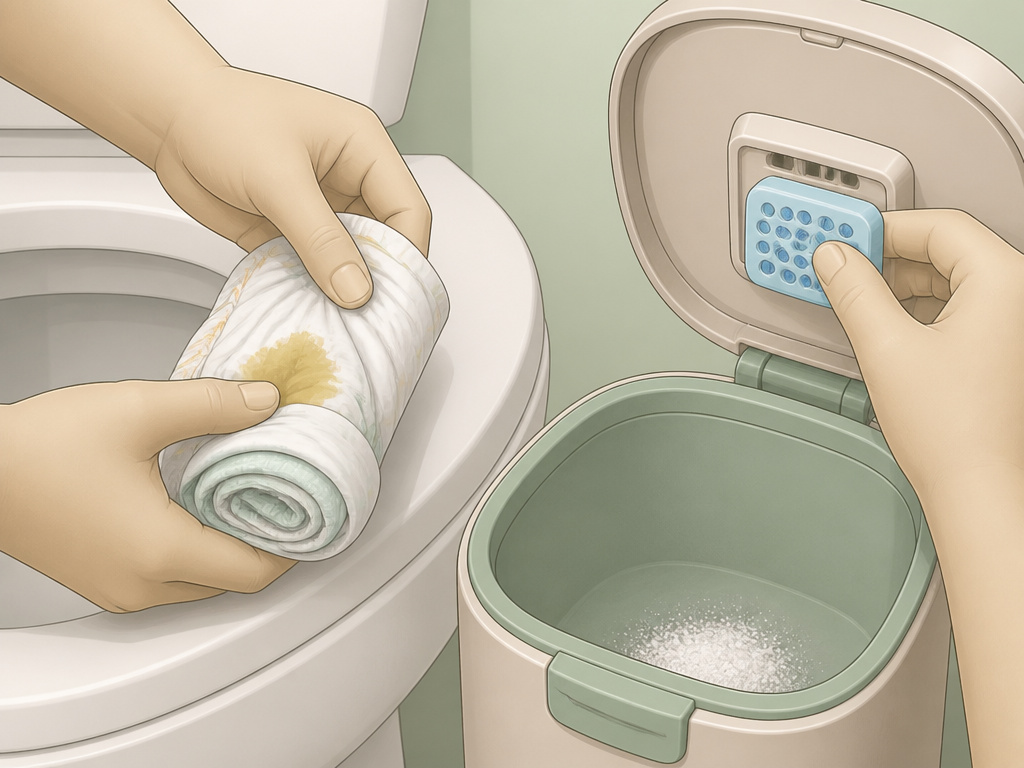
A deep clean is your reset button. Daily habits are how you keep that button from getting stuck. The goal is to limit bacterial food and time.
First, empty the pail before it’s full. A half-full pail emptied every two days smells better than a bursting one changed weekly. In summer or a warm nursery, make it a daily task. Heat accelerates bacterial growth exponentially.
Second, pre-treat the diapers. Dump solid waste into the toilet before disposing of the diaper. Tightly roll the diaper to minimize surface area. The Momcozy manual explicitly recommends this to “prevent leaks or contamination inside the pail.”
Third, use a daily deodorizer. For open systems like the Ubbi or a simple trash can, sprinkle 2–3 tablespoons of baking soda in the bottom each time you put in a new bag. It neutralizes acidic odors as they form. For closed systems, use the designed product. The Diaper Genie Complete needs its carbon filter replaced every 3 months—mark your calendar. The Momcozy DP01 uses a clip-in deodorizer pack installed in a slot on the underside of the lid.
Common mistake: Waiting for a smell to react. Odor control is proactive. If you can smell it when the pail is empty, you’re already two weeks behind.
Choosing and Using the Right Deodorizer Products
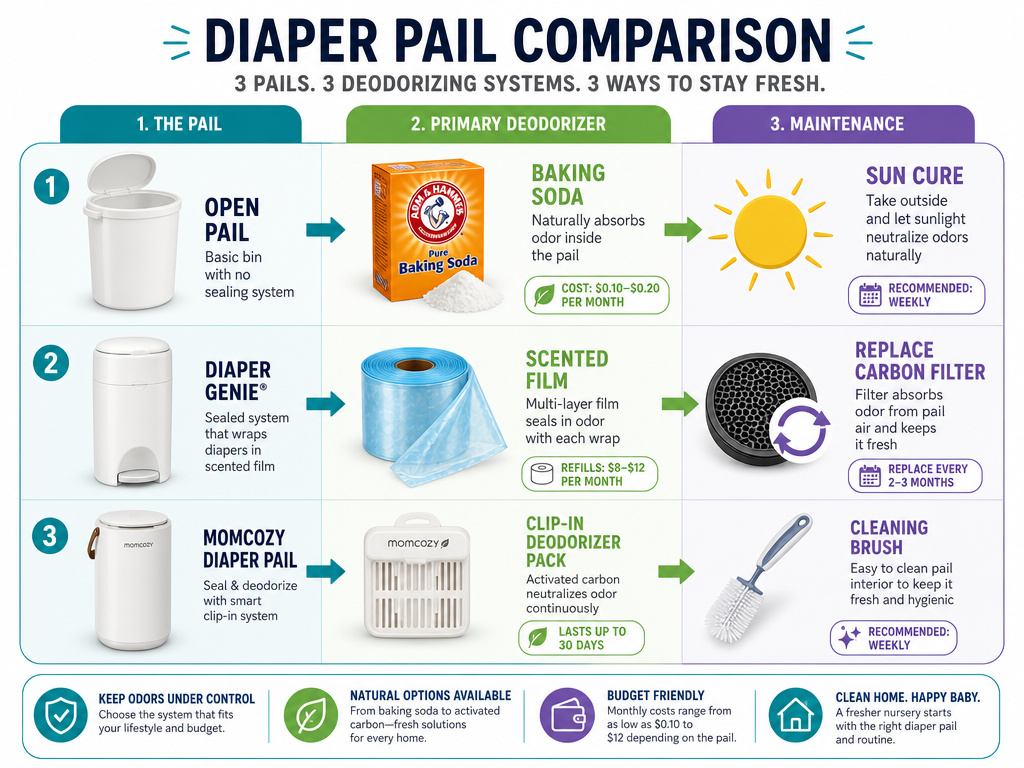
Deodorizers aren’t all the same. They work through absorption, chemical neutralization, or scent masking. Your pail type dictates your best choice.
For plastic pails, you need a neutralizer that tackles ammonia. Baking soda is the classic because it’s a base that counters acidic compounds. Commercial diaper pail deodorizers like those from Munchkin or Angel Dear often use baking soda as a core ingredient, sometimes in a convenient drop-in pod. They’re a good pick if you want a hands-off approach.
For sealed system pails like the Diaper Genie, your deodorizer is built-in. The scented film that wraps each diaper contains odor neutralizers. The secondary defense is the carbon filter in the lid, which adsorbs gaseous odors. This filter loses effectiveness over time and must be replaced quarterly. If you skip this, the pail will smell even with fresh refills.
The Momcozy Triple-Seal has a patented slot for a proprietary deodorizer pack. It’s not an optional accessory; it’s part of the engineered odor-control system. Forgetting to install or replace it is like leaving the filter out of your water pitcher.
| Pail Type | Primary Deodorizer | Secondary/Maintenance | Key Consideration |
|---|---|---|---|
| Open (Ubbi, simple can) | Baking soda sprinkle | Sun cure during deep clean | Easy to use, but requires daily habit. |
| Sealed Film (Diaper Genie) | Sented refill film | Carbon filter (replace every 3 months) | System fails if you use non-brand refills. |
| Mechanical Seal (Momcozy) | Clip-in deodorizer pack | Regular deep cleaning of rotating parts | Pack must be securely clipped or it does nothing. |
When reviewing the best diaper pails for odor control, the deodorizer mechanism is a critical rating factor. A good pail makes the deodorizer easy to use and essential to the function.
When to Deep Clean More Often (Or Give Up)
The monthly rule has exceptions. Your environment and usage pattern can force a faster schedule.
If the nursery is consistently warm—above 75°F (24°C)—or it’s summer, move your deep clean to every 2–3 weeks. Bacterial growth rates double with heat. Also, if your baby is on antibiotics, their waste can host different bacteria that cause sharper, more persistent odors.
But what if you’re cleaning weekly and the empty pail still reeks? You’ve likely hit the permanent saturation point for plastic. As noted in our research, after 12–18 months of heavy use, the plastic can be done. No amount of baking soda, vinegar, or sun will pull the smell out.
At that point, you have two paths. You can replace the plastic pail, knowing it may happen again. Or, you can upgrade to a steel pail like the Ubbi. Steel doesn’t absorb odors into its material, so a proper deep clean an Ubbi pail can restore it to like-new condition indefinitely. For a family with a year or more of diapering left, steel is often the cheaper long-term play. Our guide on the best diaper pails breaks down the lifetime cost.
Frequently Asked Questions
Can I use bleach to deodorize my diaper pail?
You can, but with extreme caution. Use only 1 tablespoon of regular bleach per gallon of cool water. Never mix it with vinegar or ammonia-based cleaners. Rinse the pail three times after using bleach to ensure no residue remains, as it can irritate baby’s skin. For most odors, baking soda or vinegar is safer and equally effective.
Why does my Diaper Genie still smell with a new refill?
Check the carbon filter. If it’s older than 3 months, it’s saturated and no longer working. Replace it. Also, ensure you’re pulling enough film through the system when you reload; if the film is too tight, the seals don’t close properly, letting odor escape.
How do I deodorize the rubber gasket on my Ubbi pail?
Remove it if possible. Soak the gasket in your vinegar solution for 10 minutes, scrub it with a soft brush, rinse thoroughly, and then give it the full 2–4 hour sun cure. The UV light is particularly effective on rubber.
Are diaper pail deodorizer refills worth the money?
For proprietary systems like the Momcozy or the Diaper Genie carbon filter, yes—they are integral to the design. For open pails, a box of baking soda is far cheaper and works just as well. See our roundup of recommended diaper pail deodorizers for brand-specific picks.
How can I make my diaper pail smell better immediately?
Empty it, even if it’s not full. Tie off the current bag and take it outside. Sprinkle a generous amount of baking soda into the bottom of the new bag before you put it in. For a quick surface wipe, a cloth dampened with diluted white vinegar will neutralize ammonia smells on contact.
Do steel pails really not smell?
They don’t absorb smell into their material, which is the fatal flaw of plastic. However, steel pails still get dirty. Residue on the interior surface and in the seals will smell if not cleaned. The advantage is that a proper clean actually works on steel, while plastic can retain odor permanently.
The Bottom Line
Deodorizing a diaper pail is a mix of chemistry, habit, and knowing when you’re fighting a losing battle. Commit to the monthly deep clean with a sun cure, be religious about frequent emptying, and use the right deodorizer for your pail type. If you’re using a plastic pail and the smell won’t quit after 18 months, listen to the pail. It’s telling you it’s done. Switching to a steel pail like the Ubbi or investing in one of the best odor-control pails from the start can save you months of frustration. Your nursery air will thank you.
