
How to Fix a Diaper Genie: Step-by-Step Troubleshooting Guide
This post contains affiliate links. As an Amazon Associate, we learn from qualifying purchases
To fix a Diaper Genie, identify the specific failure: a jammed lid usually needs the bag emptied or the internal clamp track cleaned; a lost seal often means the carbon filter is spent (replace every 3 months); and a bag that won’t cut points to a clogged cutter blade. Most issues are dirt or misalignment, not broken parts.
The manual’s “clean periodically” is where these problems start. Dried film residue and diaper dust build up on the moving parts inside the head. That gunk is sticky, and it gums up the spring-loaded clamps and the sliding cutter blade within a couple of months of normal use.
What follows: a diagnostic flowchart to pinpoint your issue, the exact cleaning steps from the service manual, the refill process that prevents jams, and what the one-year warranty actually covers when a fix isn’t enough.
Key Takeaways
- The carbon filter is a consumable part. The official manual states to replace it every 3 months or when it loses effectiveness; a stinky pail is the first sign it’s gone.
- Ninety percent of “broken” Diaper Genies have a simple mechanical jam. A monthly wipe-down of the internal clamp track and cutter with isopropyl alcohol prevents most failures.
- Overstuffing the pail stresses the clamp mechanism and can bend the internal plastic fingers. The official refill holds up to 270 newborn-sized diapers, use that as a guide, not a challenge.
- The one-year limited warranty requires your original sales receipt, the product model number, and the retailer’s name. It does not cover damage from misuse, incorrect assembly, or normal wear and tear.
- If the main body plastic is cracked or a major hinge is snapped, the unit is likely beyond repair. The cost of a new pail is usually less than the hassle of a bodged fix.
Before You Start: The Two Things That Aren’t Broken
Worth knowing before you start: A visible gap between the main body (B) and the canister (C) is normal per the manufacturer and does not affect odor control. Also, if the lid won’t open at all, the bag is almost certainly full and needs emptying, this is a design cue, not a malfunction.
First, rule out the simple stuff. Press the foot pedal. Does the lid not budge? The internal bag is probably full. Press the canister button, open it up, and check. If the lid opens but doesn’t close tightly, smell the air around the carbon filter slot. A faint, persistent odor means the filter is exhausted.
If those check out, your issue is mechanical. The system relies on two clamps that grab the film and a cutter blade that slides across to sever it. Both are inside the black plastic head under the lid.
The Diagnostic Flow: Lid, Stink, or Cut?
Your symptom points to one of three systems. Use this table to narrow it down fast.
| Symptom | Most Likely Cause | First Thing to Check |
|---|---|---|
| Lid won’t open or is sluggish | Full bag; jammed clamp track | Open canister, check bag fullness, inspect for debris in clamp rails. |
| Odor escapes even when closed | Expired carbon filter | Remove filter holder—filter should be replaced every 3 months. |
| Bag won’t cut or tears | Clogged cutter blade; mis-threaded film | Visually inspect cutter slot for dried film residue. |
| Lid doesn’t seal shut | Bent clamp fingers; obstructed track | Look for visible diaper threads or film stuck in the closing mechanism. |
The “Lid won’t open” problem is the most common. It feels like the pedal is stuck. This is almost never a broken pedal mechanism. It’s the internal clamps bound up by gunk.
The Monthly Wipe-Down That Prevents 80% of Issues
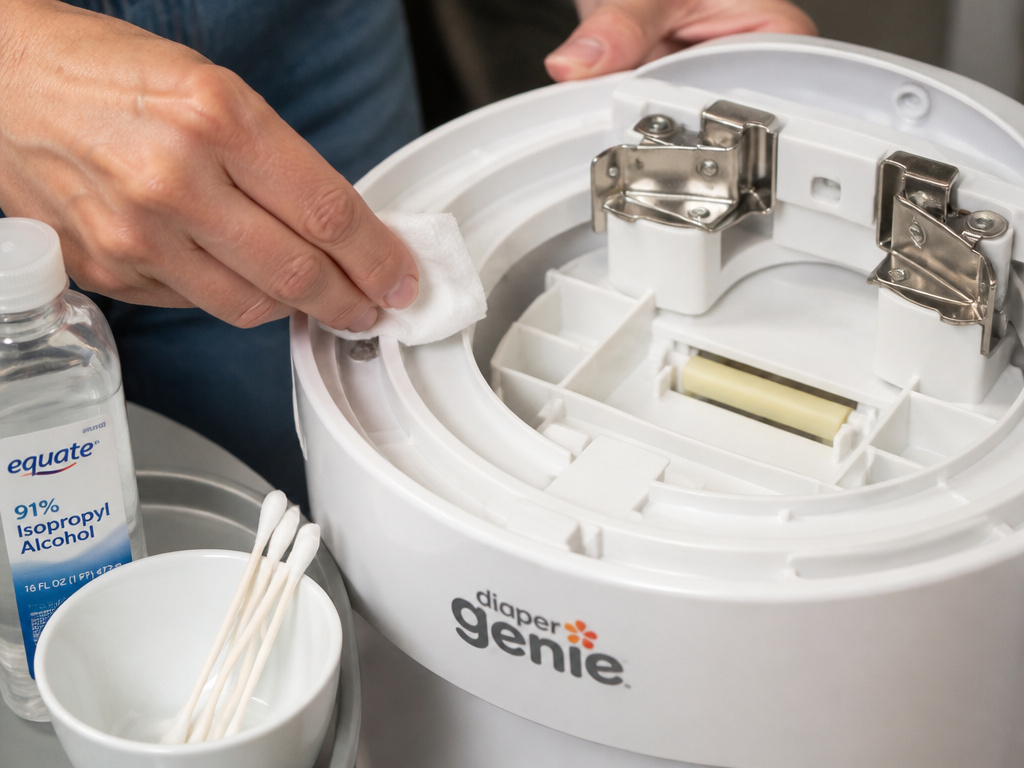 The official manual says clean “periodically.” That’s vague. A specific, monthly five-minute wipe stops jams before they start. You need isopropyl alcohol (70% or higher), cotton swabs, and a few paper towels.
Press the canister button and remove the inner bucket. Look up inside the head. You’ll see two metal clamps on springs and a plastic track they slide in. You’ll also see the vertical slot for the cutter blade.
Common mistake: Using soapy water or bleach spray inside the head. It leaves residue that attracts more dust and creates a paste. Alcohol evaporates cleanly and dissolves the sticky film residue.
- Soak a paper towel corner in alcohol. Wipe the entire plastic track the clamps move in. Get into the corners.
- Use a cotton swab dipped in alcohol to clean the metal clamps themselves. Wipe the sides and the gripping teeth.
- Find the cutter slot, a thin vertical opening. Fold a stiff piece of paper towel, soak it in alcohol, and slide it through the slot like dental floss. Repeat with a clean section until no more brown residue comes off.
- Let everything air-dry for two minutes. Press the foot pedal a few times to work the alcohol into the springs.
Do this the first weekend of every month. The clamps will snap shut with an audible, crisp click when they’re clean. If they still drag after cleaning, you might have a physical obstruction.
When It’s Not Dirt: The Physical Obstruction Check
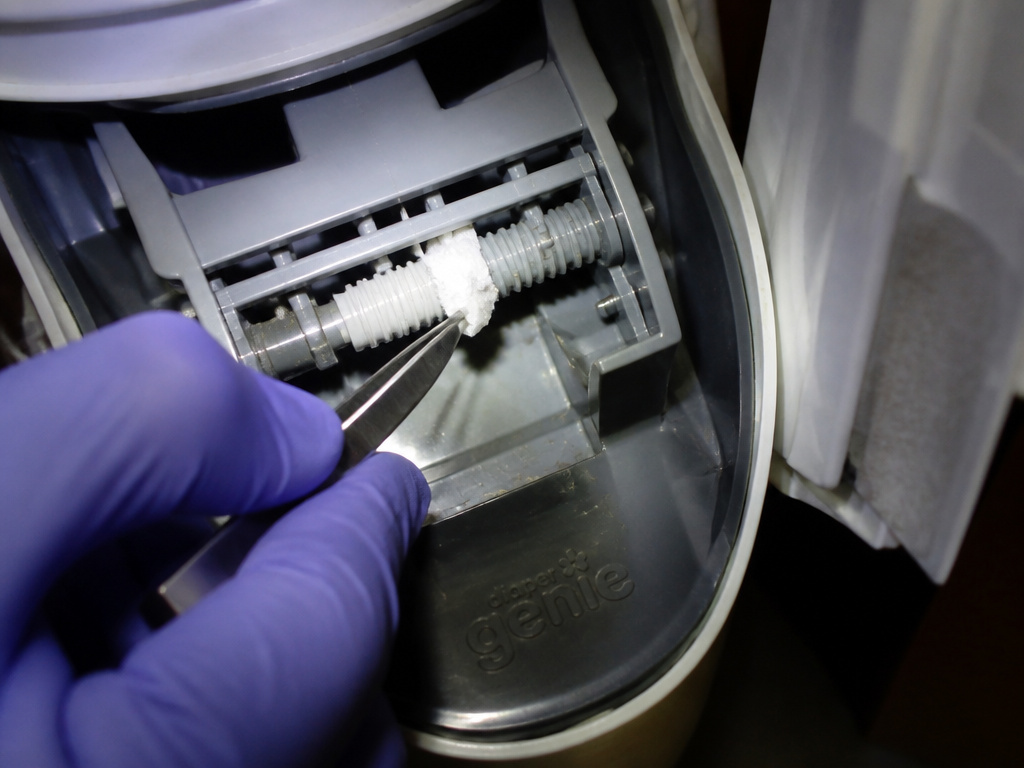 Sometimes a piece of diaper liner or a thick fragment of dried wipes gets lodged in the works. This requires a closer look and a pair of long-nosed tweezers.
With the canister removed and the head open, press the foot pedal to open the clamps fully. Shine a flashlight into the clamp area. Look for any foreign material, fuzz, a stray piece of plastic, a clump of dust. Use the tweezers to gently remove anything you see.
Next, check the cutter blade. If something is stuck in its slot, it can’t slide across to cut the bag. The manual’s cutter (E) is a white plastic piece. Try to move it side-to-side with your finger. It should slide smoothly. If it’s stuck, your alcohol-flossing might need a second, more aggressive pass. Never force it.
Where this goes sideways: Forcing a stuck cutter or clamp. The plastic internal gears can strip. If gentle cleaning doesn’t free it, the mechanism may be damaged from a prior overstuffing incident.
The 7-Step Bump-Feed Replacement (and the One Step Nobody Skips)
A bad refill install causes half of all feeding and cutting problems. The official Diaper Genie refill process has a critical step most people gloss over.
Here is the exact sequence from the Playtex manual, with the consequence of skipping each step.
- Remove the plastic seal from the new refill. Pull the plastic tab (J). If you leave even a remnant of this seal, the film won’t feed.
- Pull the film up and out of the refill. Guide it through the center hole in the pail’s base. This seems obvious, but threading it outside the hole leads to an immediate tangle.
- Knot the end of the film. A tight, bulky knot. Skip this, and the clamps have nothing to grab on the first diaper. The film just retracts.
- Press the foot pedal to open the lid. Place the refill into the pail and press down slightly to seat it. An unseated refill can tilt and bind.
- Release the foot pedal. The clamps should close on the knotted film.
- Open the canister (C) with the button (F). Reach in, grab the knotted film from the clamps, and pull it to the bottom of the pail.
- Pull a little extra film. This is the step everyone misses. The manual explicitly says to “pull a little extra film to prevent stress on the clamp for optimal functionality.” This slack is what keeps the clamp mechanism from straining on the first dozen diapers. If you pull it taut, the clamp motor works against the full weight of the bag immediately.
After this, close the canister. Your Diaper Genie bag installation is correct. The system knows how to change the bag when the time comes, if the cutter is clean.
The Carbon Filter: Your Odor Control’s Expiration Date
The carbon filter (H) in the filter holder (I) is not a permanent part. It’s a consumable, like the bags. The owner’s manual for the Diaper Genie Complete states: “Replace carbon filter, every 3 months or when they lose effectiveness.”
Replace carbon filter, every 3 months or when they lose effectiveness.
You can find the filter holder on the back of the pail’s head. Slide it out. The filter is a black carbon-impregnated pad. If your nursery starts to have a baseline odor near the pail, even when closed, this filter is done. It’s absorbed all the volatile organic compounds it can.
New filters are sold separately. Pop the old one out, slide the new one in. This single action fixes most “smelly pail” complaints that aren’t related to a full bag. Understanding what Diaper Genie filters absorb makes this maintenance make sense.
Warranty, Replacement Parts, and When to Give Up
The manufacturer offers a one-year limited warranty on manufacturing defects for residential use. It’s non-transferable and requires proof of purchase.
What it covers: Defects in materials or workmanship. If a part fails through no fault of your own within a year, they may replace the part or the entire pail.
What it doesn’t cover: Normal wear and tear. Misuse. Improper assembly. Damage from overstuffing. Commercial use. The warranty also doesn’t cover “slight color variations” or “minor imperfections.”
The part nobody mentions: Diaper Genie states they do not sell individual replacement parts. If your pail is out of warranty and a specific plastic piece breaks, your only official path is to contact customer service and hope for a goodwill gesture. The market for third-party parts is nearly nonexistent.
To file a claim, you’ll need the product model number, purchase date, retailer name, and a copy of the sales receipt. They may require you to return the product or a component for inspection.
If the main body shell is cracked, a hinge is snapped off, or the foot pedal mechanism is shattered internally, repair is impractical. The cost and effort exceed that of a new unit. At that point, knowing whether you even need a diaper pail again is a valid question.
Frequently Asked Questions
Why does my Diaper Genie lid not stay closed?
The internal clamps aren’t fully engaging. This is usually due to a dirty clamp track, a spent carbon filter causing the mechanism to sit slightly proud, or an under-threaded refill bag that doesn’t provide enough material for the clamps to grip. Clean the track first.
How do I know if my Diaper Genie carbon filter is bad?
Mark your calendar three months from installation. If you notice a persistent odor in the room around the pail, even when it’s closed, the filter is exhausted. Physically, an old filter may look unchanged, but its adsorbent capacity is gone.
Can you manually cut the Diaper Genie bag?
Yes. If the cutter is jammed, open the canister, pull up enough film to tie off the full bag, and use scissors to cut it above the knot. Dispose of the full bag, then clean the cutter slot thoroughly before restarting with a new refill. This is a standard step when you empty the Diaper Genie.
Why is my Diaper Genie not twisting the bag?
The “twist” is created by the clamping and feeding mechanism. If it’s not twisting, the film is likely snagged, the refill is incorrectly seated, or the clamp path is obstructed. Ensure the refill is pressed down firmly in the base and that you pulled the initial “little extra film” as directed.
How long should a Diaper Genie last?
With proper maintenance, monthly cleaning, filter replacement, and avoiding overstuffing, the mechanical parts can last for years. The plastic housing can become brittle over time, especially if cleaned with harsh chemicals. Many units see reliable service for the duration of a single child’s diapering years.
The Bottom Line
Fixing a Diaper Genie is less about repair and more about resetting its simple mechanics. Treat the carbon filter as a quarterly chore. Wipe the internal tracks monthly with alcohol. Never force a mechanism. Follow the refill instructions to the letter, especially the “pull extra film” step. When you understand how a Diaper Genie works, the fixes become obvious. If the plastic shell itself is broken, your time is better spent on a new pail than a fight with glue and warranty forms.
