
How to Clean Diaper Pail & The Crucial Specs Owners Overlook
This post contains affiliate links. As an Amazon Associate, we learn from qualifying purchases
To clean a diaper pail, you need to match your method to the pail’s material. For steel pails like the Ubbi, wipe with a dry cloth only, liquid causes rust. For plastic models like the Momcozy DP01 or Diaper Genie, use a damp cloth with mild detergent. Deep cleaning plastic pails involves disassembly, a 75% alcohol wipe for disinfection, and addressing odors with diluted white vinegar. Never immerse electronic units like the Munchkin UV pail in water.
That material distinction is the whole game. Get it wrong, and you trade a dirty pail for a broken one. A steel body rusts at the seams. An unknown disinfectant eats through plastic. A USB-powered UV unit shorts out.
What follows is the breakdown by material, the model-specific steps pulled from the official manuals most owners never read, and the three maintenance habits that actually stop the smell from coming back.
Key Takeaways
- Steel pails (Ubbi) are maintenance-free by design. Their manual explicitly warns against liquid cleaners; a damp cloth left wet will cause rust within weeks around thin edges.
- Plastic pails require disassembly for a true deep clean. The Momcozy DP01 needs its handle screws removed and its internal rotating observation ball taken out to reach all surfaces.
- Odor treatment has a hierarchy. Ventilation comes first, then a wipe with diluted white vinegar or a baking soda solution for plastic surfaces. Strong chemical cleaners corrode the plastic and make smells worse long-term.
- Replace consumable parts on schedule. The Diaper Genie Complete‘s carbon filter loses effectiveness after three months, a dated reminder on your phone beats guessing.
- Electronic pails have hard limits. The Munchkin UV Diaper Pail is not waterproof. Unplug it before wiping the exterior, and never touch the UV light with a wet object.
The Universal Clean-Out (For Any Pail)
Start here, no matter what brand you own. This is the weekly reset that prevents a major deep clean from ever being necessary.
Empty the pail completely. Tie off the full bag and take it outside immediately. This isn’t just about tidiness. Leaving a full bag inside for even an hour lets odor molecules settle into the plastic or steel, creating a base note that every new diaper amplifies.
Wipe the interior with a dry microfiber cloth to catch loose debris. For plastic pails, you can now use a cloth dampened with water and a drop of mild dish soap. Wring the cloth until it’s barely damp. The goal is to lift residue, not to soak the material.
For steel pails, the Ubbi manual is absolute: “The Ubbi diaper pail is maintenance free. Wipe clean with a dry cloth. Do not use liquid cleaners or spray detergents. If a damp cloth is used, let dry completely.” Liquid pools at the seams and under the paint, and rust follows.
After wiping, prop the lid open and let the interior air dry fully before putting in a new bag. Moisture is the enemy twice over, it promotes rust on steel and mildew smells in plastic. A small fan pointed at the open pail for twenty minutes works better than an hour of still air.
This routine, done every bag change, addresses 80 percent of odor issues. The remaining 20 percent comes from missed spots that require a model-specific tear-down.
Why Your Pail’s Material Dictates Everything
You wouldn’t clean a cast iron skillet like a non-stick pan. The same logic applies to diaper pails. The manufacturer’s cleaning instructions are a direct reflection of the material’s limits.
Steel pails, like the Ubbi, are coated. The paint or powder coating is a barrier, not a seal. At thin edges, where the lid meets the body, around the bag holder clip, the coating can be microscopically thin. Introducing liquid, especially a spray cleaner, lets water seep underneath. Once it’s there, it can’t evaporate. The steel oxidizes, and you’ll see brown rust spots within a few weeks. The fix isn’t cleaning; it’s sanding and repainting. The manual’s “dry cloth only” rule is a rust-prevention warning, not a suggestion.
Plastic pails are porous. Polymers used in the Momcozy DP01 or Diaper Genie Complete absorb odor compounds over time. A surface wipe doesn’t reach them. That’s why the Momcozy manual calls for disassembly and a baking soda or vinegar solution, these mild acids and bases can neutralize odor molecules trapped in the microscopic pores. However, harsh chemicals like bleach or ammonia-based cleaners can actually open these pores further or degrade the plastic, shortening the pail’s life.
Electronic units have failure points. The Munchkin UV Diaper Pail uses a USB-C port and internal UV-C LEDs. Water ingress here doesn’t just cause a smell; it fries the circuit board and voids the one-year warranty. Their manual specifies an unplugged, dry-cloth wipe only.
Model-Specific Deep Clean Steps
This is where you pull the manual. Generic advice fails because one pail’s deep clean is another pail’s death sentence. The table below maps the critical differences.
| Pail Model | Deep Clean Frequency | Key Step (From Manual) | Do NOT Do This |
|---|---|---|---|
| Momcozy DP01 | Every 4-6 weeks | Remove handle screws & rotating observation ball. | Use disinfectants with unknown ingredients. |
| Ubbi Steel Pail | As needed (rarely) | Dry cloth only. If damp cloth used, dry thoroughly. | Use liquid cleaners or spray detergents. |
| Diaper Genie Complete | Monthly | Clean surfaces; replace carbon filter every 3 months. | Immerse the main body or head in water. |
| Munchkin UV Pail | Weekly exterior wipe | Unplug unit. Wipe exterior with dry cloth. | Immerse in water or touch UV light when wet. |
For the Momcozy Triple-Seal Diaper Pail (DP01)
The Momcozy has more moving parts than most, which means more places for gunk to hide. The official deep clean is thorough.
- Disassemble the handle. Open the screw hole plugs on both sides of the handle. Use a cross-head screwdriver to remove the screws, then lift the handle away.
- Remove the rotating observation ball. This internal part inside the pail top twists out. This is the main odor channel, clean it separately.
- Wash all parts. Use a soft sponge with mild detergent and lukewarm water. Rinse thoroughly.
- Disinfect (optional). The manual states: “For disinfection, gently wipe the product with 75% alcohol.” Do not use other disinfectants unless you are certain they are plastic-safe.
- Address odors. If a smell persists on the plastic, wipe inner surfaces with diluted white vinegar or a baking soda paste. Rinse and air dry completely.
- Air dry. Let every component dry in a cool, ventilated place before reassembly. Forcing wet parts together traps moisture.
Where this goes sideways: Skipping the disassembly. Wiping around the fixed handle and ball leaves a biofilm of residue in the channels. The smell returns in three days, and you’ll think the pail is defective.
For the Ubbi Steel Diaper Pail
The process is simple because the design is simple. Simplicity is its strength.
- Empty and remove the bag. Ensure the pail is bare.
- Dry wipe. Use a dry microfiber cloth to wipe the entire interior, focusing on the bag holder rim and the inside of the sliding door.
- If necessary, use a damp cloth. If you encounter sticky residue, dampen a corner of the cloth with water. Wipe the spot, then immediately dry the area with the dry part of the cloth.
- Air out. Leave the lid open for an hour to ensure all interior moisture evaporates.
The Ubbi’s compatibility with any standard tall kitchen bag is a major advantage for maintenance. You aren’t locked into proprietary liners that can tear and leak.
For the Diaper Genie Complete
This system relies on a film bag and a carbon filter. Cleaning focuses on the mechanical parts and filter discipline.
- Empty the canister. Follow the normal emptying procedure to remove the full bag.
- Wipe down. Use a damp cloth with mild soap to wipe the interior of the canister, the cutter mechanism (part E in the manual), and the exterior.
- Check the carbon filter. This is the step everyone misses. The manual mandates: “Replace carbon filter, every 3 months or when they lose effectiveness.” Mark your calendar. A spent filter does nothing.
- Dry thoroughly. Ensure no water drips into the foot pedal mechanism or the head unit.
A functioning carbon filter is the difference between a faint smell and an overwhelming one. Treat it as a consumable, like a water filter.
The Odor Hierarchy: Treating the Smell, Not Just the Dirt
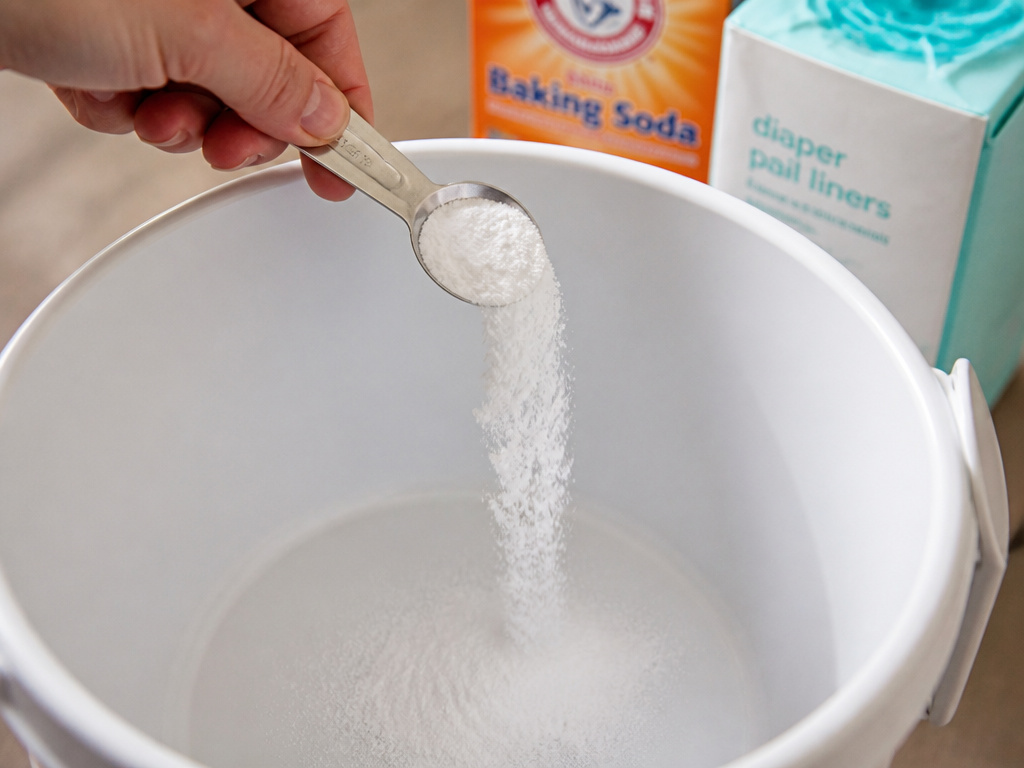
Cleaning removes the source. Deodorizing addresses the memory. If your pail still smells after a proper clean, you need to move up this ladder.
First: Ventilation. After cleaning, place the pail in a sunny, breezy spot outdoors for an afternoon. UV light and fresh air neutralize a remarkable amount of odor. This is free and often sufficient.
Second: Baking Soda. For plastic pails, sprinkle a thin layer of baking soda in the dry, empty bottom before inserting a new bag. It’s a mild base that absorbs acidic odor compounds. For a targeted treatment, make a paste with water, smear it on interior surfaces, let it sit for an hour, then rinse and dry.
Third: Diluted White Vinegar. The Momcozy manual specifically recommends this for lingering odors on plastic. Mix one part white vinegar with four parts water. Dampen a cloth, wring it out well, and wipe all interior surfaces. The acetic acid neutralizes alkaline odor molecules. Rinse with a water-dampened cloth afterward and dry completely.
Fourth: Commercial Deodorizers. Only after the above steps should you consider a dedicated diaper pail deodorizer. Look for neutralizers designed for nursery use. Avoid heavily perfumed products that just mask the smell with a stronger scent.
Common mistake: Reaching for bleach or ammonia first. These can react with urea in diaper residue, creating worse-smelling chloramine gases. They also degrade plastic, creating microscopic pits that trap future odors.
Maintenance Habits That Actually Work
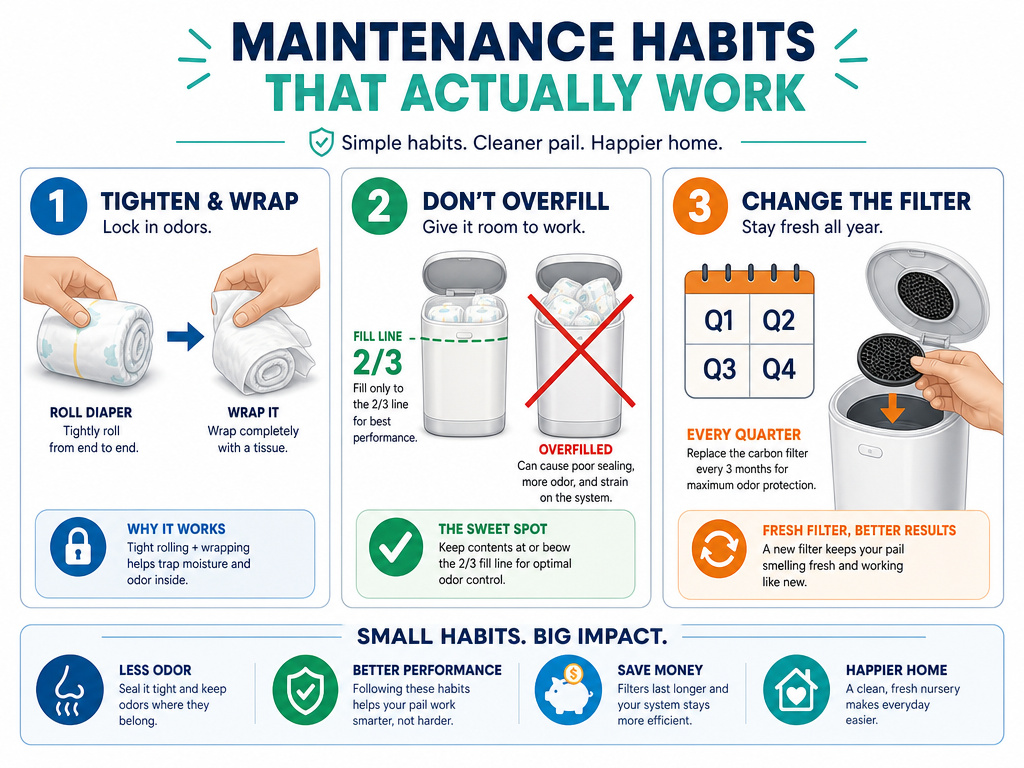
Cleaning is reactive. Good habits are proactive. These three routines prevent the need for heroic deep cleans.
- Roll and Wrap. Always roll a dirty diaper tightly before dropping it in. For diapers with solid waste, the Momcozy manual advises wrapping them in a tissue or paper bag first. This minimizes surface area and contains the primary odor source instantly.
- Don’t Overfill. This strains the bag, the pail’s mechanism, and your nose. Most pails are designed to be emptied when the bag is 2/3 full. An overstuffed bag can’t seal properly, letting odors leak back into the room and residue smear on the pail’s interior.
- Schedule Filter Replacements. If your pail uses a carbon filter (like the Diaper Genie), set a quarterly reminder on your phone. A filter works until it’s saturated; after that, it’s a decorative piece.
Understanding what a diaper pail is designed to do helps you work with it. Its job is containment, not magic. Your job is timely emptying and correct cleaning.
Frequently Asked Questions
Can you use Clorox wipes on a diaper pail?
Maybe, but it’s risky. Check your manual first. The Ubbi manual bans liquid cleaners outright. For plastic pails, the concern is the unknown “other ingredients” in many wipes, which the Momcozy manual warns can corrode plastic. If you use them, ensure the active ingredient is clearly stated (like 75% alcohol) and always follow with a rinse wipe and thorough drying.
How do you get the rotten milk smell out of a diaper pail?
That sour smell is often bacterial. After a standard clean, use the vinegar wipe method outlined above. For persistent cases, after the vinegar wipe and dry, place an open box of baking soda inside the empty, closed pail for 24 hours before using it again. The combination of acid neutralization and absorption usually breaks the cycle.
Why does my Ubbi pail smell even when empty?
The smell is likely in the bag holder mechanism or under the rim of the sliding door, places a quick wipe misses. Follow the step-by-step Ubbi diaper pail cleaning guide for a focused dry-cleaning of those areas. Also, ensure you are installing the Ubbi liner correctly so the bag’s edges are fully tucked in, creating a proper seal that prevents odors from escaping into the pail body itself.
Is it necessary to clean a diaper pail?
Yes, for hygiene and longevity. While a diaper pail’s primary purpose is odor control, residue buildup can jam mechanisms (like the Momcozy’s rotating ball) and create a breeding ground for mold and bacteria. Regular cleaning maintains function and a healthier nursery environment.
How often should you replace a diaper pail?
When it breaks or can no longer be deodorized. A well-maintained steel pail like the Ubbi can last for years. Plastic pails may become permanently stained or odor-ridden after 2-3 years of heavy use. If you’re frequently battling odors, it may be time to research diaper pails for odor control designed with better sealing technology.
Before You Go
Cleaning a diaper pail isn’t about finding the strongest chemical. It’s about precision. Match the method to the material: dry for steel, disassembly and gentle agents for plastic, and absolute dryness for electronics. The manufacturer’s manual isn’t a suggestion, it’s a map of the material’s failure points. Anchor your routine in the three habits: roll tight, don’t overfill, and replace filters on schedule. That combination keeps the nursery fresh and the pail functioning long after the diapering years are done.
