
How to Change a Diaper Genie Bag: Simple Steps for No Mess
This post contains affiliate links. As an Amazon Associate, we learn from qualifying purchases
To change a Diaper Genie bag, open the main body, pull the full bag up, cut it using the built-in cutter, tie it off, and then pull fresh film to knot a new bottom. The Diaper Genie Complete holds up to 270 newborn-sized diapers per refill, and its carbon filter needs replacement every three months for optimal odor control.
The 270-diaper number is a manufacturer spec, not a guess. It’s the ceiling before the internal clamp mechanism starts to strain and the bag risks a tear at the seams. Overfilling is the single most common reason a change turns messy.
What follows: the five physical steps that work for the Diaper Genie Complete and II models, the one tool you actually need, what to do when the film rips, and the maintenance schedule that stops odors before they start.
Key Takeaways
- Use the built-in cutter on the inner rim — not scissors — to cleanly separate the full bag from the refill cartridge.
- Pull a little extra film after knotting the new bag’s bottom to prevent stress on the internal clamp, a step the manual explicitly calls out.
- Replace the carbon filter every three months, per the OEM manual, or odors will seep back into the nursery even with a fresh bag.
- Empty the pail at about three-quarters full to avoid an overstuffed, heavy bag that’s likely to rip during removal.
- If the bag rips, contain the mess immediately by placing the entire bag inside a heavy-duty trash bag before moving it.
The Tools & Parts You’re Actually Using
You need one tool: your hands. The Diaper Genie’s design assumes you have nothing else, which is why the cutter is built in. Knowing the names of the parts you’re touching removes the guesswork.
The canister is the inner bucket that holds the bag. You open it by pressing the canister button, usually located midway up the pail’s body. The cutter is a small, child-safe blade mechanism on the inside rim of this opened canister. The refill cartridge is the plastic cylinder that holds the continuous 7-layer film. The carbon filter slides into a holder in the head of the unit; it’s a flat, charcoal-filled pad, not part of the bag system.
The Diaper Genie Complete system uses a continuous 7-layer film refill cartridge. A built-in cutter on the inner rim of the canister severs the full bag from the remaining film. The internal clamp mechanism twists and seals each diaper individually after the lid is closed, and a replaceable carbon filter in the head adsorbs residual gases.
Confusing the canister release button with the foot pedal is the first stumble. The foot pedal opens the daily-use lid. The button opens the main body for bag changes. Press the button, and the top tilts open on a hinge, giving you full access.
The 5-Step Bump-Feed Replacement (and the One Step Nobody Skips)
This sequence works for the common “bump-feed” or “signature” models like the Diaper Genie Complete. The steps are linear, but rushing the middle one is how diapers end up on the floor.
Step 1: Open the Main Body
Locate and press the canister button. The top portion of the pail will unlatch and tilt back. This exposes the chain of wrapped diapers and the top of the bag. You are now looking at the cutter, a small plastic slot with a blade on the inner rim.
Step 2: Pull, Cut, and Remove the Full Bag
Reach in and gather the film above the diapers. Pull up enough slack so you can easily guide the film into the cutter slot. Slide the film firmly into the cutter and push up; the blade will cleanly slice through it. * If you skip the cutter: Using scissors risks pulling the bag and spilling contents. The cutter is anchored, so the bag stays put. Tie the cut end of the film into a double knot. Lift the now-separate bag out of the pail and dispose of it outside immediately.
Step 3: Knot a New Bottom from the Fresh Film
Pull down on the fresh film still attached to the refill cartridge inside the pail. You need about a foot of material hanging free. Tie a tight double knot at the very bottom of this length. This knot forms the sealed bottom of your new bag. * If the knot is loose: The first diaper you push through the clamp can slip past, falling into the void below and defeating the seal.
Step 4: Seat the Film and Close Up
This is the step every quick guide glosses over. After knotting, you must pull the knotted film down to the bottom of the empty pail. The OEM manual adds a critical line: “Pull a little extra film to prevent stress on the clamp for optimal functionality.” Grab the knot and pull it firmly down until it rests at the bottom. Then pull an extra two inches of film through the clamp. This slack prevents the clamp from straining against a taut bag, which can cause feeding issues later. Close the canister until it clicks.
Step 5: Reset and Resume
Press the foot pedal to ensure the lid opens and closes smoothly. You’re ready to go. The Diaper Genie refill process is now complete.
Diaper Genie Complete vs. II: Does the Model Change the Steps?
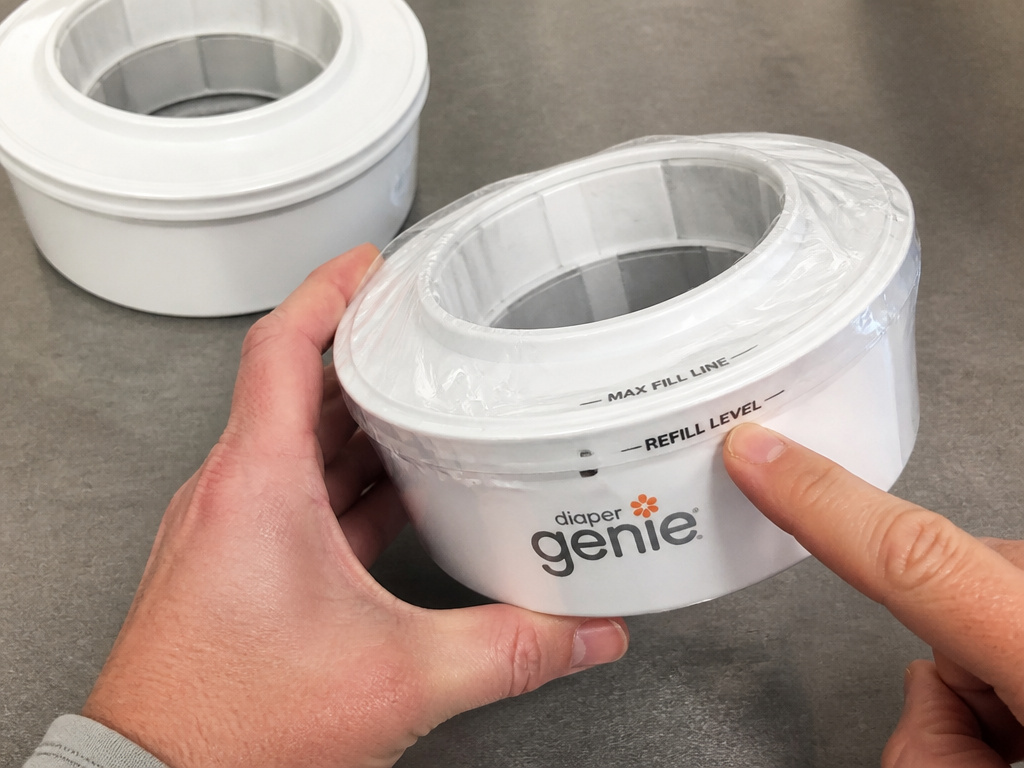 The core steps are identical, but two details shift. The Diaper Genie II manual specifies pulling out about 18 inches of film to tie the initial knot when setting up a brand-new refill. The Complete manual doesn’t give a measurement, relying on the “foot of material” visual.
The second difference is the refill indicator. Some Diaper Genie II refills have a printed line or message on the film that appears when you’re nearing the end of the cartridge. The Complete system lacks this; you’ll know the refill is empty when you can’t pull enough film to tie a new knot.
For both, the proper Diaper Genie bag installation starts with ensuring the refill cartridge is seated right-side up in the head. An upside-down cartridge won’t feed correctly.
| Model | Initial Film Length | Refill Indicator | Bag Capacity (Newborn) |
|---|---|---|---|
| Diaper Genie Complete | ~12 inches (visual) | No | Up to 270 diapers |
| Diaper Genie II | 18 inches (manual spec) | Yes, on some refills | Varies by refill size |
What to Do When the Bag Rips
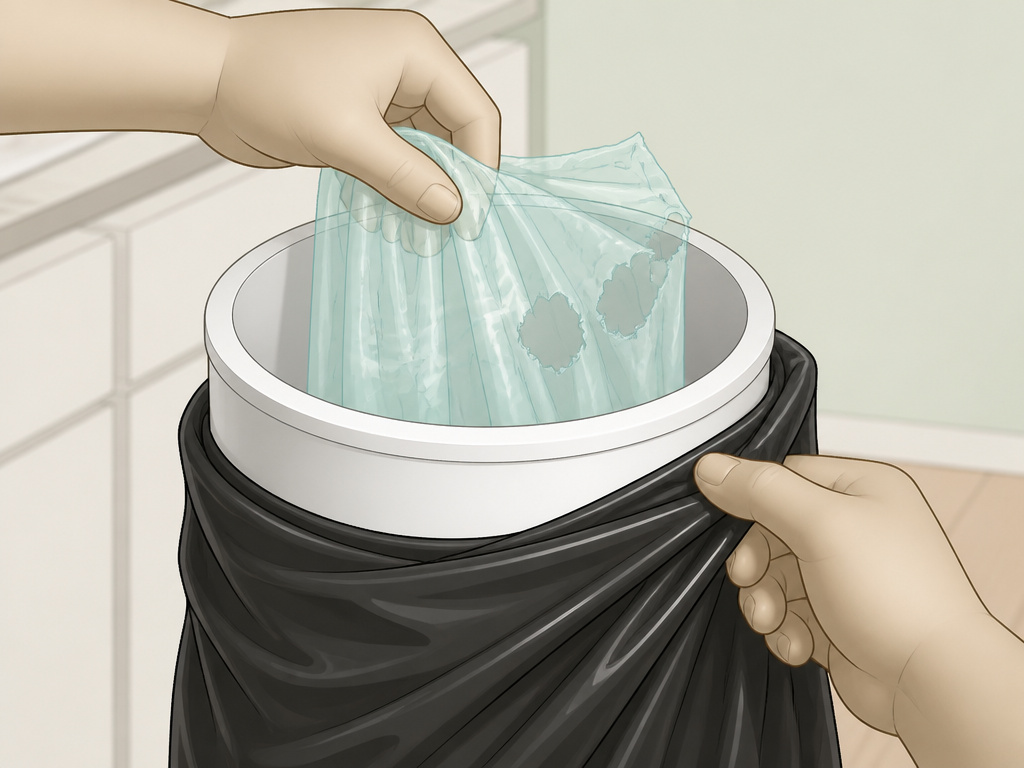 It happens. The bag gets overstuffed, the film snags, or the seam gives way. The priority is containment.
Where this goes sideways: Trying to lift a ripped bag by its film. The weight of the diapers will tear the hole wider, and the contents will spill into the bottom of the pail.
If the bag rips during removal, do not panic. Lower it gently back into the pail. Your goal is to get the entire compromised bag inside a secondary container without touching the diapers. Slide a heavy-duty kitchen trash bag around the outside of the pail, then carefully upend the pail so the ripped Diaper Genie bag falls into the new bag. Tie the trash bag closed immediately.
Then, clean the empty pail with disinfectant wipes or a vinegar solution. Let it dry before inserting a new refill. This is also the moment to check if you need to fix Diaper Genie mechanisms, like a stuck clamp or a dull cutter blade.
The “Why” Behind the Maintenance Schedule
Changing the bag isn’t the only maintenance. Odor control has two layers: the sealed film and the carbon filter. The filter is a consumable part.
The OEM manual for the Diaper Genie Complete states: “For optimal performance, replace carbon filter, every 3 months.” This isn’t a suggestion. After three months of adsorbing ammonia and organic gases, the activated charcoal saturates. Once saturated, odors pass straight through and linger in the room.
The filter is a flat, rectangular pad. To replace it, open the head of the unit (often by twisting or lifting a cover) and slide the old filter out of its holder. Insert a new one. It takes 20 seconds. Using genuine Diaper Genie filters ensures fit and rated absorption capacity.
How often you empty the bag dictates filter strain. A bag changed weekly keeps a lighter load on the seals and the filter. Letting it hit the 270-diaper max weekly means constant high odor volume. For a newborn, emptying a full pail every 2-3 days is realistic.
Frequently Asked Questions
How do I know when the Diaper Genie bag is full?
You’ll feel resistance when pushing a new diaper through the clamp. The manual says this clearly: “If you feel resistance… It is time to empty the pail.” Visually, the bag will be round and firm, with no slack at the top. Don’t wait for the lid to refuse to open.
Can I use regular trash bags in my Diaper Genie?
No. The internal clamping and cutting mechanism is designed for the specific thickness and width of the continuous 7-layer Diaper Genie film. Regular bags won’t seal correctly, will likely jam the cutter, and will fail to contain odors. Always use compatible refills.
Why won’t my Diaper Genie lid open?
If the foot pedal feels stuck, the bag is almost certainly overfull, pressing against the internal clamp. You’ll need to manually open the main body using the canister button to cut and remove the bag. After emptying, the lid should function normally. If not, there may be a mechanical fault.
How do I clean my Diaper Genie pail?
Clean it when empty, about once a month. Wipe the interior canister and the head assembly with a disinfectant wipe or a mild soap solution. Avoid harsh chemicals that could damage plastic or leave strong fumes. Ensure all parts are completely dry before reloading a refill to prevent mildew.
What’s the difference between changing the bag and refilling it?
Changing the bag refers to removing the full, sealed sack of diapers. Refilling means replacing the entire spent film cartridge with a new one. You’ll do dozens of bag changes for every one refill. The Diaper Genie refill process involves installing a whole new cartridge.
Before You Go
Change the bag at the first sign of resistance, not the last. Use the built-in cutter every single time—it’s there for a reason. Mark your calendar for the three-month carbon filter swap; it’s the difference between a sealed system and a slow odor leak.
Keep a box of heavy-duty trash bags under the changing table. If the film rips, that’s your containment kit. The process is simple once you move step-by-step: open, cut, tie, pull, knot, close. Now you know what each part does and why the order matters.
