
The Best Way to Secure Your Changing Pad to a Dresser Safely
This post contains affiliate links. As an Amazon Associate, we learn from qualifying purchases
To secure a changing pad to a dresser, you must complete two separate safety actions: attach the pad’s safety straps to the furniture and install the dresser’s anti-tip strap to the wall. The pad straps prevent the baby from rolling off; the anti-tip strap prevents the entire unit from tipping over if a drawer is opened or a child climbs it.
This distinction is where most installation guides fail. They treat “secure the pad” as one job, but it’s actually two independent mechanical systems with different failure points. The pad straps rely on screws biting into solid wood. The anti-tip strap requires finding a wall stud. Skip either one, and you’ve built a hazard that looks safe.
What follows: the specific hardware you need from the manual, the exact measurements for your pad, the drill-bit size for the pilot hole that prevents wood splitting, and the one weight limit that applies to the pad, not the dresser.
Key Takeaways
- You must use both the pad’s safety straps and the dresser’s anti-tip strap. One prevents baby falls; the other prevents tip-overs.
- The pad must fit within the dresser’s changing area and be no thicker than the manual specifies—often 2 inches for flat pads or 40 mm for contoured ones.
- Always drive strap screws into the wood framing of the dresser, not into particleboard or drawer glides. A 1/8-inch (3 mm) pilot hole prevents the wood from splitting.
- The 30 lb (13.6 kg) weight limit applies to the changing pad surface. Stop using it when your child can sit up or roll over, which usually happens long before they hit that weight.
- Safety is not a one-time setup. Check strap and screw tightness every two to three weeks as the furniture settles and is used.
The Two-Part Safety System: Pad Straps & Anti-Tip
Every manufacturer’s manual contains instructions for two restraint systems. Confusing them is the most common setup mistake.
The pad’s integrated safety straps and buckle are a personal restraint system. Their job is to keep the baby from rolling off the pad during a diaper change. These straps typically have textile ends that you screw directly into the back or sides of the dresser’s solid wood frame.
Where this goes sideways: Assuming the pad is secure because it’s heavy or contoured. A determined wiggle can shift a pad, and a rolling baby can go over the side in half a second. The straps are non-negotiable.
The anti-tip strap is a furniture restraint system. It is a separate metal or fabric strap that connects the top rear of the dresser to a stud in the wall. Its job is to prevent the entire dresser from tipping forward if weight is applied to an open drawer or if a child tries to climb it. This strap has nothing to do with the pad’s security but everything to do with the stability of the entire unit.
| System | What It Secures | Prevents | Hardware |
|---|---|---|---|
| Pad Safety Straps | The baby to the pad, and the pad to the dresser. | Baby falling from the changing surface. | Screws with washers driven into dresser wood frame. |
| Anti-Tip Strap | The entire dresser to the wall. | Dresser tip-over accident. | Long screw, washer, and wall anchor (for stud). |
What You’ll Need: Hardware and Tools
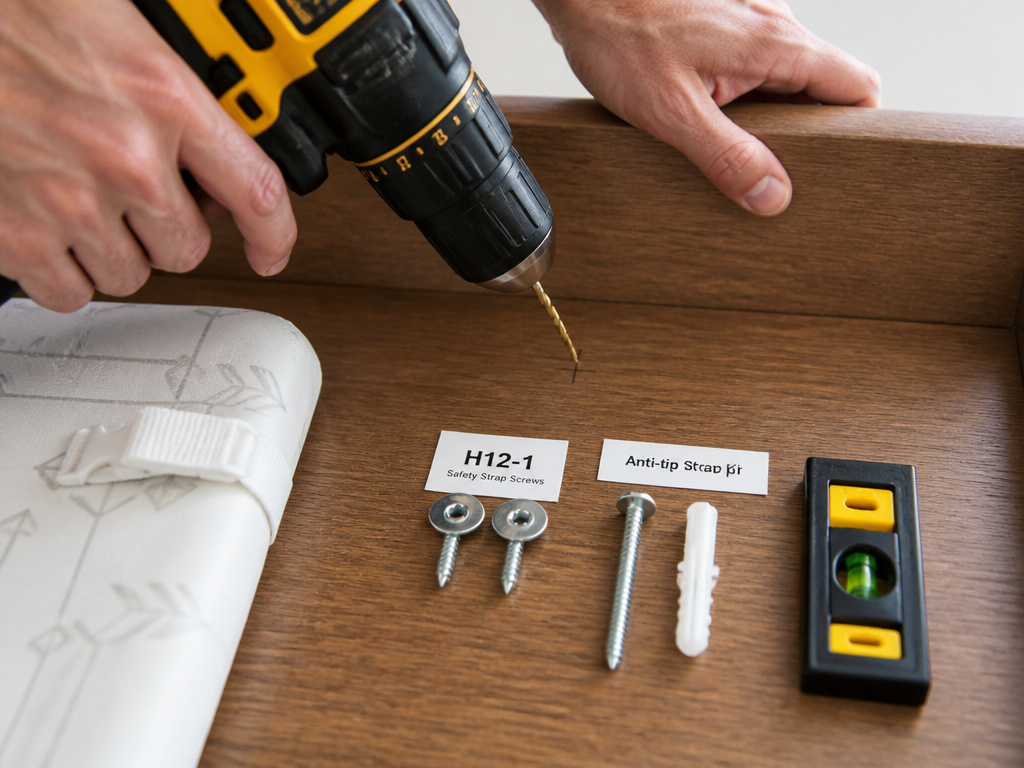 You can’t substitute hardware here. The screws provided are the correct length to grip the wood frame without poking through the other side. Using a random screw from your toolbox is a gamble.
Gather these items from the product manual’s packaging: * H12-1 Safety Strap Screws with washers (x2): These are for the pad’s textile straps. The washers distribute pressure so the strap doesn’t tear under load. * Anti-tip strap kit: This includes a long screw, a washer, and often a wall anchor. The Babyletto manual specifies marking a point 1” to 2” (25-50 mm) below the top of the dresser for this screw. * A drill with a 1/8-inch (3 mm) drill bit: This is for the pilot hole. It is not optional. * A stud finder: For the anti-tip strap. You must hit the solid wood framing inside the wall. * A level: Ensure your dresser is on a flat, stable surface before you start. An uneven dresser stresses the strap attachments.
If any parts are missing, contact the manufacturer immediately. Do not assemble the changing station without them.
Step-by-Step: Securing the Pad with Safety Straps
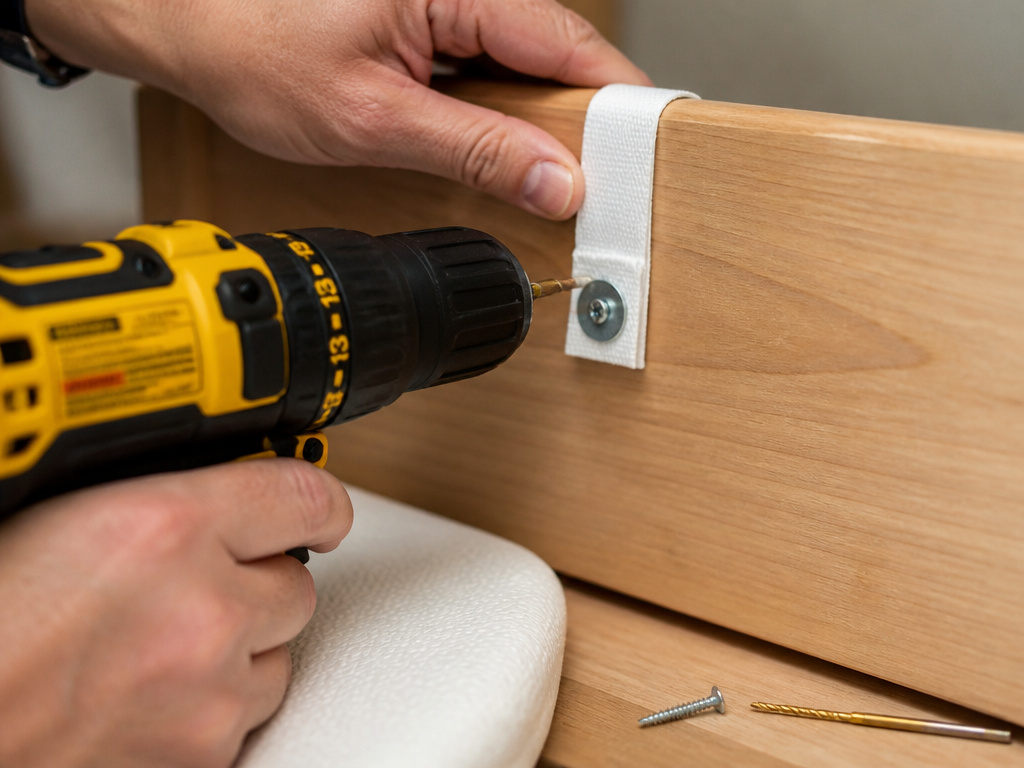 This process assumes you have a standard contoured or flat changing pad with integrated textile straps, like those used with a Babyletto Hudson or a 3-Drawer Changer (5925).
Step 1: Confirm Pad Dimensions and Placement
First, verify the pad fits your specific dresser model. A too-large pad overhangs, creating a tipping hazard. A too-thick pad raises the baby’s center of gravity.
- For the 3-Drawer Changer (5925): The surface must be at least 34” by 17”. The pad must sit completely within this boundary.
- For the Linea by Leander Changing Unit: The pad must not be thicker than 40 mm (about 1.6 inches).
- For the Babyletto Gelato: The recommended Babyletto M5319BL pad measures 31” x 16” x 4”.
Place the pad on the dresser. It should lay flat without rocking. The strap anchors should be accessible at the back or sides.
Step 2: Attach the Strap Ends to the Dresser
Locate the solid wood frame at the back of the dresser—this is typically the vertical panel the drawers slide into. Do not attach straps to the thinner backing board or into a drawer glide.
- Position one textile strap end against the frame. You want the screw to go into the center of the wooden rail.
- Using your 1/8-inch (3 mm) drill bit, drill a pilot hole straight into the wood. This prevents the wood from splitting when you drive the screw, which would drastically reduce its holding power.
- Align the screw through the washer and the strap’s grommet. Drive it firmly into the pilot hole until the washer is snug against the strap. Do not overtighten, as this can strip the threads in the soft pine or composite wood.
- Repeat for the second strap.
Tug firmly on the straps. They should not move or pull away from the wood. This is how you’ll secure your baby for every change.
Step-by-Step: Installing the Anti-Tip Strap
This step anchors the furniture itself. It is critical for all dressers, especially taller, narrower dresser changing tables.
Before you start: This requires two people. One must hold the dresser perfectly upright and flush against the wall while the other marks and drills. A dresser that’s even slightly tilted will bind drawers and put constant strain on the strap.
Step 1: Position the Dresser
Move the dresser to its permanent location against the wall. Use your level to ensure it’s not leaning forward or sideways. The back should be flush against the wall. Engage any drawer locks.
Step 2: Mark and Drill the Pilot Hole
The manual is precise about location. For the Babyletto Gelato, mark a point on the wall 1” to 2” (25-50 mm) below the top of the dresser.
- Use a stud finder to locate the vertical wood framing (stud) behind the wall at this height. Mark the center of the stud.
- This mark is where you will drill. Confirm the spot is over the stud, not just drywall.
- Drill your 1/8-inch (3 mm) pilot hole straight into the wall at the mark. You should feel firm resistance as you hit the stud.
Step 3: Attach the Strap
Connect one end of the anti-tip strap to the dresser using the provided hardware—usually inside the top rear corner. Then, align the other end with the pilot hole in the wall.
Drive the long screw with its washer through the strap’s bracket and into the wall. It should bite deeply into the stud. Tighten until the strap is taut, but don’t pull the dresser out of level.
Give the dresser a firm, careful pull forward from the top. It should not move away from the wall. If it does, the screw may not be in the stud. Re-check and re-drill.
Critical Specs and Weight Limits You Must Observe
The numbers in the manual are tested limits, not suggestions. Ignoring them voids any warranty and introduces predictable risk.
The maximum weight for a child on a changing pad is 30 lbs (13.6 kg), as stated in multiple manuals. The Leander unit has a lower limit of 12 kg (26 lbs). These limits are for the changing surface, not the dresser’s drawers.
This weight limit is almost irrelevant as a time-based guide. The real cutoff is developmental: stop using the changing station when your baby can sit up or roll over unassisted. This typically happens between 4 and 7 months, long before they weigh 30 lbs. At that point, changing on a secure, low-to-the-ground mat is safer.
Furthermore, a pad thicker than specified (like a 4-inch pad on a unit rated for 2 inches) raises the baby higher, increasing the fall distance and the leverage against the safety straps. Always match the spec.
The One Maintenance Task Nobody Does (But Should)
Hardware loosens. Wood contracts and expands with humidity. The constant tugging on straps during changes works screws loose over time.
Common mistake: Assuming a tight screw stays tight. The Leander manual explicitly states: “Remember to fasten all screws after 2-3 weeks of use.”
Set a reminder on your phone for two weeks after installation. Go back and check the tightness of: 1. The two safety strap screws. 2. The anti-tip strap screw in the wall. 3. The anti-tip strap connection to the dresser. 4. All cam locks and bolts in the dresser frame.
Tighten any that have shifted. Make this a bi-monthly habit, just like testing smoke alarms. It takes two minutes and is the final layer of a secure setup.
Frequently Asked Questions
Can I use any changing pad on my dresser?
No. You must use a pad that matches your dresser’s specified dimensions and thickness. A pad that is too large can overhang and tip, and one that is too thick can exceed the safety strap’s effective range and raise the fall height. Always check the manual; for example, the Babyletto Gelato is designed for the specific Babyletto M5319BL contour pad.
What if my dresser doesn’t have an anti-tip strap?
All dressers sold as dresser changing tables or “changer dressers” in the US after 2009 should include an anti-tip strap due to ASTM safety standards. If yours is missing, contact the manufacturer immediately for the correct replacement kit. Do not use a generic hardware store strap unless it is certified for furniture anti-tip use and matches the required load rating.
Is it safe to change a baby on a dresser without straps?
No. Never. Even if you “always keep one hand on the baby,” a slip, a sneeze, or a moment of distraction is all it takes. The straps are a mandatory backup to your attention. The manuals are unambiguous: failure to use them “can result in death or serious injury.”
How do I know if I drilled into a stud?
When drilling the pilot hole for the anti-tip strap, you will feel steady resistance and see actual wood shavings—not just drywall dust—come out of the hole. Using a stud finder is the best way to locate the stud first. If your screw spins freely and won’t tighten, you’re in drywall and must try again.
Can I move the dresser after installing the anti-tip strap?
Yes, but you must completely remove the screw from the wall, move the dresser, and re-install the strap into a new stud in the new location. Simply leaving the strap attached and pulling the dresser away from the wall will damage the wall and render the strap ineffective.
Before You Go
Securing a changing pad isn’t about following steps. It’s about understanding two separate physical systems that guard against two different accidents. The straps on the pad stop a rolling baby from hitting the floor. The strap on the wall stops a top-heavy dresser from falling on a climbing toddler. Get both right.
The takeaway is mechanical: screws need wood, straps need tension, and every connection needs a periodic check. Start with the right pad for your dresser changing table, use the provided screws with a pilot hole, anchor into a stud, and mark your calendar for a hardware check in two weeks. Then you can focus on the baby, not the furniture.
